
Correct use of DJ EQ skills can take your DJ Mixing to a much higher level. Too much bass or clipping can distort the music coming out of the speakers.
You need to manage all the three types of frequencies to ensure a melodious mixing magic.
Once you know and practice the various ins and outs of the EQ system, you will be easily able to pull the crowds to your style of DJ.
Let us learn about the key technicalities of DJ EQ and keep a few tips in our mind during live performances.
Moreover, a proper understanding of the EQ system is also going to help you in protecting your equipment from potential damage due to uncontrolled settings or frequencies.
Table of Contents
What is DJ EQ?
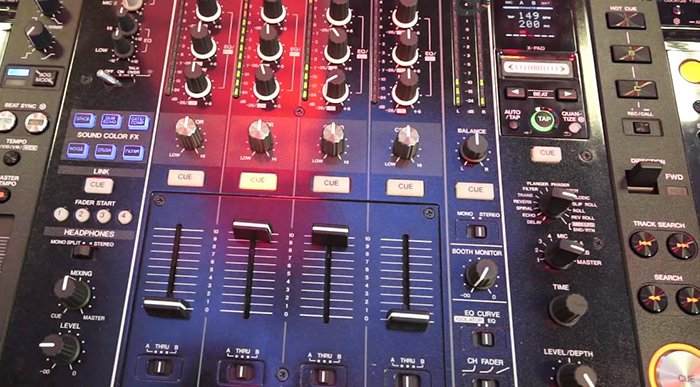
EQ stands for Equaliser, which is usually consisting of 3 bands found on DJ mixers or DJ controllers.
The primary function of EQ is to control the frequencies of low, mid, and high range to create distortion-free and avoiding lopsided music reproduction, e.g., too much bass, or lyrics are not clear, etc.
The EQ knobs on a DJ mixer let you adjust the frequencies in decibels within the full spectrum of any audio. These controls are provided independently for every channel.
EQ can be used to cut the low range frequencies, also known as the bass. It is done primarily during a build-up next to the breakdown, which makes it pronounced.
Another use could be adding a mid-range frequency to the vocal so that they are transparent enough on the filters.
Different types of music genres call for different EQ strategies. There is another potential area of EQ use, and that is a transition time for mixing.
It really makes the shifting appear smooth to the audience. Correct knowledge of EQ can also prevent clipping as well as collision of basslines.
Basic EQ Terms
Anyone who is a beginner may be bogged down by technical jargon. Before going to an advanced level, it is always handy to get yourself acquainted with the basics of any new field.
You know it very well that a little knowledge is a dangerous thing. It is always better to be down to earth. Here are a few critical DJ EQ terms and their simple meanings.
1. Hertz (Hz)
It is measured by counting the number of cycles in a second in an audio sample.
2. Decibels (dB)
It is the basic unit to measure the loudness of an audio sample. If two frequencies of the same type are played together, it increases the decibels, i.e., loudness or volume.
3. Clockwise and Anti-Clockwise
Rotating the EQ level of a frequency in a clockwise direction increases the volume of the frequency, and rotating in the anti-clockwise direction decreases the volume of the frequency.
Clockwise means to turn in the direction of the clock from 0 to 12, and anti-clockwise is the opposite, i.e., 12 to 0.
4. High EQ
It is a high frequency ranging from 5000Hz-20000Hz. It mostly includes instruments like cymbals.
5. Mid EQ
It is a medium frequency ranging from 200Hz-5000Hz. It usually includes vocals and piano, etc.
6. Low EQ
It is the lowest frequency ranging from 20Hz-200Hz. It usually includes bass and drums.
7. Pitch
It increases or decreases as per the audio wave.
8. Sound Wave
It is a vibration understood by our ears at different frequencies.
9. Clipping
Distortion of audio observed on VU meters.
10. Isolator Mode
It is the mode of mixer whereby a specific frequency could be isolated almost 100% by reducing other frequencies to a minimum.
Difference Between Classic EQ and Isolator
Many advanced DJ mixers have two EQ modes. In a classic EQ mode, you can adjust low, mid, and high frequencies by increasing or decreasing them. If you pull all the bands to a minimum position, you will still hear some miffed audio.
Whereas in an isolator, it almost entirely isolates the three types, and you will not hear anything if you reduce all the bands to a minimum.
The isolator cuts almost 100% of the selected frequency from the track. It is an advanced feature, and accidental use of it may lead to an awkward situation.
So, it calls for some practice to find which type of mode is more suitable in EQ of your DJ Audio.
Identifying and Controlling the Clipping
Clipping, also known as red-lining, is prevented by adjusting the EQ levels. These are bright red indicators on VU meters that are best not to be seen often.
These indicators are not to be ignored at any cost. A continued red indication on a VU meter can cause irreversible damage to your speakers, amplifiers or mixers.
The light on the VU meter jumps along with the music and should be restricted to a safe range denoted with a green color.
However, a small red indication of one or two points is not a cause of significant concern, and this is precisely the reason that most DJs ignore this.
But, to be on the safer side, we should try to keep those lights from going into the danger zone of red.
You can do so by decreasing the volume and/or adjusting the EQ levels.
Switching Basslines
When you try to mix two tracks with noticeably different bass levels, it sounds awesome when the EQ adjustments in the bass are not made correctly.
To blend appropriately, you need to match the bass or low frequencies. You may reduce the lows of track two and leave track one as it is.
Another option is to reduce the lows of track 1 to enable track 2 to introduce slowly. After you adjust the EQ, wait for a break and switch the basslines.
The crowd is going to like the smooth transition without noticing a change of bass levels.
This ensures that two basslines of two tracks do not clearly overlap to spoil the mood of the audience.
Removing Vocals
In the isolator mode, the reduction in mid-range frequency can reduce the vocals to a large extent, although not entirely.
It is similar to adjusting the low-frequency basslines explained earlier. This will let you add the vocal of the second track for mixing.
Removing the vocal element works because it is mostly found in the mid-range frequencies.
It is also helpful in a scenario where a DJ accidentally mixes two vocals of two tracks, and a quick visit to the isolator mode and reduction of the mid-frequency of the outgoing track is required.
Vocal over another vocal is a blunder and can be corrected with this method.
Isolating one of the Parts of the Audio to do the Mixing
EQ also helps you in isolating a part of three frequencies fully. If you reduce low and mid frequencies to the minimum and increase the high frequency to the maximum, you will be left only with the high frequency of part of a track.
It means you can easily pull only the percussion part out of a track and mix it with another track.
The isolator mode is particularly helpful here as it is more effective in this type of work when compared to the usual modes of the mixer.
Using EQ Alone for Mixing
Let us understand it this way. Instead of using volume faders to mix one track to the other, you can also use just the EQ in an isolator mode, which will work like volume faders for each of the three frequencies, i.e., low, mid, and high.
It means you could slowly introduce the frequencies of the second track by increasing them and, at the same time, reducing the three independent frequencies of the first track.
You may bring the percussion and cymbal first, then add the vocals, and lastly, the bass. Make sure to reduce all of these three types in the first track by using only the EQ knobs. It is similar to the bass sweep method.
The only difference is that here you are using all the three frequencies to do the mixing magic. In some genres of music, this type of technique is very potent because it gives better control of all the variables in the mixing scenario.
Tips for DJ EQing on a Mixer
Many DJs ignore the EQ controls on a mixer, and many others use it in the wrong way. In one genre, it may be easier to do, but it may be a disaster in the other genre.
If you have the right kind of EQ skills, you can be a capable crowd puller. Here are a few handpicked tips to help you in honing that skill.
1. Why do we use EQ in DJ?
The purpose of using EQ in DJ mixing is to balance frequencies of 2 different audio so that the overall amplitude is not large enough to sound awful.
Effectively, it amounts to counterbalancing. E.g., if I reduce EQ of track one by 30%, I should also increase EQ of track two by 30% to maintain parity. After that, the mixing can be done smoothly.
2. Bassline Swapping
As we already discussed, you can cut the bassline of track one and add track 2 for mixing.
Colliding basslines of two tracks can sound awesome. You can slowly fade out other mid and high frequencies and let the new track take over.
This way, you can keep the flow of mixing and keep the ambiance energetic and crowd enjoying the mixing.
3. Highlighting Mid-EQ of the New Track
Once you introduce the new track, the vocals can outshine the existing track and may make the mixing look unprofessional.
The best control here is to manage the mid-EQ of the new track by increasing it and decreasing the mid-frequency of the older track.
The balanced mixing now will have pronounced vocals of the original track. This works because the vocals are mostly made of mid-range frequencies.
4. Take Special Care with Tracks with Different EQ
The old tracks of, say the 90s, are made with varying frequencies of EQ and are challenging to match with the modern-day music.
You need to understand this difference early on. If you know these things before mixing, you can use the frequencies, which will help the new track to stand out in the final mixing.
5. Practicing Manual Techniques
At a beginner’s level, It is suggested to use the tracks which are close to your heart and are your favorites.
If you understand the music part of those tracks very well, you will not be surprised at the time of mixing. Your manual skills in terms of a sense of music and use of ears are going to help you in the long run.
Your memory and sense of music let you understand what will work and what will not.
6. Use Isolation Mode
We have already discussed how to use this mode to your advantage. The tip here is to use isolation to cut a frequency completely.
Slowly cut all the frequencies of the old track and introduce the frequencies of the new track.
It is an EQ only technique of mixing and generates smooth mixing audio with a potent weapon of isolation mode. The audience is going to love it.
7. What EQ Mixing Cannot Do
Some instruments produce frequencies of harmonic type.
These types of frequencies can not be simply removed with the use of high, mid, and low EQ controls.
You need to understand beforehand which tracks are compatible with harmonies and which are not.
Our advice is to use a software that shows the tracks which are made of compatible frequencies or harmonies. The software is called ‘Mixed in Key’
8. Check Out the Hardware Beforehand
Not all the hardware is the same in terms of their response to EQ controls. Some headphones or speakers may sound awful with a change in EQ controls.
Before the performance, it is better to check the hardware by testing the effect of change in the low, mid, and high-frequency knobs.
You will understand how sharp a turn of the knob is required to change the frequency.
9. The Neutral Setting of Track One Helps
If you bring the EQ setting of the older track to a neutral level before adding the new one, it helps in setting correct EQ levels of the original track.
Having a good understanding of EQ techniques for DJ mixing can take it to a refined level. The only thing is to practice as much as possible to keep exploring. And that is the best part of learning.
