Disclosure: This post contains affiliate links, which means we may earn a commission if you purchase through our links at no extra cost to you.
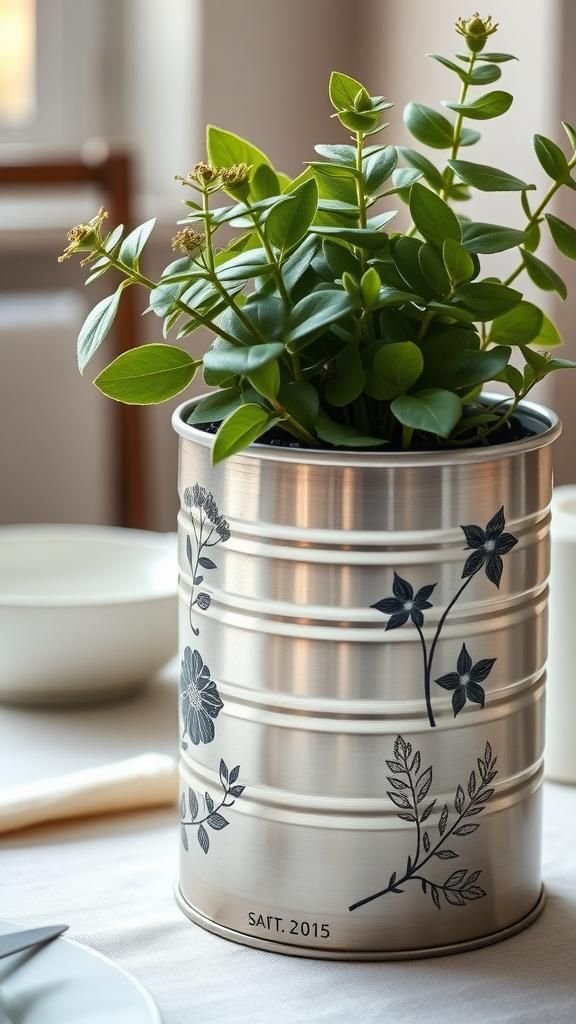
Upcycled tin can planter designs turn pantry castoffs into charm. These upcycled tin can planters, from sleek metallic finishes to cozy fabric sleeves, bring personality to windowsills and patios.
Tin can planter designs keep herbs close, flowers framed, and succulents grounded, all while celebrating recycled can planters and DIY tin can planters with color, texture, and delight.
I fell for upcycled tin can planter designs after a rainy afternoon of reorganizing the recycling bin. A dented soup can, a scrap of twine, and a leftover label sparked a tiny herb garden.
That moment made DIY tin can planters feel personal, playful, and endlessly inventive.
Table of Contents
Chalkboard-Banded Herb Cans With Crisp Lettering

A matte chalkboard band circles each tin, offering a tidy spot for handwritten herb names that change with the seasons. The contrast between soft black and silvery metal creates a timeless bistro mood on a kitchen ledge or café-style cart.
White chalk ink adds a clean graphic touch, while muted rim colors bring cohesion to a set. Fresh basil, thyme, and mint gain a touch of theater under simple script.
These make cheerful hostess gifts when bundled in a wire basket with a stick of chalk and a tea towel, ready to rotate labels for new plantings or favorite recipes.
Steps
- Clean and dry the can, then mark a horizontal band area.
- Brush on chalkboard paint within the band and let cure.
- Prime the band with chalk, wipe, and letter herb names.
- Add a liner, pot the plant, and set on a sunny sill.
Macramé Cradle Hanging Tin Planter With Natural Cord

A simple metal can takes on a breezy, bohemian spirit inside a macramé cradle. Soft cotton cord knots create rhythmic geometry that frames the planter like jewelry, while a brass ring at the top adds a warm glint.
Galvanized silver pairs beautifully with cream, clay, and sage palettes, bringing texture to narrow corners and tall windows. Trailing pothos or string-of-pearls tumbles gracefully, turning vertical space into green theater.
Gift presentation feels thoughtful when the hanger is looped around a driftwood branch, with a small tag naming the plant. A trio at staggered heights forms a light, airy balcony vignette.
Steps
- Cut equal lengths of cotton cord and tie to a brass ring.
- Knot simple square knots to form a cradle net.
- Place the can in the cradle and adjust tension.
- Add plant with liner and hang from a secure hook.
Color-Blocked Metallic Cans With Enamel Shine

Bold color blocking brings an artful gallery vibe to repurposed tins. A glossy enamel-like top section meets a gleaming metallic base, creating crisp modern lines that play well with graphic foliage such as snake plant pups or button ferns.
Shades like coral, midnight blue, and mustard strike a confident balance when grouped, while brushed gold or chrome anchors the look. The smooth sheen reflects light on a bookshelf or credenza, lending polish to casual spaces.
Gift sets look handsome in a kraft carton with tissue in matching hues, ready for a housewarming or creative desk refresh.
Steps
- Mask the can with tape to define color-block sections.
- Prime lightly and spray the metallic portion; let dry.
- Spray the enamel color on the remaining section and cure.
- Remove tape, add a liner, and pot the chosen plant.
Sea Glass Mosaic Tin Planter With Sunlit Sparkle

Tumbled sea glass transforms a humble can into a coastal jewel. Pieces in aqua, seafoam, and clear frosted tones catch the light, forming an irregular mosaic that echoes shoreline finds.
A pale grout softens the gaps, giving a beachy patina that suits airy bathrooms and breezy porches. Succulents, air plants, or hardy herbs benefit from the cool, luminous surface that stays visually light.
A pair on a windowsill resembles tide pools at dusk. Wrapped in tissue with a small shell charm, this design makes a summer birthday gift that feels nostalgic and serene without leaning too themed.
Steps
- Lightly scuff the can and spread mosaic adhesive.
- Place sea glass pieces around the surface and dry.
- Apply grout, wipe excess to reveal frosted edges.
- Insert liner, add soil, and plant a small succulent.
Burlap And Lace Farmhouse Tin Herb Pots
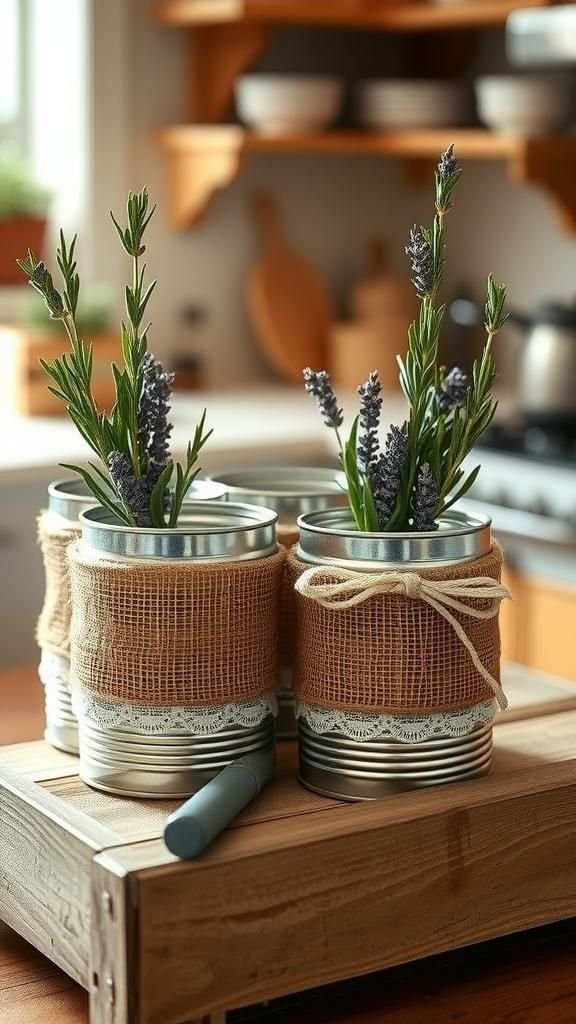
Textural contrast gives these planters a warm farmhouse character. A burlap sleeve provides earthy weave and tone, while a delicate lace ribbon adds a touch of romance.
The ribbed lines of the can peek through in places, balancing rustic and refined. Soft whites, natural tan, and muted eucalyptus greens feel right at home on wooden crates or a vintage pastry stand.
Rosemary and lavender complement the tactile pairing with fragrance and form. Wrapped together in a reclaimed box with kraft tags, these planters become a heartfelt kitchen surprise or bridesmaid proposal favor with a soothing countryside charm.
Steps
- Cut a rectangle of burlap to the can’s height.
- Glue the burlap around the can and smooth edges.
- Layer lace ribbon over the seam and secure.
- Add plant liner, soil, and favorite culinary herbs.
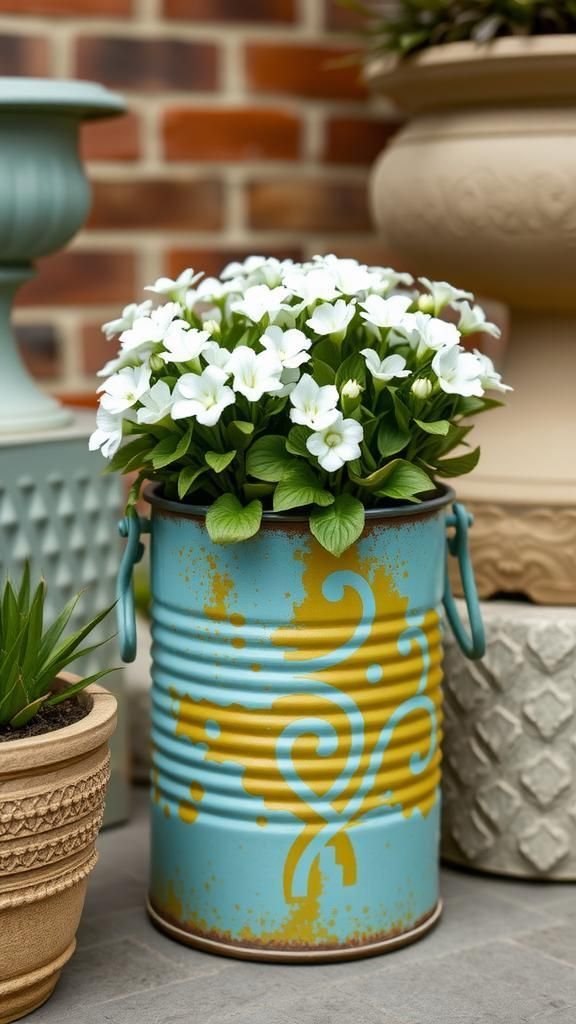
Stencil-Patterned Geometric Tins In Soft Pastels

Crisp stenciled shapes turn plain metal into patterned décor with a gentle pastel palette. Diamonds, chevrons, or scallops repeat in blush, mint, and dove gray, playing off the reflective rim of the can.
The look pairs nicely with smooth-leafed plants that echo the clean geometry. A cluster of three on a bookshelf or home office brings studied calm without feeling heavy.
For gifting, a slim bundle of matching stencils and a swatch card tucked into a ribboned box adds a creative flourish. This style harmonizes with Scandinavian accents, woven baskets, and pale woods for a cohesive interior story.
Steps
- Tape a stencil to the can and mask nearby areas.
- Dab acrylic paint through the openings and lift carefully.
- Repeat the pattern around the surface and let dry.
- Insert a liner, add soil, and nestle in a small plant.
Nautical Sisal-Twine Cans With Tiny Anchor Charm
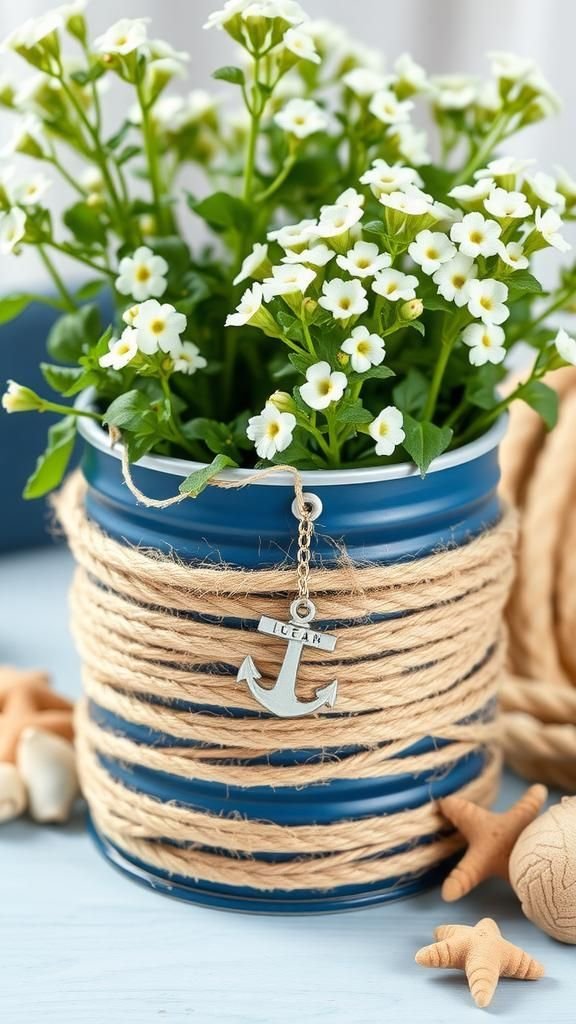
Salt-air style comes through with thick sisal twine embracing the can in textured coils. A tiny metal anchor charm at the front nods to maritime tradition, while navy accents against natural fiber keep the palette classic.
The tactile wrap sets off hardy greens and compact flowers like white alyssum. Displayed on a windowsill with striped linens and weathered wood, the scene evokes sailing weekends.
A pair in a blue crate with a note about the plant’s sunlight habits makes a thoughtful harbor-town souvenir. Sand, shells, and a rope loop frame the composition without overwhelming the compact form.
Steps
- Wind sisal twine around the can with adhesive.
- Position an anchor charm on the front and secure.
- Add a plastic liner and pot a small coastal plant.
- Set on a tray with pebbles for drainage.
Vintage Seed Packet Decoupage Herb Tin Trio

Antique seed packet art lends a nostalgic botanical feel to recycled cans. Faded typography, florals, and heirloom illustrations wrap the metal with storybook charm, while a satin finish preserves the paper without glare.
Sage green, buttermilk, and parchment tones blend seamlessly on a farmhouse shelf or potting bench. Parsley, dill, and chives reinforce the kitchen-garden theme.
The trio sits nicely in a shallow wooden tray sprinkled with dried moss for softness. As a gift, a small envelope of seeds nestled alongside invites the next planting season, turning the set into a tiny conversation piece with gentle vintage flair.
Steps
- Cut seed packet images to size and brush on medium.
- Lay the images on the can and smooth bubbles.
- Topcoat with decoupage medium and let cure.
- Insert liner and add herbs with fresh potting mix.
Hammered Faux-Copper Cans With Warm Industrial Glow
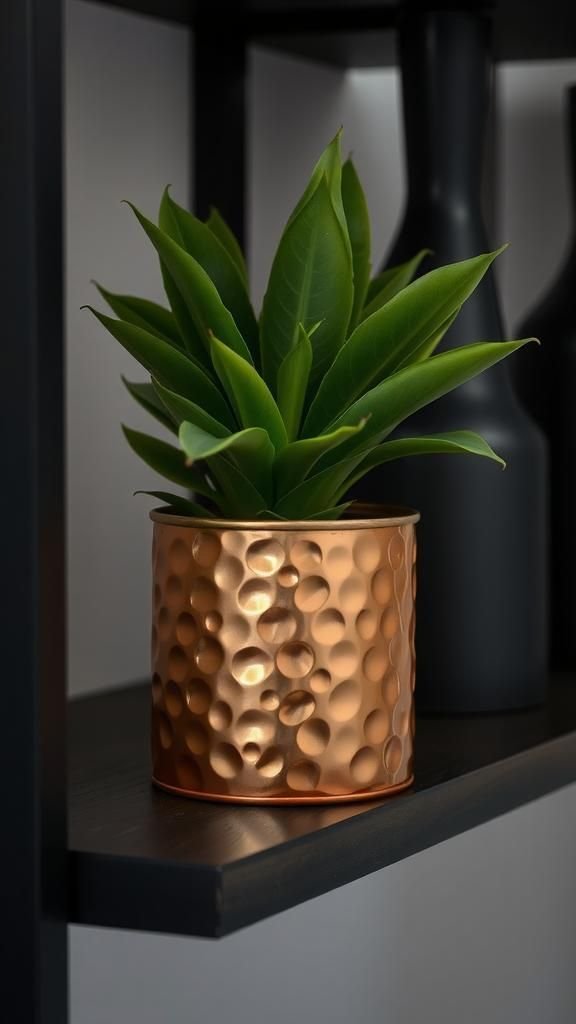
A hammered metallic finish brings depth and warmth, turning a pantry can into a coppery accent. Specks and dimples catch the light, giving an artisan mood that pairs well with dark woods, concrete, and charcoal textiles.
The color flatters glossy green foliage and burgundy succulents alike. A slim felt pad beneath keeps surfaces quiet and stable, while a soft satin topcoat preserves the glow.
Grouped near filament lamps or a black steel frame shelf, these planters create a modern loft feeling. Wrapped in kraft with a copper ribbon, a single planter becomes a handsome office desk gesture.
Steps
- Prime the can and apply hammered copper spray paint.
- Allow the texture to develop and cure fully.
- Add a felt pad under the base for protection.
- Place liner, soil, and plant to complete the look.
Verdigris Patina Planters For Weathered Garden Drama
Green-blue patina over metal suggests timeworn charm without the wait. Layers of mottled turquoise, olive, and brown create a story of rain, wind, and sun, even indoors.
The finish contrasts beautifully with delicate white blooms or velvety coleus, while stone and terracotta companions underscore the aged mood. A trio beside a brick wall feels grounded and dignified.
Gift packaging with a tiny bottle of matching touch-up color and a card about the patina colors turns the planter into an object with character. A ring of gravel on a saucer adds a soft, archaeological touch under the rim.
Steps
- Lay down a dark bronze base coat and dry.
- Sponge on turquoise and green patina tones in layers.
- Soften edges with a cloth and seal lightly.
- Add liner and plant for a weathered display.
Punched-Tin Lantern Planter With Starry Night Glow
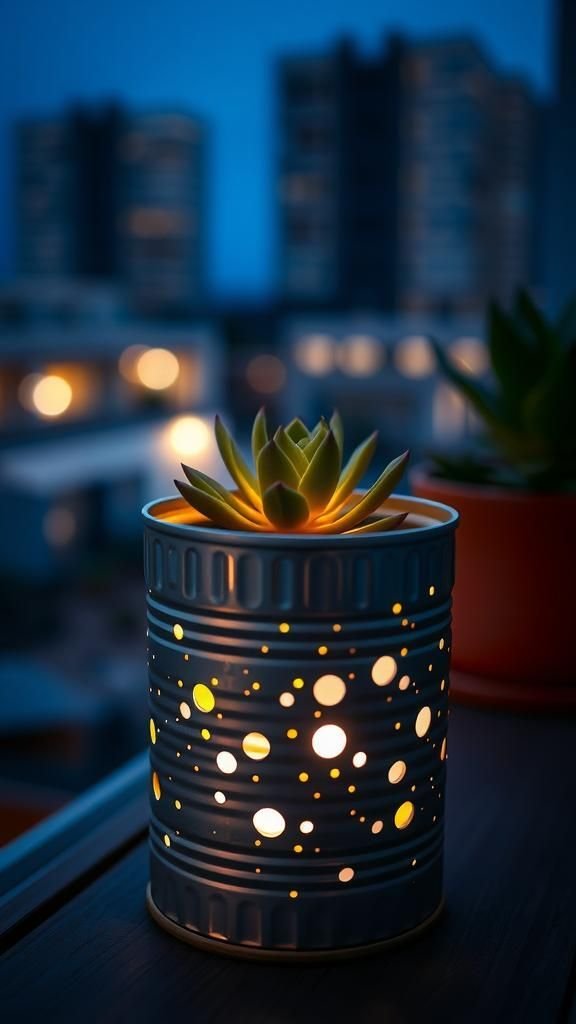
Tiny perforations scatter across the can in constellations, turning a planter into a lantern by evening. Daylight reveals delicate dot patterns and a sleek metal surface; nighttime brings a soft halo when an LED tea light sits behind or beneath the pot on a separate stand.
Succulents and small cacti sit low so the pattern remains visible. Silver or matte black finishes shift the mood from vintage to modern.
As a gift, include a flameless candle and a little card with a star chart for charm. On a balcony table, the planter casts gentle light across a cozy supper.
Steps
- Mark a constellation pattern and punch holes with a nail.
- Smooth the interior to remove burrs and wipe clean.
- Place a flameless LED beneath or behind the planter.
- Pot a small plant so perforations remain visible.
Magnetic Mini Tin Can Planters For The Fridge

Teeny tins bring greenery to unexpected places with strong magnets hidden on the back. A satin metal face keeps the look simple, while a stripe of color or washi tape adds personality.
Low-maintenance plants like air plants or tiny trailing sedums thrive in the compact footprint. The fridge, file cabinet, or a metal memo board becomes a fresh garden gallery.
A set wrapped in a small bakery box with a handful of magnet-backed labels makes a playful housewarming surprise. Arranged in rows or zigzags, the minis create living punctuation marks around grocery lists and recipe notes.
Steps
- Adhere flat neodymium magnets to the back of the can.
- Let adhesive cure and test hold strength on metal surface.
- Add a liner, a pinch of soil or moss, and the plant.
- Arrange the minis on a fridge or memo board.
Tiered Chain-Hung Vertical Garden From Linked Cans
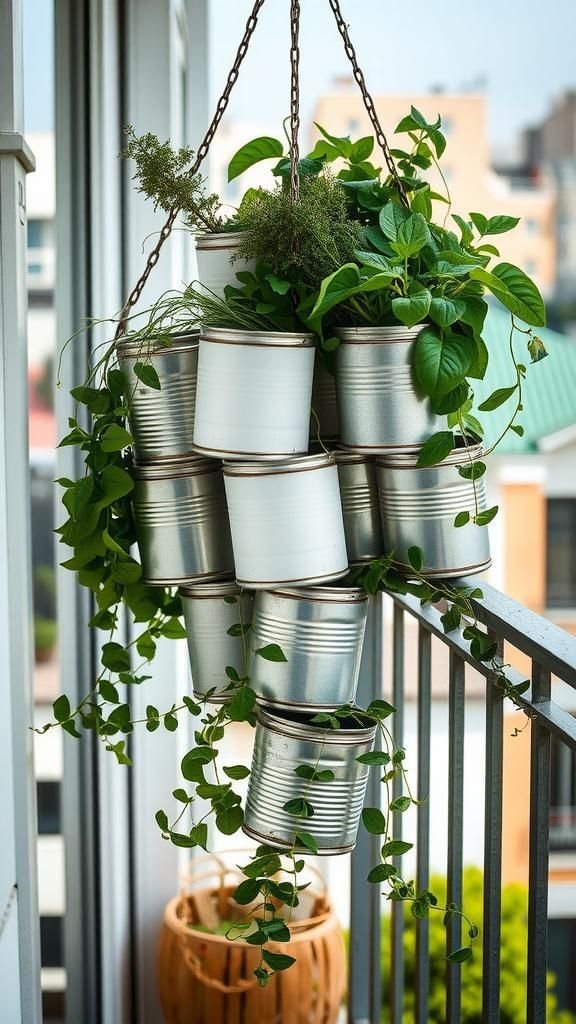
Stacked tins become a slender tower garden by linking them with chain. The vertical format fills narrow walls and brightens rental balconies where floor space feels scarce.
Alternating finishes like matte white and galvanized create rhythm, while brass chain warms the composition. Herbs at eye level and trailing vines below craft a layered green curtain.
A shallow drip tray beneath keeps everything tidy. As a gift, the tower arrives flat-packed with labeled cans and a small planting guide, ready to assemble in a new home.
Against brick or stucco, the arrangement reads sculptural and light.
Steps
- Drill drainage holes and side holes for chain connectors.
- Thread chain through side holes to link cans in a column.
- Secure top to a sturdy hook and add a drip tray below.
- Insert liners and plant each tier with complementary greens.
Acrylic Pour Drip Cans With Marble Swirls

Fluid swirls wrap each can with unpredictable ribbons of color. Puddles of teal, ochre, and ivory flow into one another, creating a marbled look that feels like polished stone.
High-gloss finish increases depth, making the surface appear almost wet. The lively pattern pairs well with restrained plants such as ZZ cuttings or sansevieria pups.
A row of three becomes the art on a shelf. Gifting feels special with a coordinating drip-painted tag and a swatch of the chosen palette.
Every planter reads one-of-a-kind, turning a kitchen window into a tiny gallery of motion and hue.
Steps
- Prime the can and mix acrylics with pouring medium.
- Pour colors over the can to create flowing marbles.
- Allow drips to settle and cure fully.
- Seal glossy and pot a contrasting green plant.
Bold Fabric-Sleeved Tin Planters With Graphic Prints

A tailored fabric sleeve gives instantaneous pattern and warmth. Mid-century dots, tropical leaves, or Bauhaus stripes wrap the cylinder, leaving a peek of shining rim.
Cotton canvas or outdoor fabric brings durability, while a removable sleeve supports seasonal refreshes. Choose jewel tones for drama or soft neutrals for understated harmony.
On a console, the prints punctuate framed art and ceramic vases. A gift-ready pair arrives tied with ribbon, a spare sleeve folded inside for future swaps.
Plants with simple silhouettes, like aloe pups or peperomia, let the pattern take the spotlight without visual clutter.
Steps
- Measure the can and cut fabric with seam allowance.
- Sew a simple tube and slide it over the can.
- Secure the sleeve with discreet fabric tape if needed.
- Add liner, potting mix, and a tidy plant.
Wood Veneer-Wrapped Tin Planter With Minimal Lines

A smooth band of real wood veneer softens metal with organic grain. Walnut reads sophisticated and moody, while ash or maple brightens the silhouette.
The union of cool sheen and warm wood suits modern Scandinavian spaces and calm work nooks. A thin seam placed at the back keeps the form clean and uninterrupted.
On a pale shelf next to linen textures and soft-gray ceramics, the planter feels serene and composed. Gift presentation in a slim box with a wood swatch labeled by species adds a material-driven touch that design lovers appreciate.
Steps
- Cut a veneer strip to height and length of the can.
- Apply contact cement to veneer and can; let tack.
- Wrap the veneer around the can and press firmly.
- Insert liner and plant a compact green.
Textured Concrete-Coated Cans With Urban Edge

A matte concrete skin gives recycled cans an architectural feel. Subtle trowel marks and tiny air pockets create a tactile surface that plays well with neon-green moss or burgundy succulents.
Gray ranges from soft dove to charcoal, meeting black steel, glass, and raw brick with confidence. The weighty look belies the light core, making the planter easy to move around a studio or balcony.
Gift packaging with a small bag of white gravel and a card about pairing with cacti turns the idea into a stylish set. The result feels industrial without losing warmth from greenery.
Steps
- Mix a thin cement slurry and prime the can surface.
- Apply the slurry in thin layers for texture.
- Allow to cure fully and buff lightly if needed.
- Add liner, gravel, soil, and sculptural plants.
Hand-Stamped Botanical Motifs On Brushed Metal
Brushed metal catches light with quiet bands, while inked botanical stamps drift around the surface. Fern sprigs, citrus slices, or wildflower silhouettes layer in charcoal or deep green, creating a print that feels breezy and modern.
A satin clear coat protects the imagery without heavy gloss. The understated pattern works especially well beside linen runners and white ceramic pitchers.
A duo on a breakfast table brings calm greenery to morning rituals. For gifting, include the stamp used on a small tag for a cute touch.
Plants with fine leaves echo the delicate look without overwhelming the gentle graphics.
Steps
- Lightly scuff and clean the can for better adhesion.
- Ink botanical stamps and press evenly around the surface.
- Let the ink dry and apply a protective clear coat.
- Add liner and pot a fine-leaf plant to complement.
Oversized Tea Tin Herb Bar On A Tray

Decorative tea tins offer taller walls and whimsical prints, perfect for forming a compact herb bar. Mismatched patterns in jade, red, and cobalt read collected and worldly, while a shared tray brings order.
A narrow strip of chalk label tape near the rim keeps identification tidy without hiding the art. Set on a windowsill, the trio perfumes the space with basil, chives, and cilantro.
As a housewarming set, include a small watering syringe and recipe card for herb butter. The ensemble balances utility and charm, inviting daily snips and a moment of aroma therapy.
Steps
- Clean the tea tins and drill small drainage holes.
- Add pebbles, soil, and herb starts to each tin.
- Apply chalk label tape and write plant names.
- Arrange tins on a shallow tray to catch drips.
Slate Label Ribbon Cans With Wooden Clips

Matte slate label ribbon circles the can like a belt, ready for quick chalk notes. A tiny wooden clip holds a care tag or date planted, adding an office-friendly stationery vibe.
Metal remains visible above and below the band for a crisp, balanced profile. Neutral tones keep the look flexible across rooms, from studio shelves to café counters.
A single planter paired with a white chalk marker makes an ideal teacher gift. Grouped in a row, the labels organize an herb lineup or small succulents while keeping the display calm and tidy.
Steps
- Wrap slate label ribbon around the can and secure.
- Write the plant name with a chalk marker.
- Clip on a wooden tag with care notes.
- Insert liner, add soil, and plant.
Ombre Metallic Sunrise Cans With Desert Succulents

A dawn-to-dusk gradient drifts from rose gold to warm champagne, catching edges of light across the curved surface. The subtle fade pairs perfectly with desert botanicals, whose sculptural forms echo the horizon theme.
Gravel topdressing in ivory and blush quartz completes the palette, while a satin sheen keeps the metal elegant rather than flashy. Lined up on a sill, the group reads like a color study.
For a gift, include a tiny vial of matching gravel and a postcard of a desert landscape. The planter brings a soft glow to bedrooms and quiet corners.
Steps
- Spray a light metallic base and let dry.
- Mist a deeper metallic from the base upward for ombre.
- Blend the transition with light passes and cure.
- Add liner, gravel, succulent soil, and a desert plant.