Disclosure: This post contains affiliate links, which means we may earn a commission if you purchase through our links at no extra cost to you.
I still remember the first clink of a tin can turned into something more than trash. A dented soup can became a tiny planter on my windowsill, and that small spark of curiosity led to many afternoons tinkering with metal, mismatched jars, and leftover paint.
Upcycled Tin Can Crafts felt like a quiet way to give ordinary objects new life.
There’s something tactile about the metal rim, the cool weight in my hand, and the soft scrape as ideas take shape. These upcycled tin can crafts cover a wide range of styles and moods, each one bringing a little personality back into everyday spaces.
Table of Contents
Rustic herb pocket with stacked tin cans

I remember the satisfying clink when a tiny herb pocket found its spot on the fence. The metal carries a muted sheen, speckled with patina and fingerprints that tell a small story.
Soil smells warm and earthy against the cool metal rim, and the bright green of basil pops against the silver-gray. Water beads on the surface after a light rain, glinting in the sun.
It feels cozy to glance at fresh leaves while making tea, a quiet reminder that something humble can be both useful and pretty.
Steps
- Empty and clean three to five tin cans, removing labels and smoothing sharp edges.
- Arrange cans in a vertical row, aligning rims, then secure them with strong adhesive or a drill and screws for added stability.
- Add small drainage holes to the bottom of each can and fill with potting soil.
- Plant herbs such as basil, thyme, and parsley, and hang the assembly on a sturdy hook or fence bracket.
Perforated lanterns casting cozy dotted light

There was a dusk when a cluster of perforated lanterns turned the backyard into a constellation of tiny lights. The metal rims catch the fading sun, and the pattern of holes throws playful shadows on the tabletop.
Holding one close, a faint metallic scent mixes with candle wax, warm and comforting. The sound of a match striking feels old-fashioned in the best way.
Lanterns hang from tree branches, their glow soft and intimate, inviting quiet conversation and lazy evenings that stretch longer than planned.
Steps
- Remove labels from clean tin cans and dry them thoroughly.
- Transfer a simple dotted pattern onto the cans, then punch holes along the marks with a nail and hammer.
- Place small tea lights or LED candles inside the cans, setting them on a heat-safe surface.
- Suspend the cans with wire or twine loops for hanging in trees or along a patio.
Desk organizer with a cheerful painted finish

My cluttered desk suddenly felt friendlier when a painted tin can joined the scene. The metal’s cool edge contrasts with the soft brushstrokes of color, and the faint smell of drying paint lingers like a memory.
Pens nestle together, scissors peek out, and little receipts tuck into a corner. There’s pleasure in the imperfect lines and drips that make each can feel handmade.
It sits near a sunlit window, catching bright light on its glossy skin and anchoring a small corner of focused work.
Steps
- Clean several tin cans and remove any rough edges with pliers or a metal file.
- Apply a priming coat, then add paint in chosen colors and allow to dry between layers.
- Optionally seal with a clear coat for a durable finish and let fully cure.
- Arrange supplies inside the cans and group them on the desk for a tidy layout.
Wind chime made from clinking metal cans and beads

There’s a lazy summer afternoon memory of a wind chime tinkling as the breeze amused itself. Tin cans sing in a gentle metallic voice, each tone slightly different depending on shape and dent.
Beads slide along the strings, adding a soft rattle that blends with the leaves. Sunlight catches on small reflective surfaces, sending playful flashes around the porch.
The whole piece swings with an easy rhythm, turning ordinary breezes into a private soundtrack that makes me pause and listen whenever the air stirs.
Steps
- Prepare several small tin cans by removing lids and cleaning the interiors.
- Drill or punch holes for hanging, then thread durable string or thin wire through the cans and tie knots to secure spacing.
- Add beads or small metal washers between cans for visual interest and additional sound.
- Suspend the completed arrangement from a wooden hoop or sturdy branch where breezes can reach it.
Garden marker set with painted can lids

I like the small ritual of marking the garden beds with tiny can lid signs. The lids have a reassuring weight and their painted surfaces invite messy handwriting or playful doodles.
Dirt smudges add character and the occasional rain spot turns colors darker and richer. Nestled among rows of seedlings, the markers create little visual anchors that make the space feel tended and loved.
Friends often comment on the charm of handwritten names wobbling in the breeze, a homespun detail that says more than a polished label could.
Steps
- Collect and clean several tin can lids, smoothing any sharp edges with a metal file.
- Paint each lid with outdoor paint and allow it to dry completely.
- Write plant names or simple icons on the lids, then attach each lid to a wooden stake or metal rod.
- Insert the markers into the soil near the corresponding plants for easy identification.
Bird feeder with a cozy platform and roof
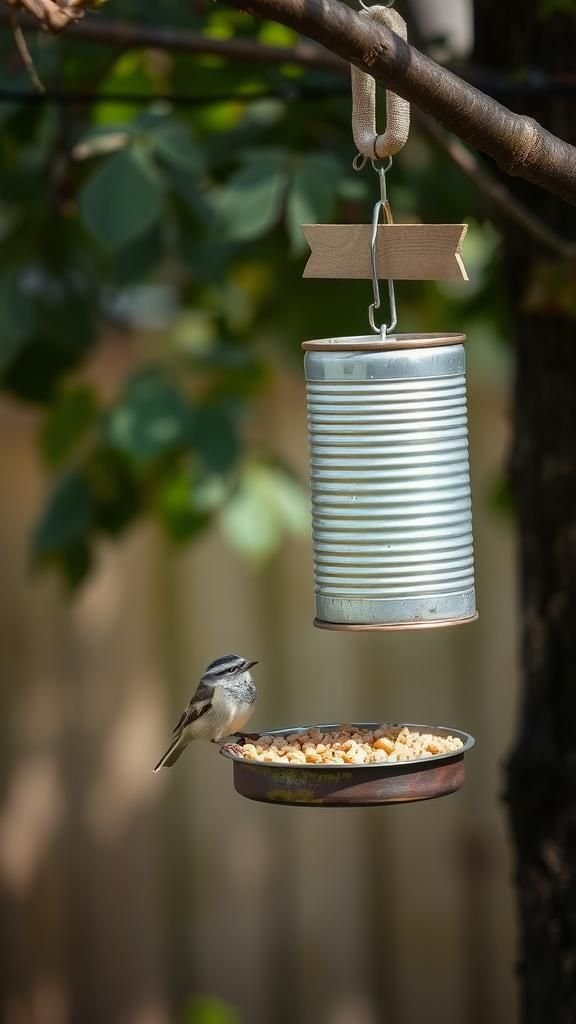
There’s a gentle thrill when a bird hesitates, then hops onto a humble feeder made from a can. The metal platform offers a reflective gleam, and scattered seeds create a mosaic of texture and color.
Nearby leaves rustle and wings whisper, the sound made softer against the metal’s cool rim. Watching from the kitchen window feels like a small ritual, and the clatter of tiny claws on the can becomes a comforting part of the morning.
The feeder’s patina blends with the garden, inviting wildlife without shouting for attention.
Steps
- Clean one or two larger tin cans and remove both top and bottom if needed to create a platform.
- Attach a small wooden or metal perch near the opening and add a partial roof from another can or lightweight material.
- Create drainage holes to prevent water buildup and hang the feeder with sturdy wire from a branch.
- Fill with birdseed and observe from a distance to avoid startling visiting birds.
Hanging succulent planters with pastel finishes

A string of pastel cans swinging gently above the patio has a calming effect. Succulents sit snugly inside, their fleshy leaves contrasting with the smooth metal.
The pastel paint softens any dents and the glossy finish catches low light in a tender way. Morning air carries the faint scent of soil and sun-warmed stone, and the planters creak slightly as the breeze moves through them.
They make a narrow balcony feel like a tiny oasis, each plant a quiet testament to the pleasure of small, patient care.
Steps
- Clean and paint tin cans in soft pastel shades, allowing ample drying time between coats.
- Add a layer of small stones for drainage then fill with a well-draining succulent mix.
- Plant assorted succulents, tamping soil gently around the roots for stability.
- Thread sturdy twine through punched holes to create hanging loops and suspend from hooks or a rail.
Utensil caddy for backyard barbecue gatherings

On a sunny afternoon, a cluster of tin cans lined up on a table made setting out utensils feel like a small ceremony. The heat gives the metal a faint warmth, and the skater of silverware creates a soft metallic chorus when someone shifts a fork.
Grease spots map the edges in familiar patterns, adding a lived-in look. It’s practical and informal, inviting people to help themselves.
The cans look at home next to napkins and platters, turning a casual meal into something more relaxed and communal.
Steps
- Clean multiple tin cans and remove any sharp edges to ensure safe handling.
- Decorate cans with a water-resistant finish, labels, or simple patterns that match the outdoor setting.
- Group cans on a tray or in a wooden box for stability, then fill each with utensils sorted by type.
- Place the caddy within easy reach of the serving area during gatherings.
Mini succulent terrarium in a low can

A small tin can terrarium becomes a pocket of calm on a shelf. The cool metal rim frames tiny gravel and spiky succulent leaves, while the soil looks dark and reassuringly moist.
Tiny pebbles catch stray specks of light and the whole arrangement feels like a miniature landscape. It rewards quiet attention; a careful tilt reveals layers and a tiny ecosystem that feels surprisingly alive.
Placed near a window, the terrarium softens the edge of a bookcase and invites a brief pause in a busy afternoon.
Steps
- Prepare a shallow tin can by cleaning it thoroughly and ensuring drainage through small holes.
- Layer small stones and charcoal at the bottom for drainage and add a light cactus or succulent soil mix.
- Plant a single small succulent or a trio of tiny varieties, pressing soil gently around roots.
- Place the terrarium in bright indirect light and water sparingly to avoid overwatering.
Chalkboard label cans for pantry organization

Cans with chalkboard panels bring a touch of thrift-store charm to the pantry. The matte black rectangle invites playful handwriting and smudged erasures, evidence of swapped contents.
The clink of metal as a can is lifted feels oddly reassuring, and the scent of spices from nearby jars curls through the air. Labels can be neat or scribbly, each hand marked label telling a little story of meals that came from that shelf.
The arrangement turns practical storage into a modest but pleasing display.
Steps
- Clean tin cans and sand any rough spots before applying a chalkboard paint panel.
- Paint a rectangle of chalkboard paint onto the outside of each can and allow time to cure.
- Once dry, season the chalkboard surface and write contents with chalk or a chalk marker.
- Place cans on a pantry shelf filled with bulk spices, grains, or baking supplies.
Sewing kit tin with vintage feel and charm

A small sewing tin holds tiny spools, thimbles, and a couple of buttons, and opening it always brings a quiet sense of order. The metal lid snaps with a soft click that feels reassuring.
Pinheads glint like tiny stars against the fabric swatches tucked beneath them. Thread smells faintly of cotton and there’s a comforting weight when the tin is held.
It sits near the living-room armchair, always ready for a quick hem or a mended cuff. The tin itself carries scuffs that hint at past projects and remembered repairs.
Steps
- Clean a small tin can and line the interior with fabric or felt for a soft base.
- Organize needles, small scissors, pins, and a few spools of thread inside the lined tin.
- Add a foam or magnetic insert for needle storage and secure lids to keep contents contained.
- Store the sewing kit near a favorite chair for easy mending moments.
Pencil holder with wrapped twine and texture

Wrapping twine around a tin can creates a tactile surface that feels warm in the hand. The rough texture contrasts with the cool metal edge, and pencils nestle into the hollow with a satisfying hush.
The smell of natural twine and graphite mixes faintly when the holder sits near a sketchbook. Details like a frayed end or a loose knot give the piece personality, and the holder fits into the corner of a crowded desk with quiet dignity.
It’s a small thing, but it brings a sense of calm to the workspace.
Steps
- Clean a tin can and remove any sharp edges to make it safe to handle.
- Apply a bead of strong adhesive near the rim and begin wrapping natural twine tightly around the can.
- Continue wrapping to cover the exterior, securing the end with adhesive and trimming excess twine.
- Fill the completed holder with pencils, charcoal sticks, or brushes and place on a desk.
Hanging tea-light mobiles that twirl in breeze

A string of tiny tea-light mobiles spins slowly above the patio, catching sunlight and then glow from candles as dusk falls. Each can sparkles where the metal edge reflects light, and the faint scent of wax mixes with evening air.
The soft rotation creates a hypnotic rhythm, like a slow, private dance. When the breeze picks up, the cans chime ever so gently and shadows stretch across the table.
They invite lingering conversations and quiet smiles, turning ordinary nights into something cozy and slightly whimsical.
Steps
- Clean small tin cans and punch a pattern of holes along their sides for light to escape.
- Create a hanging loop at the top and attach each can to varying lengths of string or thin chain.
- Place tea lights or battery-operated candles inside each can and test the balance so they hang straight.
- Suspend the mobile from a pergola or overhead beam where it can catch breezes.
Outdoor lanterns with colored glass inserts

Colored glass tucked into a tin frame throws jewel-toned light across the patio floor, and the effect feels almost theatrical on a balmy night. The metal edges give the lantern structure while the glass brings a vibrant mood, each hue bathing the surroundings in gentle color.
Holding one at arm’s length yields a kaleidoscope of small, saturated glows. The combination of cool metal and warm light creates a pleasing contrast, as if a tiny stained-glass window had been repurposed for evening company.
Steps
- Clean larger tin cans and cut windows into the sides to accommodate glass inserts.
- Fit small pieces of colored glass or translucent resin into the openings and secure with silicone or a safe adhesive.
- Add drainage holes and a sturdy handle for hanging, ensuring all edges are smoothed.
- Place a candle or LED light inside and suspend the lantern outdoors.
Candle votive clusters with salted glass effect

A cluster of small tin votives peppered with a frosted, salted-glass finish evokes a gentle seaside feeling. Candle flames dance behind the textured surfaces, their light softened into a warm, diffuse glow.
Salted edges sparkle faintly, and the soft scent of wax mingles with night air. Placed along a windowsill, the votives create a row of miniature lanterns that look both deliberate and effortless.
There’s a pleasing hush to the scene that encourages slow breathing and a brief moment of quiet appreciation.
Steps
- Clean tin cans and roughen the exterior surface slightly for better adhesion.
- Apply a translucent coating mixed with coarse salt or textured medium to achieve a frosted effect and allow to dry.
- Place small candles or LED lights inside the votives and arrange them in a cluster on a heat-resistant surface.
- Light the candles and enjoy the softened glow created by the textured finish.
Magnetic spice tins that cling to fridge sides
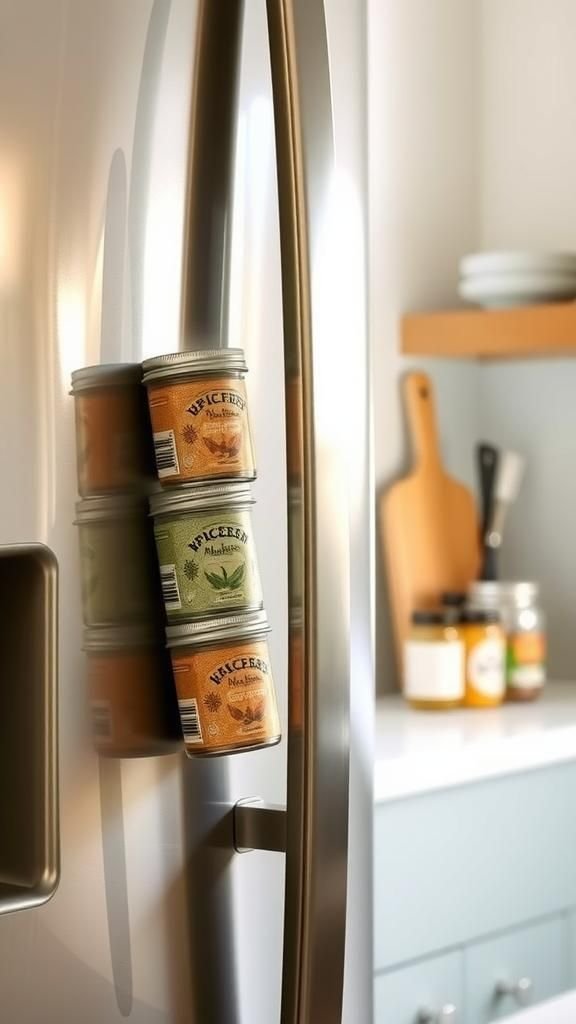
Watching tiny magnetic tins cling to the fridge brings a tidy joy to cooking. The cans rest flush against steel, their round shapes forming an informal map of flavors.
Opening one releases a burst of scent that lifts the mood, and the cool metal feels reassuring in the hand. Labels written in neat script add a personal touch, and the whole arrangement makes spices feel accessible and playful.
It’s a small convenience that nudges me toward trying a different herb or spice mid-recipe without hunting through cupboards.
Steps
- Attach magnets to the back of small tin lids or cans using strong adhesive suitable for metal.
- Fill the tins with commonly used spices and seasonings, taking care to seal them well.
- Label each tin with a waterproof marker or sticker for quick identification.
- Arrange the magnetic tins on the fridge or a magnetic board within easy reach of the stove.
Whimsical fairy house made from painted cans

A tiny fairy house tucked under a fern feels like a secret waiting to be found. The painted tin walls hold little hand-drawn windows and a miniature door that invites a second look.
Moss softens sharp edges and tiny pebble paths lead to the entrance. In quiet moments it sparks a childlike delight, a small world that can be rearranged between rain showers.
The colors age as seasons pass, gaining a warm weathered look that adds to the house’s narrative and makes it feel as though it might belong to something small and curious.
Steps
- Clean tin cans and paint them in charming colors, adding window and door details with small brushes.
- Combine multiple cans or lids to build a small structure, securing with adhesive or wire as needed.
- Decorate the base with moss pebbles and tiny found objects to create a path and garden.
- Place the fairy house in a sheltered spot in the garden where it can be admired.
Soap dish with drainage for bathroom counter

A tin soap dish with clever drainage feels thoughtfully simple beside the sink. Water collects and escapes in a steady little rhythm, and the bar settles on the metal with a quiet clink after use.
Soap bubbles leave a thin sheen on the surface that wipes away into familiar patterns, and the dish’s patina gains character over time. The overall effect is utilitarian but inviting, a small object that helps keep the counter tidy and adds a touch of handmade charm to daily routines.
Steps
- Prepare a shallow tin can by removing one side and smoothing edges to form a tray.
- Punch several small drainage holes in the bottom to allow water to escape.
- Optionally add a removable inner tray or layer of pebbles for improved airflow.
- Place the soap dish on a saucer or mat to catch any excess moisture on the counter.
Picture frame planter for tiny trailing ivy

A picture-frame planter mounted on the wall turns ivy into living art. The tin border frames a cascade of green, and the contrast between rigid metal and soft foliage feels pleasingly paradoxical.
The rusted sheen softens over time, and small tendrils search for purchase along the frame, creating delicate shadows on the wall. It’s a compact way to bring life onto vertical surfaces, and catching sight of a trailing leaf as I pass gives a moment of calm and surprise in an otherwise ordinary hallway.
Steps
- Flatten or reshape a wide tin can to create a shallow frame-like planter, ensuring edges are smoothed.
- Add drainage holes if desired and line the interior with a breathable fabric or mesh.
- Fill with a light potting mix and plant a small trailing ivy or similar plant.
- Secure the planter to the wall with appropriate hardware and allow the plant to trail naturally.
Outdoor candle path lights in a rustic row

A row of tin path lights leads across the garden with a humble glow that feels welcoming rather than showy. Their soft circles of light sketch a route across grass and stone, while the metallic edges catch hints of moonlight.
The scent of wet earth rises as dew settles, and the lights make evening walks feel slightly ceremonial. They balance practicality with a homely aesthetic, offering just enough illumination to guide the way while leaving most of the garden to the dark and the sky.
Steps
- Prepare larger tin cans by removing tops and creating ventilation holes near the rim.
- Anchor each can into the ground or attach to short stakes at even intervals along the path.
- Place candles or LED lights inside, ensuring stability and safe placement away from flammable materials.
- Light the path in the evening to create a warm, guiding glow through the garden.
Wind spinner crafted from patterned metal cans

A wind spinner made from patterned cans whirls on the porch, catching sun and shadow in slow, hypnotic turns. The reflections change with the day, sometimes bold and bright, sometimes soft and diffused.
The motion makes a quiet rustle, a sound that blends with bird calls and distant traffic into a backyard chorus. Colors fade in an appealing way as paint ages, and the spinner becomes part of the garden’s personality.
Watching it rotate is a small pleasure that asks for nothing more than a minute of attention.
Steps
- Cut cans into curved blades or shapes using tin snips or sturdy scissors, smoothing edges afterward.
- Arrange blades around a central axis and secure them with a bolt or rivet, ensuring balance for smooth spinning.
- Add a hook or eyelet for hanging and attach the spinner to a sturdy bracket or pole.
- Place the spinner where breezes are common to enjoy rotational motion and reflections.