Disclosure: This post contains affiliate links, which means we may earn a commission if you purchase through our links at no extra cost to you.
I always look forward to the tactile pleasure of making little touches for the holiday table. Over the years I’ve kept a handful of favorite Thanksgiving Table Decor Crafts that feel warm and familiar, pieces I reach for when I want the room to feel alive with texture and scent.
Last autumn I mixed dried orange slices with cinnamon and wheat, and the way the light hit the table lingered with me.
These Thanksgiving Table Decor Crafts are about small moments that draw people closer and make the meal feel like a true gathering.
Table of Contents
Mini pumpkin napkin rings with patina charm

There is something quietly joyful about a line of tiny pumpkins arranged along the center of the table, each one serving as its own little accent. I like the way rough twine sits against the soft curves of a painted miniature, the tactile contrast between matte clay and a faint metallic sheen.
The scent of baked spices nearby makes the scene feel cozy. Close up, the subtle brushstrokes and tiny imperfections read as handcrafted, inviting guests to linger.
Light bounces off the metallic highlights in a gentle, fall-hued way.
Steps
- Form small pumpkin shapes from air-dry clay and let them firm up on a flat surface.
- Apply a thin wash of autumn paint tones and dab a metallic finish for a patina effect.
- Thread twine through each pumpkin base to create a ring shape that slips over a napkin.
- Allow every piece to dry completely before arranging them along the table for a rustic display.
Leaf-shaped place cards with inked edges

A single leaf placed at each setting can feel like an invitation. I remember tearing open envelopes of handmade paper and tracing veins with a fine pen until the edge of each leaf picked up a faint, dark line.
The tactile softness of the paper against fingertips and the faint smell of ink combined to make the table feel intimate. Each leaf had its own little quirks, curled slightly at the tip, with shadows that shifted under candlelight.
Guests lingered over them, running a thumb along the inked edge as they took their seats.
Steps
- Cut leaf shapes from sturdy handmade paper and lightly score veins with a fine pen.
- Darken edges by brushing them with diluted ink or paint and allow the tone to settle.
- Add a small name or message in delicate handwriting on each leaf surface.
- Place a single leaf at each plate so lighting brings out the inked edges.
Cinnamon stick holders that smell like autumn

When cinnamon meets flame-safe glass, the table feels like a well-worn kitchen in a countryside home. I like the rustic cluster of dark brown sticks leaning together, their rough bark and sweet scent mingling with simmered fruit in the background.
Light glows through the glass and paints the cinnamon with soft highlights, while shadows from neighboring place settings add depth. The arrangement draws people toward the center of the table, and the aroma keeps conversations low and easy.
It’s a small, sensory note that keeps returning every year.
Steps
- Gather bundles of whole cinnamon sticks and arrange them around short glass votives.
- Secure the sticks by wrapping natural twine around each bundle’s base for a snug fit.
- Insert battery-operated tealights into the glass vessels and nest each within the cinnamon bundle.
- Cluster a few of these holders along the table center to create warmth and scent.
Dried orange slice garland in warm tones

A strand of dried citrus brings a crisp sweetness to the table’s visual rhythm. I once draped a thin garland along the runner and watched as the light passed through tiny translucent centers, turning them into glowing amber coins.
The edges curled slightly with age, and the citrus scent was faint but present, like a memory. The texture of the slices contrasted with rough linen and smooth ceramics nearby.
Draped loosely, the garland created a quiet line of color that kept the eye moving from one place setting to the next.
Steps
- Dry thin orange slices slowly in low heat until they turn translucent and firm.
- Thread a needle with strong thread and pierce each slice through the center to string them.
- Mix in other dried elements like star anise or small pinecones along the length for variety.
- Arrange the garland along the table runner, allowing gentle loops and dips.
Burlap runner with stenciled leaf pattern
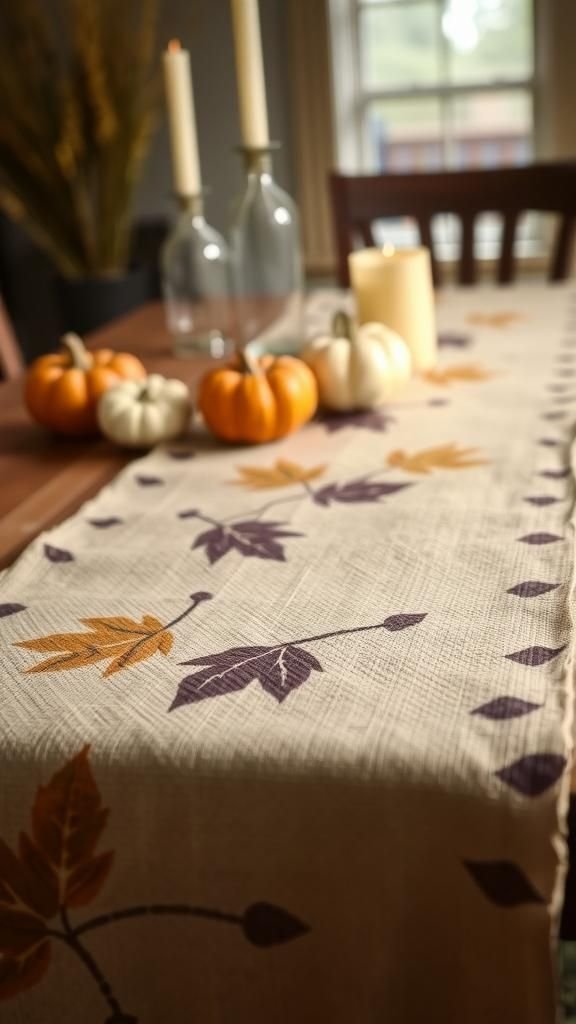
There’s a humble charm when burlap lays down the base for other pieces to shine. I like the coarse weave under my palms and the way stenciled leaves sit a little flat against the fabric, soft paint blending into the fibers.
The runner feels weighty yet forgiving, a steady visual path for candles and dishes. When light grazes the painted edges, tiny threads catch highlights and create a lived-in look.
Set against polished plates and glassware, the contrast feels lively, grounding the setting with an organic presence.
Steps
- Lay a length of burlap down the center of the table and smooth out wrinkles.
- Position leaf stencils along the burlap and dab paint through each stencil to form a repeating pattern.
- Let the paint settle and cure fully so the texture remains intact.
- Place tableware and centerpieces on top, letting the runner anchor the arrangement.
Acorn and pinecone scatter to add texture
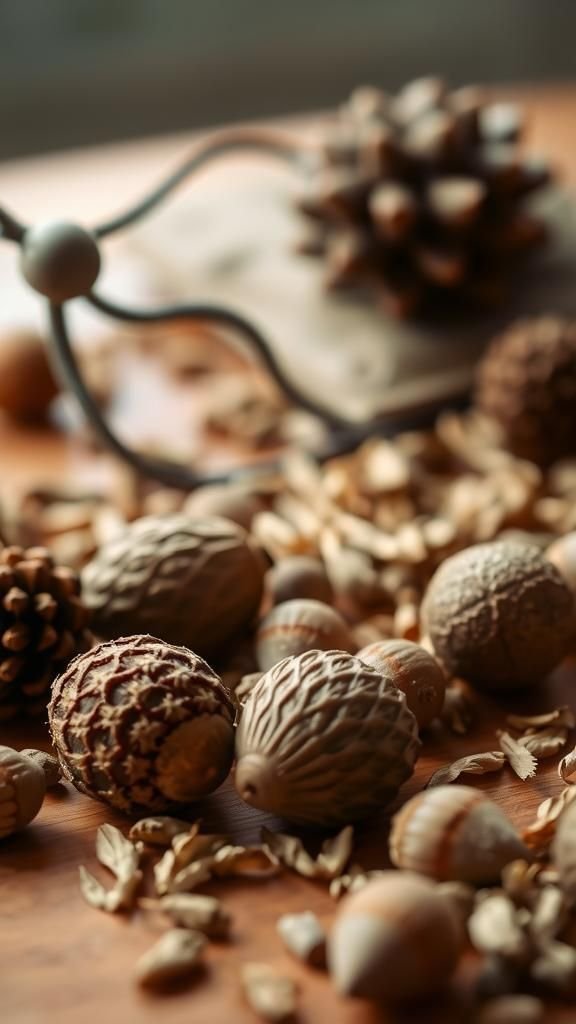
Scattering small natural elements across the table creates a gentle sense of abundance without fuss. I remember picking through a basket of toasty brown acorns and rough pinecones, liking how each one had a tiny identity: a curled scale here, a mottled shell there.
They felt reassuring under fingertips and offered a soft crunch against napkins when shifted. The mix of matte browns and pale highlights played well with ceramic plates and brass utensils, grounding the scene with woodland notes.
The overall effect was cozy and quietly layered.
Steps
- Collect clean acorns and pinecones, sorting by size and shape for balance.
- Arrange them loosely along the center of the table, mixing larger cones with smaller acorns.
- Tuck a few sprigs of dried foliage among the pieces to add color contrast.
- Step back and adjust clusters until the placement feels natural and varied.
Mason jar herb centerpiece with simple green notes
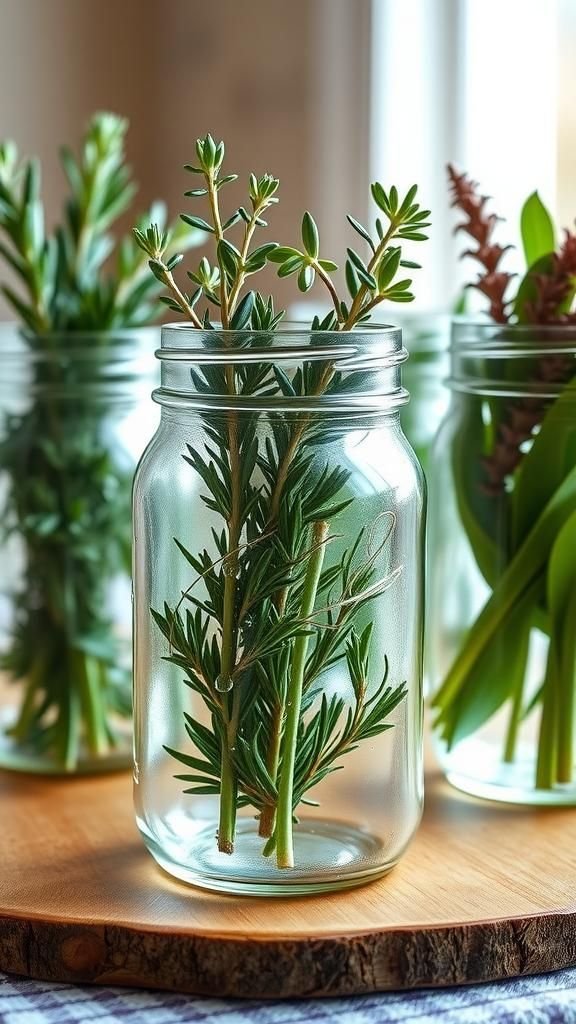
A row of clear jars filled with fragrant herbs brings a fresh undertone to the richer scents of the meal. I often stack a few jars together and let rosemary, thyme, and sage rise up like miniature hedges.
The stems catch the light, and droplets caught on leaves after a quick rinse sparkle like tiny jewels. The scene felt kitchen-adjacent and welcoming, a reminder of the ingredients moving from counter to plate.
Guests commented on the scent more than I expected, and it kept conversations anchored to the table’s sensory world.
Steps
- Fill several mason jars with water and trim herb stems to fit neatly inside.
- Group the jars closely on a small wooden board or runner for a unified look.
- Add a few sprigs of flowering herbs or small branches for extra height.
- Replace water as needed to keep the herbs fresh during the gathering.
Salt dough leaves as charming table keepsakes

There’s a slow pleasure in pressing a leaf pattern into soft salt dough and watching it dry into something tactile and weighty. I made a handful one afternoon and later scattered them among place settings; each held tiny vein impressions that caught the light and the eye.
They felt like small relics, smooth on the edges where fingers had smoothed them, slightly rough where the leaf impressed. Guests tended to pick one up and tuck it into pockets as a reminder of the meal.
The muted earthen tones fit effortlessly with wooden chargers and candlelight.
Steps
- Mix a simple salt dough until it reaches a pliable texture and roll it out evenly.
- Press natural leaves gently into the surface to leave clear vein impressions.
- Cut around each imprint and allow the shapes to dry until firm.
- Paint or seal lightly for color and durability before arranging at place settings.
Wheat bundle ties that whisper harvest stories

A small bundle of wheat evokes fields and slow afternoons, and it sits quietly amid plates like a little narrative fragment. I remember the soft sweep of the stalks against my palm and the whispery sound when a breeze passed.
Tied with a thin ribbon, the bundle felt refined but still honest, a simple line against linen. The pale gold caught warm lighting and created a subtle halo, drawing attention without shouting.
Guests commented on the nostalgic quality, as if the table had borrowed a piece of late summer.
Steps
- Select uniform wheat stalks and trim the ends to create neat bundles.
- Tie each bundle at the base with ribbon, twine, or narrow fabric strips.
- Arrange bundles individually at each place or cluster them as a centerpiece.
- Replace or fluff stalks as needed to maintain a tidy appearance.
Felt turkey napkin pouches with playful texture

There’s a small delight in a napkin that looks like a tiny turkey peeking out from the fold. I recall assembling a few felt pouches and laughing at how each one had its own personality: a tilted beak, a fluffier tail, a crooked eye.
The fabric felt soft against hands and added a cheerful, tactile element to the setting. Colors read as warm and saturated under candlelight, and the stuffed little shapes kept guests smiling as they sat down.
It was an easy way to add whimsy without distracting from the meal.
Steps
- Cut felt into simple turkey body shapes and glue or stitch the edges to form pouches.
- Attach layered felt feathers and small eyes for character on each pouch.
- Slip folded napkins into the pouches so the turkey face peeks out.
- Scatter the napkin pouches across the table for a playful touch.
Corn husk napkin holders with a rustic air
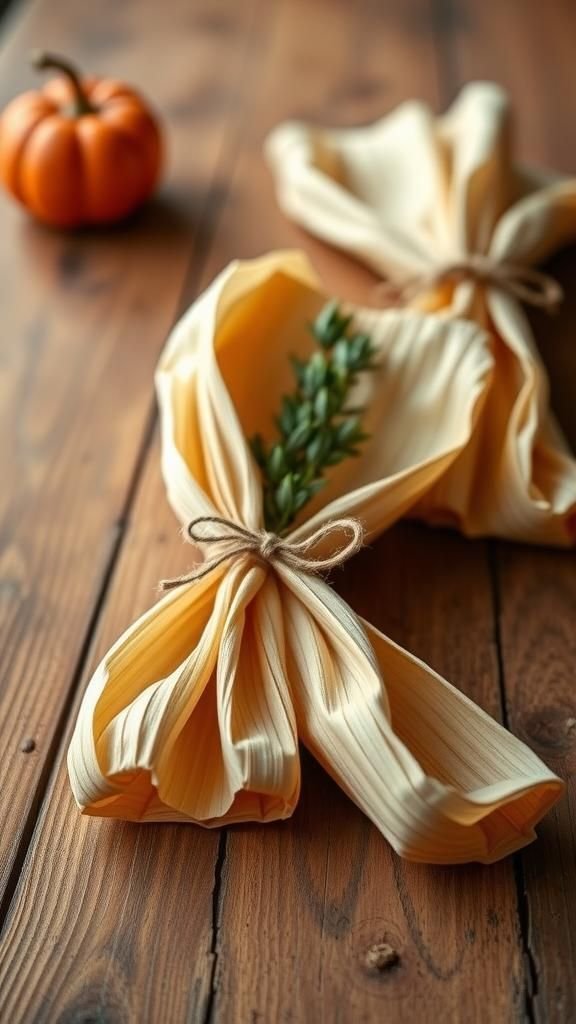
Corn husks hold a quiet, agricultural poetry when arranged on a table. I enjoy the papery texture against a soft linen napkin and the natural gradients from pale cream to deep amber along each husk.
They impart a rural elegance, the kind that suggests a day spent harvesting. The husks crinkle softly when handled, and their long fibers catch specks of light in a way that complements polished silver.
Positioned at each place, they make the setting feel rooted in the season’s cycles.
Steps
- Soak dried corn husks briefly to increase flexibility and then pat them dry.
- Fold or shape a husk around a napkin and secure with thin twine or ribbon.
- Trim ends for a neat look and tuck a small sprig of foliage into the tie.
- Place the wrapped napkin at each setting for an earthy, textural detail.
Pinecone votives that glow with soft light
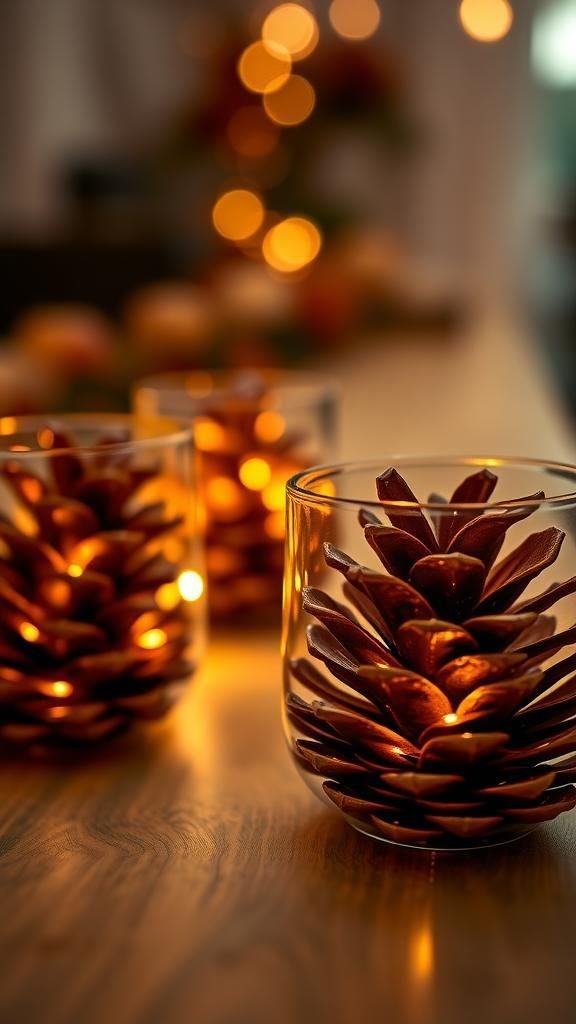
Pinecones paired with tiny lights create pockets of glow that feel comforting. I once nestled small battery lights inside cones and watched as warm flecks spilled between scales, casting playful shadows on the table.
The rough texture contrasted with smooth glassware, and the scent of resin seemed to brighten in the light. Clustered together, the votives read like little lanterns, inviting hands to linger near them.
The overall feeling was quiet luminosity, like pockets of hearthlight scattered across a long wooden surface.
Steps
- Hollow the base of medium pinecones if needed to create space for battery lights.
- Insert small LED fairy lights into the cones so light filters through the scales.
- Arrange the lit pinecones on heat-safe trays or shallow dishes.
- Position clusters along the runner to create a chain of soft illumination.
Branches with copper sheen as an elegant centerpiece

A handful of bare branches given a warm metallic tone can look like small sculptures on the table. I once arranged a few tall stems in a low vase, their slender silhouettes catching the evening light and throwing delicate shadows.
The copper hue felt modern yet rooted, pairing well with neutral linens and deep-colored dinnerware. Up close, faint brush marks and uneven sheen made each branch feel handcrafted and honest.
The overall silhouette added vertical interest without overwhelming the line of sight during conversation.
Steps
- Select slender bare branches and clean off loose bark and debris for a neat surface.
- Apply a thin metallic finish or leafing to give the branches a subtle copper tone.
- Arrange the treated branches in a low, stable vase or vessel for support.
- Balance the composition with low candles or small clusters of foliage around the base.
Rosemary and cranberry napkin rings that smell fresh

A simple loop of rosemary woven with tiny cranberries brings fragrance and color to each place setting. I remember the bright green scent mingling with simmering stock and the sharp red popping against white napkins.
The combination looks both festive and understated, the herbs’ oilier leaves offering tactile contrast with glossy berry skins. Under soft lighting, the cranberries reflected tiny highlights while rosemary cast slender shadows.
Guests often commented on the scent first, and the visual interplay felt lively yet refined at the same time.
Steps
- Gather fresh rosemary sprigs and small cranberries, arranging them into small clusters.
- Secure each cluster with thin floral wire or twine to form a compact ring.
- Slip the ring around folded napkins so the herbs and berries face upward.
- Refresh the herb sprigs shortly before guests arrive to keep the scent vibrant.
Chalkboard acorn place holders with tiny notes
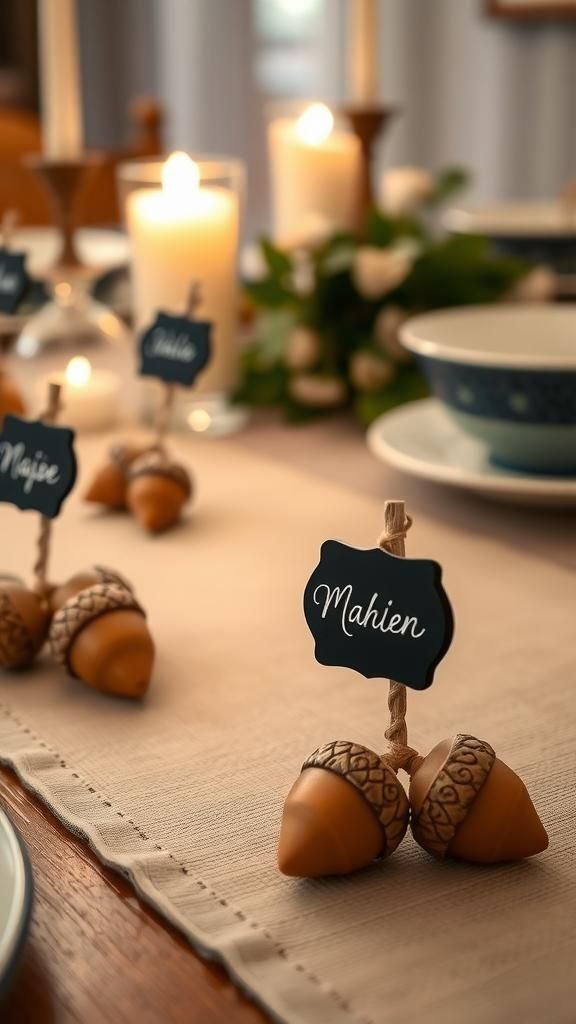
Small chalkboard tags paired with acorns create a low-key way to mark seats. I liked the tiny matte board standing against a glossy acorn cap, the contrast between chalk dust and smooth shell.
Writing a name in a casual hand felt intimate and personal, and the action of erasing and rewriting reminded me of the living nature of gatherings. The look read as both playful and thoughtful, with the neutral tones of the acorns balancing brighter ceramics.
Under candlelight, the chalk softened and the little signs became part of the tabletop rhythm.
Steps
- Prepare small chalkboard tags and clean acorn tops for stable placement.
- Write names on each tag using chalk or a chalk marker with light pressure.
- Tuck a tag behind an acorn or prop it within a small acorn cap.
- Position the holders at each setting where they are easy to see.
Paper-quilled leaf confetti for delicate scatter

Tiny paper quilled leaves bring a delicate, handcrafted layer to the table surface. I spent an afternoon curling strips into small scrolls and arranging them into little leaf shapes, enjoying how each coil caught the light differently.
The pile looked almost like confetti from a slow, careful celebration, with slender shadows and whispers of color. The paper’s slight sheen contrasted with matte surfaces nearby, and I liked how every piece felt unique under fingertips.
Placed lightly, the quilled leaves suggested a gentle, celebratory mood without overwhelming the place settings.
Steps
- Roll narrow paper strips into tight coils and shape them into small leaf forms using quilling tools.
- Glue the coils together into leaf shapes and let them dry thoroughly.
- Create a variety of colors and sizes for a natural, scattered look.
- Gently scatter the quilled leaves across the table for a delicate embellishment.
Harvest corn centerpiece with miniature accents

A small grouping of decorative ears and mini pumpkins can feel curated rather than crowded. I like how the kernels’ glossy texture and the pumpkins’ matte skins play against each other, the colors moving from deep burgundy to cream.
The arrangement read like a vignette from an old harvest photograph, quiet and composed. Placed on a shallow tray, the pieces sat low and allowed sightlines to remain open across the table.
The result felt like a thoughtful nod to the season that allowed conversation to stay at the center.
Steps
- Select decorative ears of corn and small gourds that complement each other in color and size.
- Arrange them on a shallow tray or wooden board to create a contained vignette.
- Add sprigs of dried foliage to soften edges and tie colors together.
- Position the tray along the runner for an understated harvest focal point.
Vintage silverware wrap with ribbon accents

Wrapping utensils in a small ribbon bundle lends a slightly formal, nostalgic touch. I liked the weight of old silver against my palm and how the ribbon’s color offered a tiny punctuation mark to each place.
The sound of a soft knot being tied felt ceremonious, and the overall look recalled long, leisurely family dinners. Under close light, the metal picked up warm glints while the ribbon softened the silhouette.
The wraps felt like a simple courtesy to each guest, a small folded gesture that hinted at care.
Steps
- Stack cutlery neatly and hold them together with a cloth napkin for alignment.
- Tie a ribbon or narrow fabric strip around the bundle, finishing with a subtle knot.
- Trim ribbon ends and tuck the bundle onto each place setting.
- Choose ribbon hues that harmonize with the table’s overall color scheme.
Wood slice chargers with leaf inlay detail

A thin wood slice under a plate adds a rustic anchor that feels both sturdy and warm. I once sanded a few slices lightly and inlaid small cured leaves into shallow grooves for texture.
The rings of the wood showed age and made each setting feel rooted in time. The leaves’ outlines provided a delicate contrast to the wood grain, and the overall composition read as handcrafted refinement.
The chargers gave the table an organic rhythm, a steady, tactile presence beneath plates and glasses that invited hands to linger a moment longer.
Steps
- Select flat wood slices and sand surfaces lightly to remove rough spots.
- Create shallow grooves or cutouts for leaf-shaped inlays and place cured leaves into them.
- Seal the surface with a clear finish to preserve the wood and inlay.
- Position each charger beneath plates for a warm, natural base.
Cinnamon and clove pomander bouquet centerpiece

Stitched oranges studded with cloves and tucked into a bouquet of dried stems create a sensory focal point. I once sat as the bouquet slowly released a spicy citrus perfume that threaded the entire dining room, a quiet hum beneath conversation.
The glossy orange peels dotted with clove heads provided a pointillist texture, while the dried stems offered height and structure. The arrangement felt both rustic and refined, like a living ornament that steadily gave off warmth.
Guests often reached out to touch the orange’s dimples, commenting on the layered scent.
Steps
- Press whole cloves into oranges in decorative patterns, spacing them evenly across the surface.
- Tie a small cluster of dried stems and foliage and secure the pomanders within the bouquet.
- Arrange the bouquet in a low vase so the pomanders sit comfortably among the stems.
- Refresh the aroma by gently warming near a candle or warm room air if needed.
LED-lit twig arch to frame the centerpiece
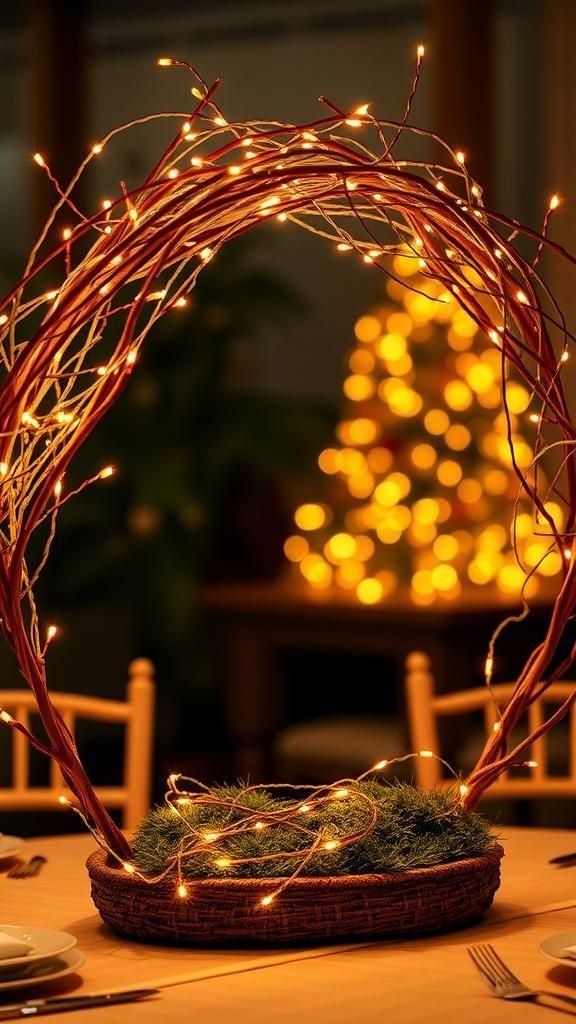
An arch of twigs threaded with tiny lights creates an intimate frame for the main centerpiece. I enjoy the way the lights pick out bark textures and make slender branches shimmer faintly.
The structure feels airy yet defined, a little architectural gesture that keeps focus in the middle without blocking sightlines. From different seats the arch offers shifting glimpses of the meal beneath, casting playful shadows across napkins and plates.
The overall effect is quiet illumination that enhances the table’s mood as the evening settles in.
Steps
- Gather slim flexible twigs and shape them into an arch on a stable base.
- Wrap tiny LED fairy lights evenly around the twig structure for gentle illumination.
- Secure the arch in a low container and surround the base with moss or small foliage.
- Center the arch over the main centerpiece to create a lit focal point.