I still remember sitting at the kitchen table with green construction paper and a mug of tea, folding and tracing shamrocks until my fingers smelled faintly of glue. Those little projects became a slow, happy ritual that brightened an otherwise quiet late winter afternoon.
St Patrick’s Day Shamrock Crafts have a way of turning small bits of scrap into something cheerful and a little bit magical.
Best Sellers


As an Amazon Associate, I earn from qualifying purchases.
This list grew out of those afternoons and a few experiments that went pleasantly sideways. Each idea here feels like a friendly nudge toward making something tactile and green, whether for a mantel, a classroom, or a rainy weekend at home.
Paper shamrock garland for a cozy mantel

The garland hangs like a soft green whisper across my mantel, each shamrock slightly different and warm to the touch. Thin paper feels delicate and crinkles gently when moved by a draft, catching the light in pale, leafy highlights.
There was something comforting about folding and tracing small heart-shaped leaves while the radio played quietly in the background. The rhythm of repeating motifs turned a simple string into a little procession of luck, and the color palette—deep forest to mint—made the whole room feel like an instant, tender nod to spring.
Steps
- Trace shamrock shapes onto green paper, making a handful in different sizes.
- Cut out each shamrock and make a small hole near the top of each leaf cluster.
- Thread twine through the holes, spacing shamrocks evenly along the length.
- Tie simple knots on each side of a shamrock to hold placement.
- Hang the garland across the mantel and let the pieces sway gently.
Felt shamrock brooches with a stitchy feel

These soft brooches have that handmade heft that invites a gentle squeeze. Wool-blend felt offers a velvety surface and the edges pick up the light in a way that feels tactile.
The little running stitches along the perimeter reminded me of a sweater’s cozy cuff, and the tiny button centers added an old-fashioned charm. Wearing one felt like carrying a private piece of the holiday in my lapel, a small green comfort that sparked compliments from strangers and family alike.
The palette ranged from moss to lime, each shade giving a different mood.
Steps
- Trace shamrock outlines onto felt and cut two matching layers for each brooch.
- Place a decorative button or bead at the center between the layers.
- Whipstitch around the edge to join the layers, leaving a small opening to add a bit of stuffing.
- Add soft stuffing to give a gentle puff, then finish stitching the opening closed.
- Affix a pin back with a few sturdy stitches to complete the brooch.
Clay shamrock magnets that feel pleasantly weighty

Freshly baked air-dry clay leaves the faint scent of the studio and a satisfying coolness under the fingertips. Each shamrock holds tiny thumb impressions near the stem, which I found oddly comforting.
The surfaces took paint in a way that emphasized tiny ridges and smoothed edges, and the magnets on the back gave them a practical life on the fridge. Seeing grocery lists held in place by these little green forms made everyday moments a touch more celebratory.
The mix of matte clay and glossy glaze offered a pleasing contrast in miniature.
Steps
- Roll small portions of air-dry clay into flat discs and press into shamrock shapes.
- Smooth edges with a damp fingertip and add faint vein impressions for texture.
- Allow clay to dry completely according to package instructions, then sand any rough edges lightly.
- Paint the shamrocks in shades of green and apply a protective glaze if desired.
- Attach strong magnets to the back with adhesive and press firmly to secure.
Watercolor shamrock greeting cards with soft washes

The paper still smells faintly of water and pigment, and each card feels like a little watercolor discovery. Light green washes pooled into soft gradients, and darker strokes suggested veins without being literal.
The deckled edges of the paper caught stray splashes in a way that felt intentional and relaxed. I remember sitting with a mug and letting the paint find its own path, then adding a tiny gold accent to catch the eye.
Sending one of these always felt like sending a small, hand-tended wish in an envelope.
Steps
- Fold heavyweight watercolor paper into card blanks and prepare a palette of green washes.
- Wet the shamrock shapes lightly and drop in varied green tones to create soft gradients.
- Add slightly darker lines to suggest veins and dab with a clean brush for highlights.
- Let the paint dry fully, then add a small metallic accent if desired.
- Write a personal note inside and slip the card into an envelope for mailing.
Shamrock suncatchers that glow in the window

Thin translucent sheets created a stained-glass effect that made my kitchen window feel sunnier even on a gray day. When the light hit, the colors warmed into jewel-like tones and tiny edges shimmered.
I enjoyed watching the shadows dance across the sill, little clover silhouettes marching with the sun’s angle. The sound of them clinking softly against the glass on breezy afternoons felt unexpectedly soothing.
Hanging several at different heights created a layered curtain of green that shifted with the day, lending the room a gentle, playful atmosphere.
Steps
- Cut shamrock outlines from transparent crafting sheets or colored vellum.
- Arrange pieces on a clear backing and adhere edges with a thin clear adhesive.
- Punch a hole at the top of each suncatcher and thread a length of fishing line.
- Tie the line securely and create a small loop for hanging.
- Suspend suncatchers in a sunny window and enjoy shifting colors throughout the day.
Button shamrocks with vintage charm and texture

A small pile of mismatched buttons became a tactile little landscape, glossy surfaces clicking against each other as I arranged them. The variation in size and sheen gave each shamrock an heirloom quality, like something stitched into a family keepsake.
Buttons with mother-of-pearl shimmer sat next to matte wood ones, and tiny threads peeked from some centers. Holding one up to light showed the layered silhouettes, and placing them on a tabletop felt like organizing a tiny, cheerful constellation.
They made delightful tabletop accents and carried a nostalgic warmth.
Steps
- Gather a collection of buttons in green shades and sort them by size.
- Arrange buttons into three connected leaf clusters on a backing material to form a shamrock.
- Secure each button to the backing with strong adhesive, working from the center outward.
- Add a small stem element at the base using a narrow button or fabric scrap.
- Allow the adhesive to set fully before displaying on a shelf or gifting.
Shamrock shadow box with layered paper depth

The shadow box felt like a tiny green theater, each layered piece creating a shallow landscape that changed as I shifted my angle. Paper of differing weights contributed subtle depth, and the play of light and shadow inside the frame made the leaves feel almost sculptural.
I enjoyed rearranging a few elements until the composition clicked, finding satisfaction in the way negative space balanced the clustered shapes. The finished piece had the quiet presence of a small artifact, perfect for tucking onto a bookshelf where it caught light and curiosity alike.
Steps
- Cut shamrock silhouettes from paper in several shades and weights for depth.
- Mount each layer onto narrow foam pads to create separation and arrange them inside the shadow box.
- Adjust spacing until the composition feels balanced, then secure layers with adhesive.
- Close the shadow box and check the piece under different lighting angles.
- Hang or prop the box on a shelf so it catches ambient light.
Pom-pom shamrocks with fluffy, playful texture
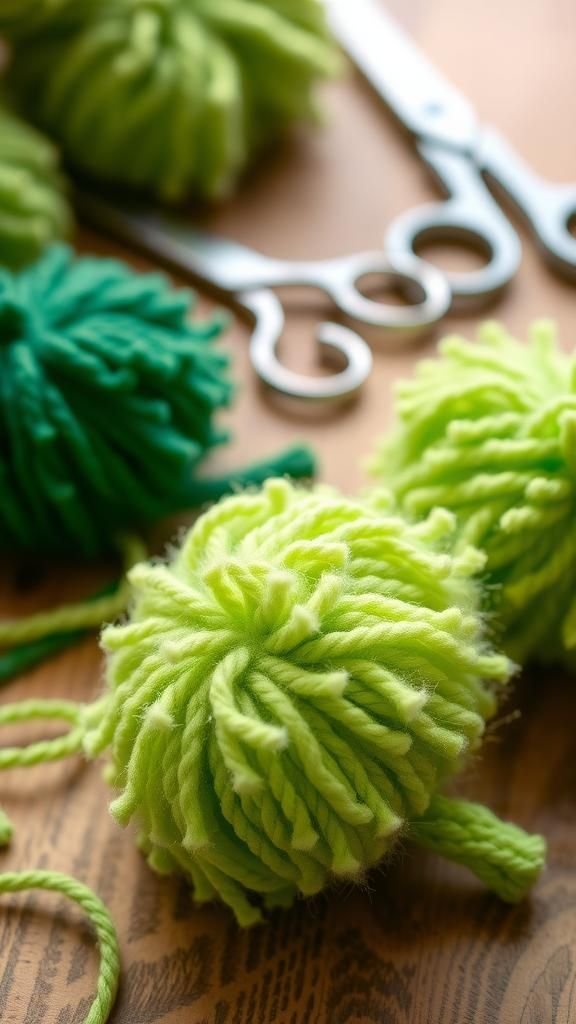
These felt like little green clouds pinned to a tabletop, and running fingers over the pom-poms sparked a childlike smile. The yarn fuzz caught the light and gave each leaf a halo of soft fibers, making the shapes read as both playful and very tactile.
Arranging three pom-poms into a clover felt absurdly satisfying, and adding a short stem grounded the buoyant trio. They seemed perfectly suited for a casual party setting or scattered among place settings, offering a whimsical softness that contrasted with sharper ceramic and glassware nearby.
Steps
- Wrap yarn around a pom-pom maker or cardboard to create dense pom-poms in matching sizes.
- Tie and trim the yarn bundles, then fluff each pom-pom to a round shape.
- Arrange three pom-poms together with a small stem piece and secure them with hot glue.
- Trim any stray fibers for a tidy appearance and add a small felt backing if needed.
- Place pom-pom shamrocks as table decorations or attach to a garland for a playful touch.
Embroidery hoop shamrock with charming stitches

The needlework sat snug within a small hoop like a miniature piece of embroidery theater. Satin stitches and tiny backstitches outlined each leaf, and the subtle sheen of thread caught the light in narrow bands.
I found the steady hand motion calming, and the slow buildup of texture felt importantly domestic in a comforting way. The piece looked lovely hung in a kitchen window, the circular frame echoing the warmth of old sewing rooms.
It had a quiet, earnest presence—like a small vintage badge about patience and color.
Steps
- Stretch a piece of fabric in an embroidery hoop and transfer a simple shamrock outline.
- Fill leaf areas with satin stitches in one or multiple shades of green.
- Add outline details with a backstitch or stem stitch for definition.
- Trim excess fabric and secure it neatly behind the hoop frame.
- Hang the finished hoop on a wall or prop it on a shelf as a small artwork.
Shamrock cookie cutters turned into clay ornaments

The unexpected repurposing of cookie cutters felt clever in a homely way, and the metal rim left a crisp, charming edge on each ornament. The clay captured tiny tool marks and bore a slight coolness before firing.
After glazing, the surfaces reflected light like miniature tiles, and hanging them from a jute loop made them feel at once festive and understated. I liked how everyday kitchen tools could be given a second life, producing small keepsakes that were both familiar and a little bit new.
Steps
- Roll out polymer or air-dry clay to an even thickness and press cookie cutters into the surface to form shamrocks.
- Smooth edges gently and add a small hole at the top for hanging.
- Bake or air-dry the clay according to material instructions and sand any rough spots.
- Paint or glaze the ornaments and allow them to dry fully.
- Thread a loop of jute or ribbon through the hole for hanging.
Shamrock plant markers for little indoor pots

A cluster of tiny plant markers poked from my herb pots like a secret celebration among leaves. Thin wooden sticks topped with small shamrock shapes introduced a playful contrast to the verdant growth.
The smooth wood had a faint, comforting scent that blended with the earthiness of soil, and the little green shapes brightened the rim of each pot. They felt practical and decorative at once, offering a small springtime personality to windowsill plants and making me smile during routine watering moments.
Steps
- Cut shamrock shapes from thin wood or sturdy cardstock and sand edges smooth if needed.
- Paint or stain each shamrock in shades of green and allow them to dry.
- Attach each shamrock to a slim wooden stake or skewer with a small dab of adhesive.
- Insert markers into potted soil at gentle angles so they remain visible.
- Group markers among herbs or houseplants for a cohesive, festive touch.
Shamrock candle holders with soft glow

The candlelight made little clover silhouettes flutter across the tabletop, turning the room into a gentle green-tinged space. Translucent cutouts allowed warm candle glow to seep through, while the holders’ edges caught light and shimmered softly.
There was a meditative quiet in watching the flicker reflect through leaf shapes, and the scent of beeswax added a faint honey note to the air. They felt well suited to an intimate dinner or a cozy corner, where the warm pool of light and patterned shadow invited slow conversation.
Steps
- Choose small glass votives and affix shamrock-shaped translucent decals or cutouts to the outer surface.
- Ensure decals adhere smoothly with no air bubbles and allow any adhesive to set.
- Place a tea light or small candle inside each votive and light carefully.
- Arrange holders on a heatproof tray or table surface with adequate ventilation.
- Extinguish candles responsibly when finished and allow holders to cool before moving.
Shamrock shadow puppets for a cozy evening show

The silhouettes seemed to come alive against the soft glow of a bedside lamp, each shamrock cutting a crisp dark shape that danced across the wall. Thin cardstock made the shadows bold and graphic, and the slight rustle of the stick handles added an oddly theatrical percussion to the performance.
I found a quiet happiness in crafting a tiny story around the motifs, improvising voices and little scenes. The effect was simple but immersive, turning a standard night into an intimate, story-rich moment where imagination took center stage.
Steps
- Cut shamrock silhouettes from sturdy dark cardstock and attach them to thin wooden dowels or sticks.
- Position a bright lamp or flashlight against a blank wall and stand between the light and wall to cast shadows.
- Move the puppets slowly to create different sizes and overlapping silhouettes.
- Combine multiple puppets for layered scenes and experiment with distances from the light source.
- Create short stories or scenes and perform a small shadow show for family or friends.
Shamrock table runner with patchwork charm

A patchwork table runner introduced a stitched green band that brightened the center of my dining table, and the mix of cotton prints felt both homey and intentional. Tiny shamrock patches varied in pattern—stripes, small florals, and solid hues—creating a lively, approachable texture across the fabric.
Running a hand over the seams revealed the rhythm of stitches and the snug joins where fabrics met. When plates and glasses were set atop it, the runner provided a soft, festive spine for the meal, tying mismatched tableware together in an unpretentious way.
Steps
- Select assorted green fabrics and cut shamrock appliqué shapes in coordinating sizes.
- Arrange the shamrocks along a long backing fabric to create a balanced composition.
- Baste or pin each shamrock in place and sew around the edges with a decorative stitch.
- Quilt or add batting and backing fabric if a padded runner is desired, then bind the edges.
- Press the finished runner gently and place it down the center of the table.
Shamrock lantern jars for gentle porch light

Mason jars transformed into soft beacons with tiny shamrock silhouettes clustered around their glass. The warm glow from inside softened the green forms and cast friendly patches of colored light across the porch floor.
There was a quiet satisfaction in seeing ordinary jars take on a seasonal character and in watching the way the light pooled through thicker paint layers. Placing them along steps created a welcoming line, and the subtle movement of flame reflected against the glass had a calming, almost ritual quality on cool evenings.
Steps
- Clean mason jars and apply shamrock-shaped stencils or paint designs around the glass exterior.
- Allow any paint to dry fully according to manufacturer guidance before handling.
- Place a battery-operated candle or tea light inside each jar for safe illumination.
- Arrange jars along the porch or steps, ensuring stable, level placement.
- Bring jars indoors during inclement weather to preserve decoration longevity.
Shamrock napkin rings that feel casually festive
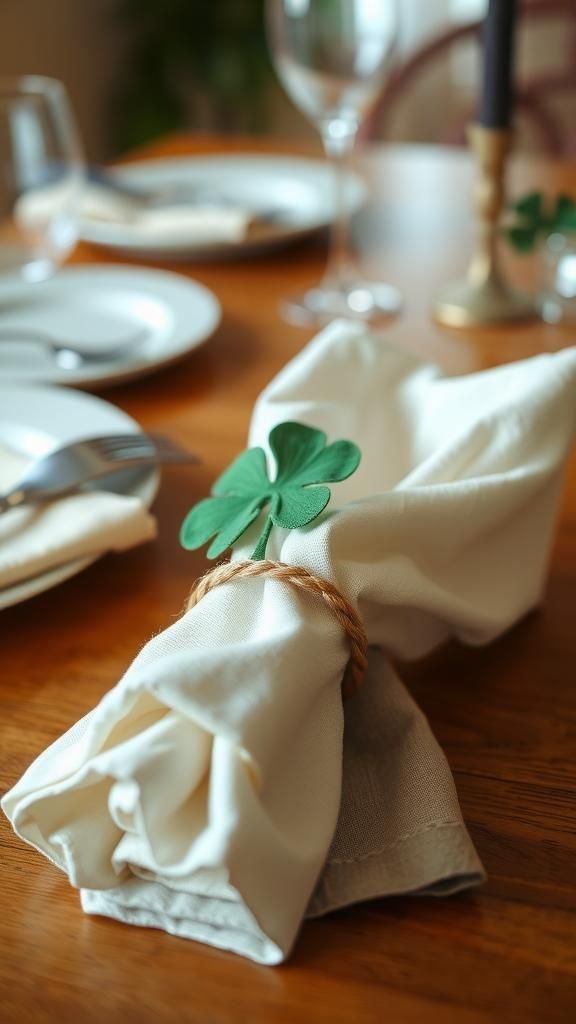
Simple napkin rings added a small flourish to dinner settings without feeling fussy. The clover motif rested lightly atop linen folds and gave the table a handtouched cadence.
The texture of braided twine or thin leather contrasted pleasingly with the softness of cloth, and the green motif made the arrangement feel both seasonal and welcoming. Watching guests pick up a napkin and smile at the tiny detail made hosting feel more personal, as if each place setting carried a short, friendly note from the host.
Steps
- Cut shamrock shapes from sturdy cardstock, thin wood, or felt to create decorative toppers.
- Thread a ring of twine, ribbon, or narrow leather through or behind each topper to form a napkin ring.
- Secure the ends of the ring with a small knot or stitching for a neat finish.
- Slide napkins through the rings and arrange them at each place setting.
- Adjust rings so the shamrock motif sits prominently on top of the napkin fold.
Shamrock stencil tote with wearable cheer

The canvas tote picked up the shamrock imprint with a satisfying flatness that felt modern and approachable. The crisp edges of the stencil produced a graphic motif, while a slightly imperfect inking gave the piece personality—far from factory-perfect.
Carrying the bag added a small nod to the season during errands, and strangers often offered knowing smiles. The fabric had a cool, slightly rough weave against the palm, and the green print contrasted neatly with the neutral canvas.
It felt like wearable craft that kept its quiet, practical dignity.
Steps
- Position a shamrock stencil on a plain canvas tote and secure it to prevent shifting.
- Dab fabric paint through the stencil with a sponge or brush to build an even layer.
- Allow the paint to dry fully and heat-set according to paint instructions for durability.
- Remove the stencil carefully to reveal the crisp shamrock image.
- Fold and store the tote until ready for daily use or gifting.
Shamrock wine glass charms for party conversation

Tiny charms looped around stems like delicate jewelry, and each little clover added a playful identity to a guest’s glass. The soft metallic glint of wire and the matte of tiny clay or felt shamrocks created a pleasant textural interplay.
They invited a lighthearted exchange as guests compared designs, and the charms made it unexpectedly easy to keep track of glasses during lively evenings. Holding one between finger and thumb revealed the careful handwork and the small scale of the object, which made it feel like a personable keepsake from the night.
Steps
- Fashion small shamrock charms from polymer clay, felt, or lightweight beads in green tones.
- Thread each charm onto a jump ring or a small loop of flexible wire.
- Close the loop securely so the charm can slide onto a wine glass stem.
- Create multiple unique charms so guests can choose their favorite.
- Present the charms near the glassware for easy selection at a gathering.
Shamrock paper lanterns for a gentle overhead display

The lanterns bobbed slightly when a door opened, creating soft movement overhead and a playful pattern of green on the ceiling. Lightweight paper had a quiet rustle and diffused warm light into the room, making the atmosphere feel intimate and festive.
Folding created crisp edges that caught shadow and the assembled array suggested the feel of a canopy. I liked how they transformed ceiling space into a decorative field, and arranging heights added an organic, slightly whimsical rhythm to the room that felt both planned and pleasantly relaxed.
Steps
- Assemble or purchase paper lantern frames and select coordinating green tissue or thin paper panels.
- Cut shamrock shapes from colored paper and adhere them to the lantern surface in a balanced arrangement.
- Install LED lights inside each lantern to provide gentle, safe illumination.
- Suspend lanterns at varied heights from the ceiling using clear fishing line.
- Adjust placement until the overhead display feels harmonious and evenly spaced.
Shamrock keychains that feel pocket-sized and sweet

A tiny shamrock swung from my keys like a small talisman, and reaching for the door always felt a touch more cheerful. Polymer clay and leather both offered compact durability, while small metal rings added a reassuring heft.
The charm’s texture, whether matte or slightly glossy, made it easy to find in a bag by touch alone. It became a tiny conversation starter when friends noticed the motif, and I appreciated the way something so small could carry a bit of personality into everyday routines.
Steps
- Create small shamrock shapes from polymer clay or cut them from leather for durable charms.
- Bake clay charms or treat leather according to material care to set the shape.
- Attach each shamrock to a sturdy key ring with a jump ring or small hardware loop.
- Add a bead or tiny tag for personalization if desired.
- Clip the finished keychains to keys or a bag and enjoy the small decorative detail.
Shamrock candle wax melts in comforting scents

The wax carried faint notes of citrus and clover as it sat unlit, and melting a single shamrock released a gentle, room-filling aroma. The tiny leaf shapes looked like edible sweets and felt satisfying to arrange on the counter.
The wax’s smooth surface caught the light with a soft sheen, and choosing a scent became a small domestic ritual. They offered a quiet way to bring seasonal scent into the home without overwhelming, and the melted pools left behind a warm, honeyed memory in the tray.
Steps
- Melt soy or beeswax flakes gently and stir in fragrance oil chosen for a light, fresh scent.
- Pour the scented wax into shamrock-shaped silicone molds and allow to cool completely.
- Remove the solidified wax melts and trim any small imperfections.
- Place a wax melt into a wax warmer to release fragrance without an open flame.
- Store unused melts in a cool, dry container away from direct sunlight.