Disclosure: This post contains affiliate links, which means we may earn a commission if you purchase through our links at no extra cost to you.
I always look forward to the small, slow ritual of painting eggs each spring. There’s something calming about choosing colors, testing patterns, and watching a plain shell turn into a tiny piece of seasonal art.
Painted Easter Egg Craft Ideas feel like a mix of childhood nostalgia and grown-up play, and I find myself lingering over tiny brushes and scattered jars of pigment.
Over the years I’ve tried many painted Easter egg approaches, from whisper-soft washes to bold metallics. These ideas are a collection of favorite looks and little surprises that made me smile while working at a sunlit kitchen table or on a rainy afternoon.
Table of Contents
Polka dot eggs with playful retro charm

I love how a simple grid of round dots makes an egg look dressed up and cheerful. The glossy contrast between a matte base and raised paint dots always catches my eye, and fingernails brushing a tiny bead of paint feels oddly satisfying.
I remember making a dozen of these while chatting with a friend, the steady tap of brush handles against jars like a small drum. Light bounces differently off each dot, and the tactile beads invite little smiles from children passing by the table.
Steps
- Paint an even base color across the eggshell and allow the surface to dry fully.
- Dip a round-tipped tool or end of a brush into contrasting paint and press gently to create consistent dots.
- Repeat dot placement around the egg until the pattern feels balanced from every angle.
- Let the dots cure completely, then apply a clear protective sheen if desired.
Soft watercolor wash eggs like delicate blossoms

Watercolor washes turn eggs into dreamlike little landscapes where colors fade and mingle along the curve. I usually stand by the sink, watching pigments pool and then whisper away, leaving gentle gradients that resemble painted petals.
The shells feel silky under fingertips once the paint dries, and the faint streaks of dye add a fragile quality that makes each piece feel handmade and intimate. Those muted tones look especially sweet when arranged in a shallow bowl lined with linen, the whole grouping resembling a miniature floral bouquet.
Steps
- Prepare watery paint mixtures with diluted pigments to achieve translucent shades.
- Apply a light wash across each egg surface using a soft brush and allow pigment to settle into subtle gradients.
- Layer additional translucent washes for depth, letting previous layers dry between applications.
- Finish with a gentle matte or satin varnish to preserve the delicate look.
Shimmery metallic eggs that catch the light

There’s a small thrill when an ordinary egg suddenly gleams like a tiny treasure. Metallic finishes reflect light in streaks and halos, turning a cluster of eggs into a sparkling vignette on a tabletop.
When I arrange bronze, gold, and pewter tones together, the contrast between warm and cool metals makes each piece feel intentional. The surface often holds faint brush marks that look charming up close, and the metallic sheen plays beautifully with soft candlelight or a sunny windowsill on a crisp morning.
Steps
- Apply a smooth base coat suitable for metallic paints and let it dry thoroughly.
- Brush metallic paint over the base in thin, even layers to build up reflected sheen.
- Add gentle highlights or antiquing with a darker metallic or glaze for visual depth.
- Seal with a clear satin or glossy varnish to enhance reflective qualities.
Marbled eggs with swirling ink-like patterns

Marbled patterns always feel a touch theatrical, as if each egg holds a little galaxy. Watching pigments swirl and nestle against one another is quietly mesmerizing; the colors fold together in unexpected ways and every shell ends up with its own personality.
I find myself tracing the veins and swoops with a fingertip, marveling at how glossy ridges catch the light. These eggs work wonderfully paired with deep jewel tones or soft neutrals, and their organic lines lend a pleasing chaos to an otherwise tidy spring display.
Steps
- Prepare a shallow tray with a base of liquid medium suitable for marbling.
- Drip different paint colors onto the surface and use a thin tool to swirl them gently.
- Lower each egg onto the colored surface, lift carefully to reveal marbled patterns.
- Allow excess medium to drip away and let eggs dry on a rack before finishing.
Wax-resist batik style for delicate linework

The cracked, fine-line look of wax-resist eggs always feels a little magical. Beeswax lines create tiny borders where color doesn’t reach, leaving a lacy, aged effect that invites closer inspection.
I like the slow reveal when wax is removed and hidden patterns emerge, the contrast between smooth painted fields and matte wax lines offering a lovely tactile interplay. These eggs have an old-world, handcrafted sensibility that pairs well with dried grasses and linen, making a simple arrangement feel thoughtfully curated and quietly nostalgic.
Steps
- Draw delicate patterns on the eggshell with melted wax using a fine-tipped tool.
- Apply dye or paint over the waxed shell, allowing colors to sit and develop.
- Gently warm and remove the wax to reveal contrasting linework beneath.
- Buff the surface lightly to enhance sheen and display patterns clearly.
Pressed florals and paper decoupage for sweet detail

Tiny pressed flowers and paper motifs bring an heirloom softness to eggs, each petal adhered like a miniature postcard. I remember pausing to pick the smallest blooms from a neighbor’s garden, arranging them as if composing a micro bouquet.
The results feel fragile and gentle, the edges of petals creating soft shadows on the curved shell. When lined up, the eggs become a kind of botanical display, every bloom telling a small story.
The tactile contrast between silky petals and the smooth shell surface is always satisfying to notice.
Steps
- Choose delicate pressed flowers or thin paper motifs and arrange them gently on the egg surface.
- Apply a clear adhesive layer over the egg and smooth the motif into place with minimal pressure.
- Seal the entire surface with a protective clear coat to hold the floral detail.
- Allow to cure fully before handling to preserve delicate textures.
Speckled robin’s egg finish for natural charm

Those little speckles bring a dash of wildness to an otherwise smooth shell. I enjoy experimenting with tiny flicks and sprays that land like pollen, and the randomness always makes me smile.
When clustered together, speckled eggs evoke the tidy chaos of a bird’s nest tucked into a branch. The tactile variance from flat background to raised flecks creates a playful contrast, and the palette of soft blues and sandy browns feels unexpectedly soothing on a spring morning.
Steps
- Paint or dye the eggs with a soft base color and let them dry completely.
- Load a small brush or toothbrush with contrasting paint and flick or spray tiny specks across the surface.
- Rotate the egg to create an even distribution of speckles and allow paint droplets to dry.
- Finish with a gentle sealant to protect the speckled surface.
Soft ombré eggs that graduate color beautifully

There’s a quiet satisfaction in seeing color fade serenely from one tone into another along a curved shell. Ombre eggs feel like small studies in patience, with gradients that read differently from each angle.
I like holding an egg to the light and watching the hue shift, the midpoint where two colors meet often revealing accidental harmonies. Grouping eggs in a gradient lineup makes for a soothing centerpiece, the gentle transitions resembling a tiny sunrise captured in paint and pigment.
Steps
- Apply a light base tone across the entire egg to create uniform coverage.
- Add a darker shade at one end and blend toward the middle with soft, overlapping strokes.
- Soften the transition by layering thin washes until the gradient appears seamless.
- Let the ombré cure thoroughly before displaying.
Galaxy eggs with starry depths and nebulous swirls

I never grow tired of tiny cosmic scenes on eggshells; deep inky blues and iridescent touches make them feel like miniature planets. The contrast between speckled stars and smooth nebulas invites close inspection, and a single egg can look different under warm lamp light versus daylight.
Painting these late at night with a cup of tea nearby became a small ritual, the quiet punctuated by the soft clink of glass jars. They sit well in dim corners where their metallic flecks catch glints like distant constellations.
Steps
- Create a dark base of deep blues and blacks on the eggshell and allow it to dry.
- Layer in lighter blues, purples, and tiny touches of metallics, blending edges for a nebula effect.
- Flick white paint gently across the surface to form star-like speckles.
- Finish with a clear gloss to enhance depth and shine.
Matte chalkboard eggs for doodling and messages
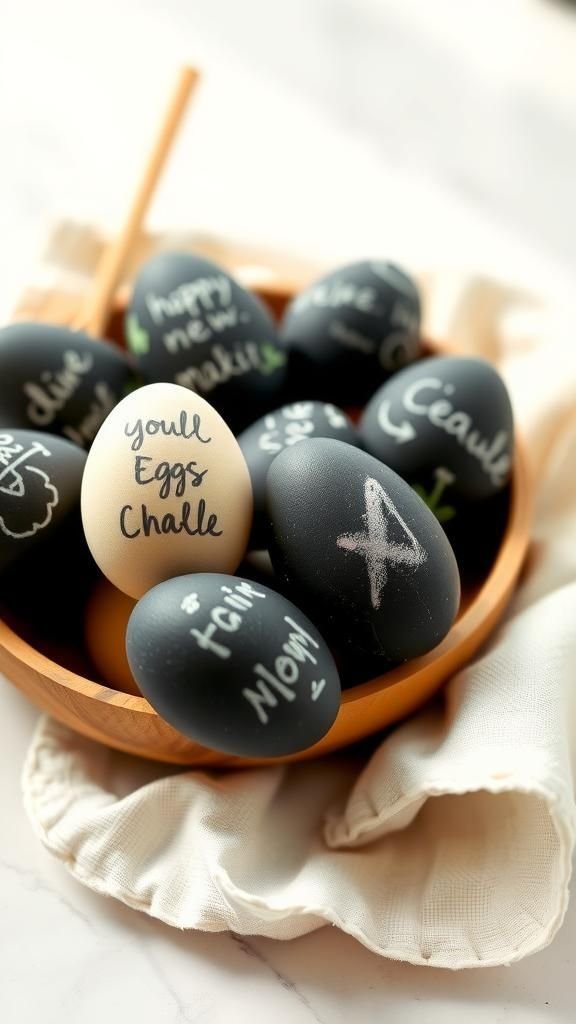
There’s a playful, interactive quality to eggs that take chalk like tiny canvases. I enjoy scrawling quick greetings and doodles that can be changed at a moment’s notice.
The matte surface absorbs pastel chalks and leaves a soft, velvety finish under the fingertips. Children particularly like the ability to redraw faces or hearts, and the tactile chalk dust on fingers brings back slipper-socked afternoons around the kitchen table.
When clustered with linens and wooden bowls, these eggs add a quaint, homespun touch.
Steps
- Apply a matte black base coat formulated for a chalkboard finish and let it dry thoroughly.
- Lightly rub chalk over the surface and then erase to season the finish for drawing.
- Draw designs or messages with colored or white chalk directly on the eggshell.
- Wipe clean with a soft cloth to change designs as desired.
Crisp geometric tape-resist patterns, modern and bold

Geometric tape-resist patterns bring a clean, contemporary edge to egg decorating. The sharp lines contrast beautifully with the organic curve of an egg, and the satisfaction of revealing crisp shapes is oddly akin to unwrapping a small present.
I like arranging triangles, stripes, and chevrons in a palette of two or three colors for a chic effect. The interplay of matte and glossy finishes adds visual interest, and when grouped in a minimalist bowl, those linear compositions feel surprisingly architectural and pleasing to the eye.
Steps
- Mask off sections of the egg with narrow tape to create desired geometric shapes.
- Apply paint over exposed areas, allowing each color layer to dry before adding another.
- Remove tape carefully to reveal sharp, crisp lines and patterns.
- Touch up edges lightly if needed and protect with a clear coat.
Stenciled floral motifs for delicate springtime scenes
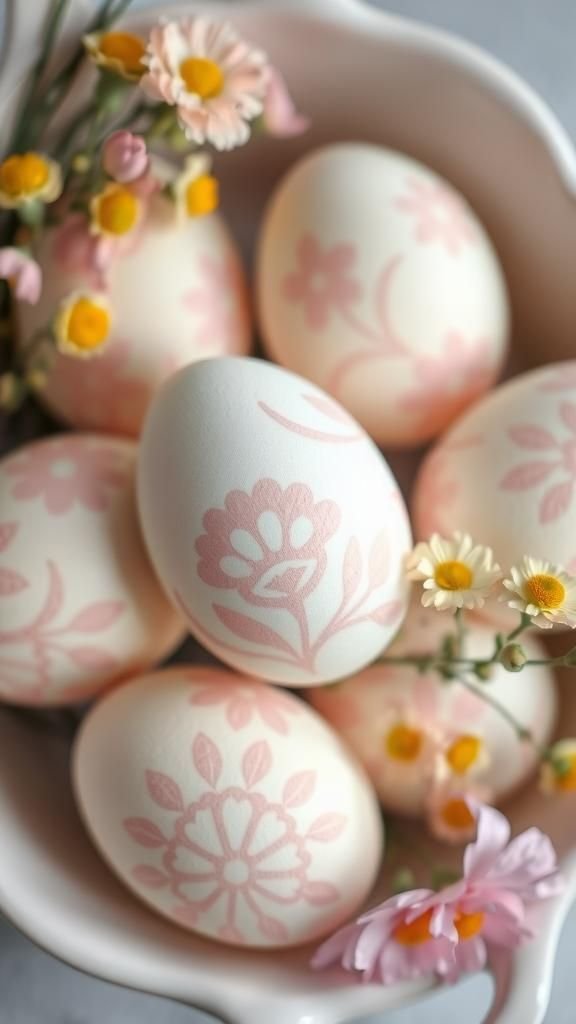
Stenciled flowers add an instant sense of refinement, like mini canvases of botanical illustration. I enjoy choosing tiny motif shapes and arranging them to curve with the egg’s form, the repetition creating a soothing rhythm.
The edges of a stencil often leave a soft halo where paint settled, which looks charming rather than perfect. When a bowl includes several floral patterns, the whole display reads like a small garden, and the gentle scent of drying paint mixed with fresh-cut flowers nearby makes the moment feel complete.
Steps
- Position a small stencil against the eggshell and secure it gently in place.
- Dab paint lightly over the stencil openings with a sponge or stiff brush for crisp shapes.
- Remove the stencil and allow the motif to dry before adding additional layers or colors.
- Seal the surface to protect the stenciled design.
Hand-lettered calligraphy eggs for poetic spring notes

There’s something quietly charming about tiny script curling across a curved shell. I used to write short greetings and little one-word sentiments and was surprised how expressive a single flourish could feel.
The contrast between thin upstrokes and heavier downstrokes brings motion to a still object, and a close look reveals the subtle wobble of a human hand, which I find endearing. These eggs feel personal, like hand-delivered notes, and nestled in a basket they read like a small collection of wishes.
Steps
- Choose a fine-tipped pen or brush and practice lettering on paper to plan spacing.
- Lightly sketch words on the eggshell if needed, then trace over with ink or paint for permanence.
- Allow ink to dry fully and add tiny decorative flourishes around words for balance.
- Apply a clear sealant to protect delicate lettering.
Glitter-dipped eggs for a dash of festive sparkle

A cascading band of glitter along the tip of an egg brings instant party personality. I like the tactile crunch of fine glitter juxtaposed with the smooth shell, and the way light hits those tiny facets feels celebratory.
Arranging a few glittery eggs among matte neighbors creates a pleasing contrast, and the sparkle reflects nearby colors, pulling the whole display together. There’s a bit of joyful mess to the process, which made some afternoons feel playfully rebellious, fingers dusted in shimmer long after the table was cleared.
Steps
- Apply an adhesive band around the area chosen for glitter and ensure it is tacky.
- Roll or sprinkle fine glitter onto the adhesive until the area is fully covered.
- Gently tap away excess glitter and press down any loose flakes for adhesion.
- Seal with a clear protective spray to minimize shedding over time.
Mosaic eggs using crushed shell pieces for texture
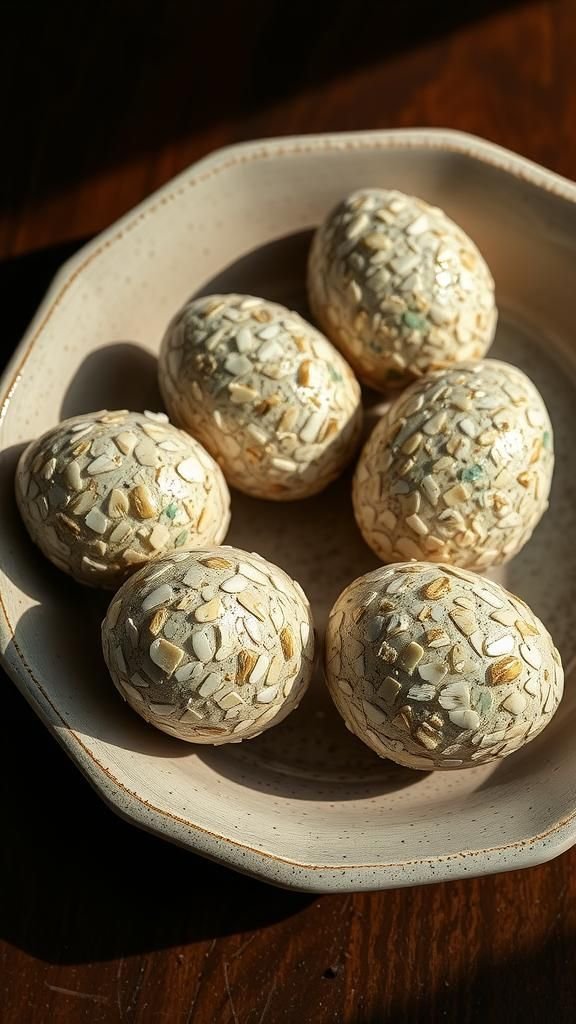
Mosaic eggs feel like miniature stained-glass windows rendered in shell and color. Tiny fragments catch light and create a tactile, jewel-like surface that begs a gentle touch.
I once sorted shells by hue and spent an afternoon fitting fragments like a puzzle; the slow work was oddly meditative. The broken edges create miniature ridges that shimmer when sunlight passes over them, and when arranged on a dark tray the whole group feels like a collection of tiny relics from a seaside crafting day.
Steps
- Break eggshells into small mosaic pieces and sort them by color for composition.
- Apply adhesive to the base shell and press mosaic pieces into a planned pattern.
- Fill gaps with a fine grout or sealing medium for cohesion and clean excess material.
- Allow the mosaic to set fully before polishing surface edges gently.
Antique wallpaper transfer for vintage-inspired eggs

Transferring tiny motifs from aged wallpaper gives eggs an old-fashioned elegance. Those faded florals and delicate scrolls read like miniature pages torn from a bygone room, and the slight patina of transferred ink lends quiet history to each piece.
I once rescued scraps of patterned paper from a flea market and found that tiny motifs fit an eggshell perfectly, creating a nostalgic charm. When clustered with lace and brass accents, the eggs look like collectibles from an attic, bringing a warm hush to a spring display.
Steps
- Cut small motifs from thin patterned paper or wallpaper and arrange them for composition.
- Apply a transfer medium to the eggshell and smooth motifs into place, ensuring contact.
- Remove paper backing gently if using a water-transfer technique to reveal the transferred pattern.
- Seal the surface to protect the delicate vintage look.
Plant-dyed and onion-skin eggs for earthy tones
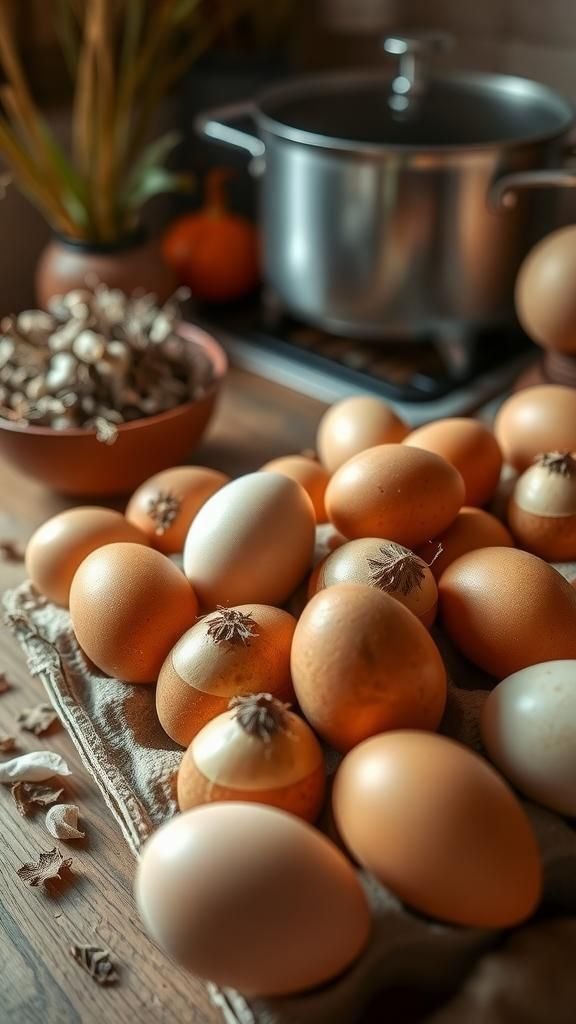
Dyeing with plant materials yields subtle, organic hues that feel like the earth’s own palette. Onion skins, tea, and beet peels leave soft stains that read as warm umbers and rusty oranges, while greens from leaves create pale mossy tints.
I love the slow unpredictability of this method, where each egg develops a personality and the smell of simmered plant matter lingers faintly in the kitchen. When displayed on a bed of dried grasses, these eggs read like a natural study in gentle, muted color.
Steps
- Simmer chosen plant materials in water to extract natural pigments and allow the liquid to cool.
- Submerge eggs in the strained dye bath until the desired shade is reached.
- Remove eggs and pat dry gently on absorbent cloths to reveal final tones.
- Optionally rub with a little oil to bring out a soft sheen and protect the surface.
Cute animal face eggs for playful table companions

Tiny painted faces transform eggs into delightful characters that make a table feel friendlier. I remember my niece giggling as a cluster of bunny and chick faces seemed to mingle like a miniature barnyard.
The roundness of the shell lends itself well to expressive eyes and tilted smiles, and the small imperfections in hand-drawn features add charm. When mixed with simple props like paper ears or felt beaks, these eggs become conversation starters that invite small hands and big smiles around a sunny brunch spread.
Steps
- Sketch simple facial features lightly with a pencil on the eggshell for placement.
- Paint or ink eyes, noses, and mouths with fine-tipped tools to add character.
- Add tiny accessories such as paper ears or felt beaks for dimensional charm.
- Seal gently to protect painted features while keeping textures soft.
Glow-in-the-dark eggs for a midnight surprise

Glow-in-the-dark finishes add a playful nocturnal twist, turning ordinary eggs into tiny lanterns once the lights go down. I once left a cluster on the mantel and returned after dusk to find them emitting a soft, ghostly glow that felt magical in a low-lit room.
The daytime appearance is often subtle, but after a spell under a lamp they shine with pale green or blue luminescence. The effect is always met with delighted curiosity, and the soft glow creates a whimsical hush on an evening shelf.
Steps
- Apply a light base coat compatible with glow pigments and allow it to dry.
- Brush on glow-in-the-dark paint in even layers, building intensity with each coat.
- Charge the painted shells under strong light, then turn out lights to view glowing effect.
- Store away from direct sunlight to preserve brightness over time.
Confetti-splattered eggs for carefree colorful fun

Splattered confetti patterns read as exuberant and carefree, like a tiny celebration captured on shell. I enjoy the unpredictability of scattered dots and the lively energy they lend to a display.
Fingers always end up with a hint of color, and the table looks untidy in the most inviting way—bright flecks on parchment, a stray smear or two. These eggs pair wonderfully with simple white linens, the random bursts of pigment turning an otherwise quiet arrangement into something playful and youthful.
Steps
- Prepare vibrant paint colors in small cups for easy access.
- Flick paint onto the egg using a loaded brush or a splatter tool to create random confetti marks.
- Rotate the egg to achieve coverage across the entire surface as desired.
- Allow splatters to dry fully and seal with a clear coat if needed.
Lace-imprinted eggs for romantic, textured patterns

Pressing lace or fabric against a painted shell leaves delicate, intricate impressions that read as soft and romantic. I once borrowed an old lace doily and loved how tiny floral motifs translated into elegant shadows and textures on eggs.
The contrast between the shell’s smooth curve and the lace’s fine netting produces a gentle tactile difference that feels almost textile-like. When scattered among pastel ribbon and soft greenery, these eggs create a refined, feminine vignette that quietly echoes vintage table settings.
Steps
- Lay a piece of fine lace over a damp painted surface to transfer texture.
- Press gently so the lace pattern makes contact without shifting, then remove carefully.
- Touch up any faint areas with a small brush if needed and let dry.
- Seal the eggs to preserve the delicate lace-imprinted texture.