I remember first playing with felt without any thread or needle and feeling oddly triumphant. There was something oddly cozy about soft felt under my fingertips, bright colors strewn across the table and simple shapes coming together with just a dab of adhesive.
That early afternoon sparked a long run of easy projects and quiet afternoons crafting without a sewing kit.
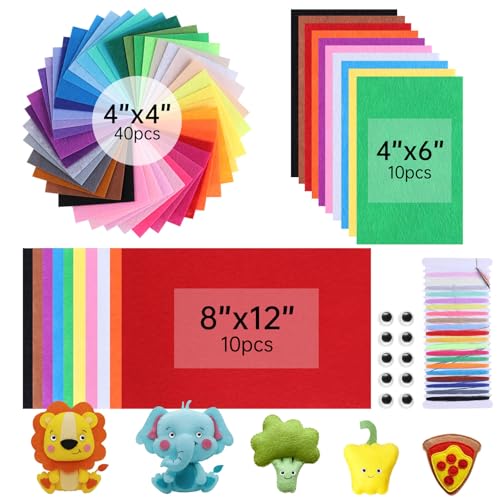
Best Sellers

As an Amazon Associate, I earn from qualifying purchases.
No Sew Felt Craft Ideas kept becoming a personal go-to for gifts and last-minute decorations. These ideas have lived on my shelf, in gift bags, and perched on my bookshelf, always ready when a quick, tactile project is needed.
Fuzzy heart bookmarks with tassel and charm
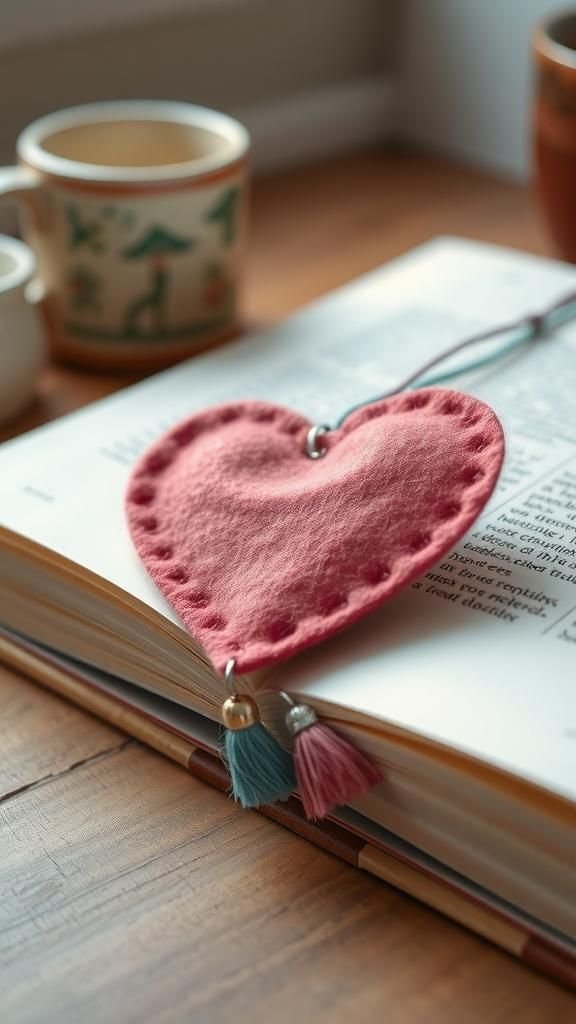
I have optimistic memories of keeping a warm cup nearby while slipping one of these little hearts between pages. The felt feels plush beneath fingertips, and the tiny tassel adds a whisper of movement when a book is pulled from a shelf.
Colors range from dusty rose to teal, each hue soft against the book spine. A small charm gives a quiet personality, jangling faintly when the book is shifted.
These bookmarks often end up as small, thoughtful gifts that arrive with a coffee stain on the corner of a note.
Steps
- Trace a heart shape onto doubled felt layers, then cut through both layers with sharp scissors to create matched pieces.
- Sandwich a short length of tassel loop between the top edges, then apply a thin bead of clear craft adhesive around the perimeter to bond the layers together.
- Press gently along the edges until the adhesive sets, allowing the heart to hold a plump, slightly raised profile.
- Thread a small decorative charm onto the tassel loop before final setting.
Playful animal fridge magnets for hands-on kitchens

These little animal faces have a habit of brightening the fridge and commandeering the grocery list. Felt lends a snuggly matte finish and a slight fuzz that invites a fingertip poke.
A hedgehog’s tiny felt quills show neat layering while a fox’s rusty orange feels warm against the jolt of stainless steel. The magnets click silently, and each piece catches morning light differently, the stitchless edges looking cozy rather than polished.
They’ve become an informal family language; a red bird can mean ‘remember bread’ without a word said aloud.
Steps
- Draw simple animal silhouettes onto felt, then cut each shape precisely with scissors.
- Layer contrasting felt details for facial features and secure them with a clear craft adhesive, holding briefly until they stay put.
- Adhere small disc magnets to the back with a strong bonding glue and allow full cure before placing on metal surfaces.
- Group a handful in an open tray so little hands can rearrange them at will.
Mini felt succulents in tiny clay pots
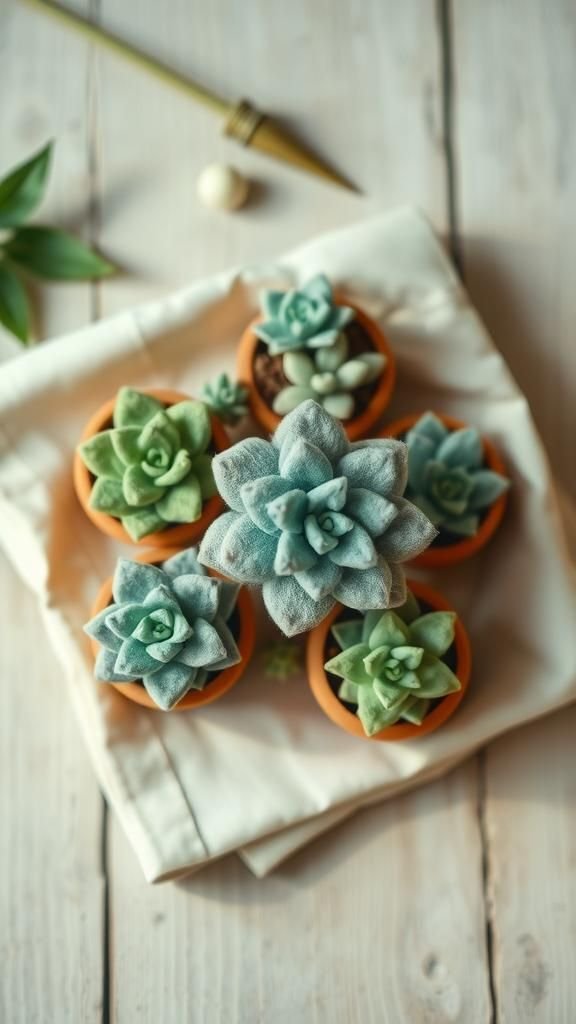
There’s a little satisfaction in having green without the guilt of watering. The felt petals have a velvet softness that mimics plump succulent leaves, and the palette moves from pale sage to deep forest in a calm, reassuring way.
Tiny pots cradle the felt arrangement, and the contrast between the ceramic coolness and soft felt is pleasing to the touch. These pieces sit on windowsills and bring a pinch of quiet color to work desks.
Close up, the layering looks almost like real plants; from afar they read as playful, handcrafted greenery.
Steps
- Cut leaf shapes from multiple shades of green felt and arrange them in overlapping rings to form a rosette.
- Attach layers with small dots of fabric adhesive at points of overlap so the petals hold their rounded shape.
- Fill a mini clay pot with a bit of filler or pebbles, set the felt succulent on top, and press gently so it sits snugly.
- Allow adhesive to cure fully before placing on display.
Soft felt garland with geometric shapes

This garland has been the go-to for adding a gentle mood to a room without shouting for attention. Felt triangles and circles lie flat with a soft matte finish, and the gentle color transitions are pleasing across a mantel or nursery wall.
The texture feels velvety under the hand and the shapes swing with a slow, sleepy grace in a draft. It often hangs above a reading nook where the movement catches a stray beam of light.
At parties it becomes an understated backdrop that invites compliments rather than stealing the show.
Steps
- Cut multiple geometric shapes from sheets of felt in a coordinated color palette, keeping edges neat.
- Arrange the shapes in the desired order on a flat surface, leaving small gaps between each item.
- Apply small dabs of craft adhesive to the back center of each shape and press onto a length of cord or twine, allowing space for gentle movement.
- Let the garland lie flat until adhesive cures before hanging.
Whimsical felt keychains with tiny pom details
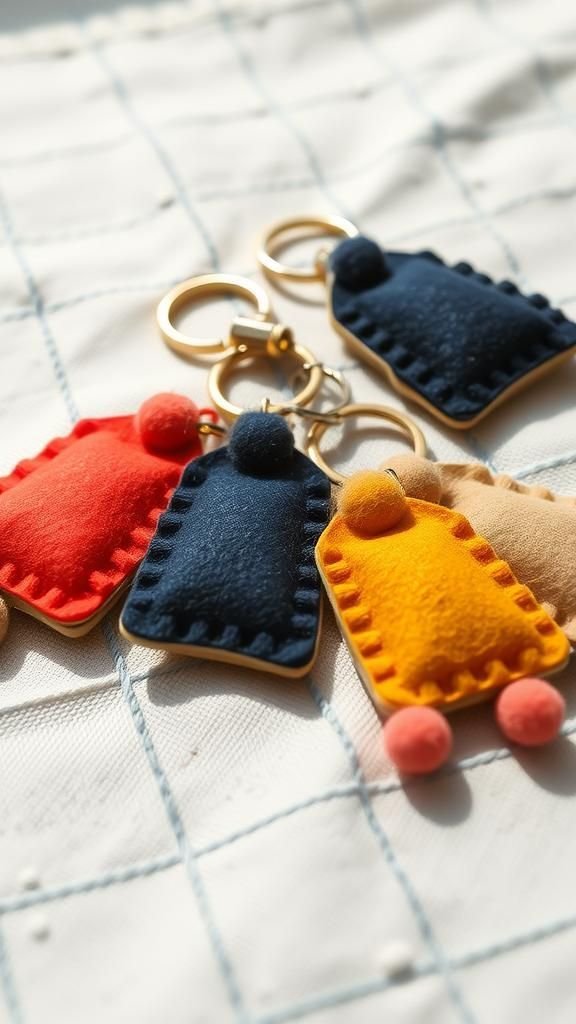
Keychains made from felt tend to soften the jangling of keys and add a pinch of personality to an everyday routine. The felt feels pleasantly pillowy in the palm, and tiny pom accents add a bouncy texture that makes reaching into a bag a moment of small delight.
Color combinations can be bold or muted, and metallic key rings offer a cool contrast to the warm felt. These have been gifted as little reminders of trips and inside jokes, often clipped to backpacks where they collect tiny scuffs and stories.
Steps
- Trace a chosen motif onto felt and cut out two matching layers for each keychain.
- Sprinkle a tiny tuft of fiber or a small pom between layers near the top, then apply craft adhesive around the edge to seal.
- Press a split key ring into the top edge before adhesive firms, ensuring the ring sits snugly.
- Allow a thorough cure time so the pieces hold up to daily handling.
Dreamy felt cloud mobile for sleepy corners

I have memories of watching this kind of little sky drift slowly above a crib while the room filled with quiet afternoon light. The clouds are cushy to the touch, and tiny felt raindrops sway with an almost hypnotic patience.
Soft greys and muted blues read as calming, and a hint of glitter felt can add a flecked shimmer without feeling showy. The way light filters through and sketches shadows on the wall below gives the whole scene a gentle movement that makes the space feel softer and more intimate.
Steps
- Cut cloud shapes from white and pale grey felt, keeping edges smooth and rounded.
- Suspend small teardrop felt pieces from the cloud base using fine thread, securing each connection with tiny drops of adhesive at the knots.
- Fix a lightweight loop to the top of the main piece for hanging and balance the lengths so the mobile hangs evenly.
- Hang the mobile in a calm area and test for gentle sway.
Button-eyed felt plushies with rounded charm
These small plush shapes feel like pockets of comfort on a shelf. The felt surface has a muted richness that invites a gentle squeeze, while little button eyes add personality and a hint of nostalgia.
Colors are often warm and approachable, and the form language is deliberately forgiving, with rounded limbs and friendly faces. They sit as tabletop companions, sometimes collecting a stray toy soldier or two.
I often find one perched on the window ledge, slightly leaning as if taking in the afternoon street noise.
Steps
- Draw a simple plush outline onto doubled felt and cut carefully to create matching front and back pieces.
- Place small features like button eyes or layered felt shapes on the front piece and secure with fabric adhesive.
- Add a small amount of stuffing between the layers, then bond the edges with a line of strong adhesive to close the seam.
- Shape the plush gently as the adhesive firms to keep a rounded silhouette.
Seasonal ornaments with layered felt motifs

I love the idea of a slow rotation of ornaments that return every year, each carrying a small, quiet memory. Felt lends a matte, lived-in look that feels more like an heirloom than a novelty.
Layered motifs like pine boughs or stars have a depth that catches afternoon light, and the soft edges prevent any clinking that might startle a cat. Hanging them produces a faint, comforting rustle.
They tuck easily into ornament boxes and seem to soften the whole tree with their tactile presence.
Steps
- Trace seasonal shapes onto felt in complementary colors, then cut out stacked layers for depth.
- Bond the layers with craft adhesive, allowing a slight offset for a dimensional effect.
- Add a small ribbon loop at the top before the adhesive fully sets so it anchors securely.
- Allow ornaments to rest until adhesives cure before decorating a tree or garland.
Colorful felt coasters with scalloped edges

There’s a cozy rhythm to setting a warm mug on a felt coaster. The felt absorbs a little condensation and gives a gentle, cushioned rest to glass and ceramic.
Scalloped edges add a charming silhouette and the layered composition gives visual interest without fuss. Colors can be mixed in playful stacks, creating a small palette on the table that changes with the seasons.
Over time, these coasters collect faint marks and a lived texture that makes them feel more personal, a subtle record of slow afternoons and repeated conversations.
Steps
- Trace coaster shapes onto thick felt and cut clean edges, including scalloped or decorative outlines.
- Layer contrasting felt circles or designs on top and secure with fabric adhesive for a tidy finish.
- Press gently and allow adhesive to dry fully so the layers bond without shifting.
- Store flat when not in use to keep shapes crisp.
Tiny felt florals for hair clips and headbands

I remember slipping a small felt bloom into a plain hair clip and suddenly feeling whimsical. The felt petals have a soft, matte surface that sits lightly against hair, and the small centers offer a touch of contrast that catches the eye.
Colors range from punchy to pastel, and the size keeps the look subtle rather than costume-like. These blooms often find their way onto headbands for Sunday walks or clipped at the temple for a quick lift.
They feel like tiny accessories that carry a quiet, hand-made confidence.
Steps
- Cut layered petal shapes from felt and arrange them into a small bloom form on a flat surface.
- Secure the layers together with small amounts of clear adhesive at the center, pressing briefly until tacky.
- Adhere the finished floral to a hair clip or headband base and let set completely before wearing.
- Trim any stray fibers once adhesive cures for a neat appearance.
Puffy felt coin pouches with snap closures

A small pouch sits reassuringly in the palm, the felt exterior giving a warm tactile quality that leather seldom achieves. The puffy profile comes from a gentle interior pad, leaving a soft cushion around coins and tiny treasures.
Snap closures give a satisfying click, and the color contrasts around the trim create a neat, deliberate look. These pouches slide into pockets easily, and the felt muffles the sound of coins against one another.
Over time they soften further, taking on a quiet patina from being carried around.
Steps
- Cut matched pouch shapes from felt and add a thin layer of padding between them for a puffed effect.
- Apply adhesive around the outer edge to bond the layers, leaving a small opening for turning if desired.
- Press the snap closure into place at the top following the hardware instructions for secure fastening.
- Allow the pouch to rest until all adhesives and snaps are fully settled.
Play food set: felt fruits and veggies for pretend play

These felt food pieces have collected small hands and big imaginations over many afternoons. The woolly texture of felt makes apples and carrots pleasantly squeezable, and the simplified shapes read clearly to toddlers.
The color palette is bold enough to be legible yet soft to the touch, which helps with calming play sessions. A felt orange can look wonderfully plump, and the slight fuzz on a felt pear invites a curious nibble that is purely pretend.
These pieces often become interleaved with real cooking sounds during kitchen play.
Steps
- Draw simple fruit and vegetable outlines onto felt, then cut pairs for each item.
- Place a small bit of stuffing between the layers and seal the edges with a bead of fabric adhesive, shaping gently as it sets.
- Add small felt details like stems or seeds on the exterior with adhesive for realism.
- Let everything cure thoroughly before offering to little children to ensure durability.
Charming felt eyeglass cases with soft lining

The gentle bulk of a felt case makes reaching for spectacles feel less like a chore and more like a small pleasure. Felt’s yielding surface cradles lenses, and the soft lining prevents tiny scratches.
Rounded shapes and muted colors give the case a comforting silhouette that slips easily into a bag. I’ve found that the felt picks up tiny, pleasant dusting from everyday handling, which somehow makes the case feel more personal.
It’s a small object, but the everyday ritual of sliding glasses into that soft nest is oddly satisfying.
Steps
- Cut two outer shells from sturdy felt and a single softer piece for the lining sized slightly smaller.
- Bond the lining to one outer shell with fabric adhesive, smoothing out any wrinkles as you go.
- Fold the outer shells to create a pouch shape and secure the sides with a neat line of adhesive.
- Add a snap or magnetic closure to the flap if desired, allowing full cure time before use.
Pocket-sized felt journals with decorative covers
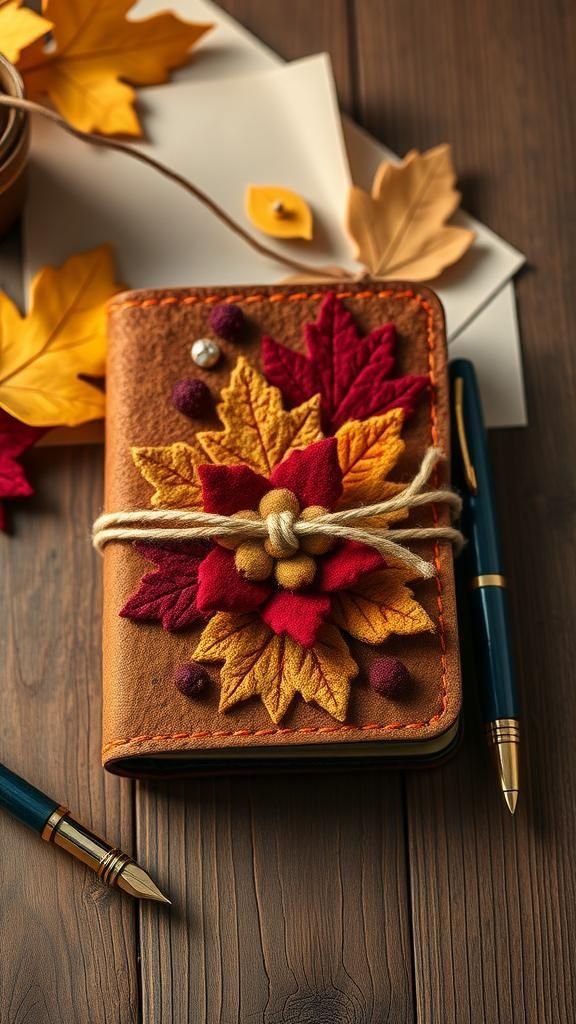
There’s a cozy pleasure in carrying a tiny notebook that wears felt like a soft jacket. The cover takes on a subtle warmth to the touch and the layered felt patterns add a handcrafted, tactile element.
The edges feel rounded and shelter the paper within, and little felt tabs can peek out as playful bookmarks. The cover resists scuffs from being tossed into a bag, and over time these journals pick up a gentle familiar life.
They often become the place where small notes and half-sentences find refuge during coffee breaks.
Steps
- Cut a felt piece large enough to wrap around a small notebook, leaving extra for a flap.
- Decorate the front cover with layered felt shapes and secure them with fabric adhesive.
- Wrap the cover around the notebook and bond the inside edges to hold it in place.
- Add a small felt tab or elastic loop for closure and let everything set fully.
Rustic felt sachets infused with dried herbs

Sachets made from felt feel pleasantly tactile in linen drawers, and the scent of dried lavender or sage emerges in soft wafts when opening a closet. Felt keeps the herbs contained while letting their fragrance breathe through the fabric.
The little pouches develop a subtle softness over time and sometimes take on a tiny smudge from being handled. They are often tied with thrifted ribbon and handed to friends who comment on how the smell makes a drawer feel more like a memory.
Each sachet carries a domestic hush that comforts daily routines.
Steps
- Cut two small pouch shapes from felt and fill the center with dried herbs like lavender or rosemary.
- Fold or join the edges with a line of adhesive, leaving a small opening to add more if needed.
- Seal the final seam and add a decorative ribbon loop for hanging or placing in a drawer.
- Allow the adhesive to cure completely before placing among clothing to avoid transfer.
Playful felt puppet finger friends for storytelling

Felt puppet friends fit snugly on a finger and open a world of quick stories at the sink or bedside. The felt feels warm against skin and the small facial features add immediate expression.
Pocket-sized gestures and tiny movements make the characters come alive, and the quiet material keeps sound soft and intimate. Colors often skew bright for easy recognition, and little ears or tufts create immediate personality.
These puppets have a way of making even a short lullaby feel like a full performance, bringing a smile without the fuss of larger props.
Steps
- Trace simple finger puppet shapes onto felt and cut out matching fronts and backs.
- Add facial features and small felt details to the front piece and bond them with adhesive.
- Join the front and back along the edges with a thin line of glue, leaving the bottom open for a finger.
- Allow the puppet to set fully before inviting little hands to play.
Elegant felt brooches with brass pinbacks
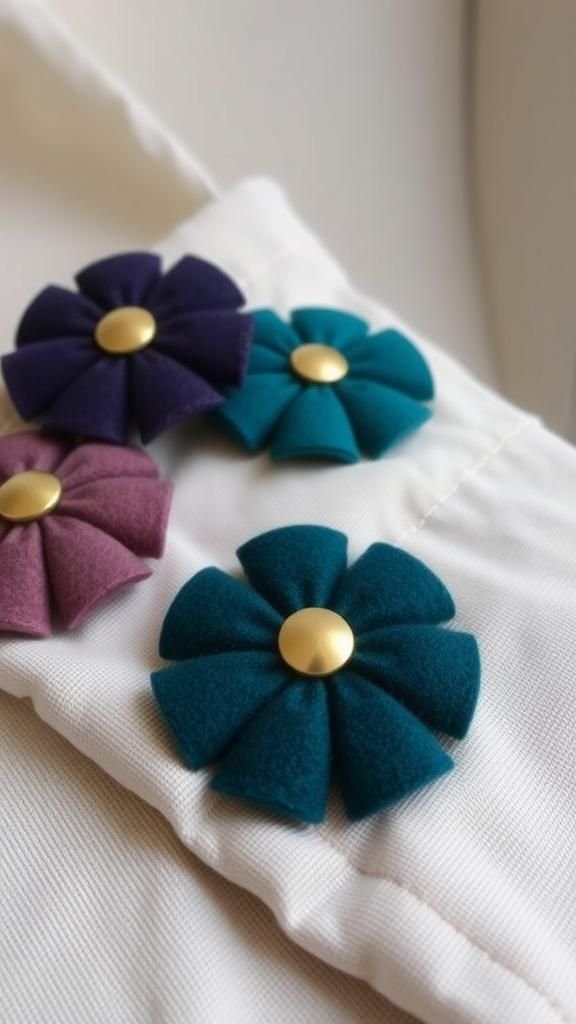
A felt brooch can tilt a plain sweater into something quietly personal. The matte surface of the felt contrasts with the cool gleam of brass pinbacks, creating a small focal point that feels handcrafted rather than loud.
Petal or abstract shapes have a calm geometry, and layered centers add a hint of shadow and depth. I often find one pinned to a bag after an outing, gathering a few lint specks and a soft crease that only adds character.
Wearing one feels like carrying a small, handcrafted thought pinned close to the chest.
Steps
- Cut elegant shapes from felt and layer smaller details on top, arranging for balance.
- Secure the layers with fabric adhesive, centering any decorative element for visual harmony.
- Attach a brass pinback to the reverse with a strong fabric glue and press until set.
- Let the brooch rest until adhesives are fully cured before wearing.
Felt name banners for doors and desks

A small felt name banner seems to claim a corner of a room in the sweetest way. The letters have a soft visual weight, and the banner’s sway gives a little motion to an otherwise static door or desk.
Felt edges feel muted against painted wood and the tactile letters invite a fingertip trace. Colors can be mixed with a personality that feels deliberate, and the banner ages into a familiar accent that children often rearrange during quiet afternoons.
It reads like a tiny flag of ownership, softly asserting presence without shouting.
Steps
- Cut rectangular backings and felt letters, choosing a readable font size.
- Arrange the letters on the backing and adhere them with fabric glue, spacing evenly for balance.
- Add a cord or ribbon across the top edge with adhesive for hanging support.
- Allow the banner to set flat until fully cured before mounting.
Cuddly felt wrist cuffs with snap fasteners

A felt wrist cuff wraps with a comfortable, slightly rustic feel against the skin. The material offers a soft warmth and a matte finish that keeps the accessory understated but interesting.
Contrasting trim and small decorative felt motifs add a handcrafted note without feeling oversized. The snap gives a subtle click that feels satisfying, and the cuff moves with the wrist in a companionable way.
I’ve worn them on brisk walks when a little extra warmth at the wrist felt welcome, the felt softening as the day went on.
Steps
- Cut a cuff strip sized for the wrist and layer with a decorative top piece if desired.
- Secure the layers with fabric adhesive and smooth edges for a clean look.
- Install snap fasteners at measured points so the cuff closes comfortably.
- Allow the snaps and adhesive to set completely before wearing to ensure durability.
Cozy felt phone pocket with geometric trim

Sliding a phone into a felt pocket feels like tucking it into a little nest. The soft, dense felt cushions the device and the geometric trim provides a crisp aesthetic contrast.
The tactile edge invites a reassuring swipe when checking the screen, and the felt surface resists scratches better than bare metal surfaces. A pocket placed inside a tote or on a bedside table gives a small, designated home for a frequently handled object.
Over time, the pocket gathers faint signs of daily life, warmth building into the fibers.
Steps
- Measure and cut felt to fit a phone snugly, allowing a slight margin for the thickness of the device.
- Layer a decorative trim piece on the front and fix it with fabric adhesive for a neat seam.
- Bond the sides with a strong glue to form a pocket, ensuring the opening remains even.
- Let the pouch rest until the adhesive is fully cured before inserting the phone.
Felt alphabet blocks for tactile learning play
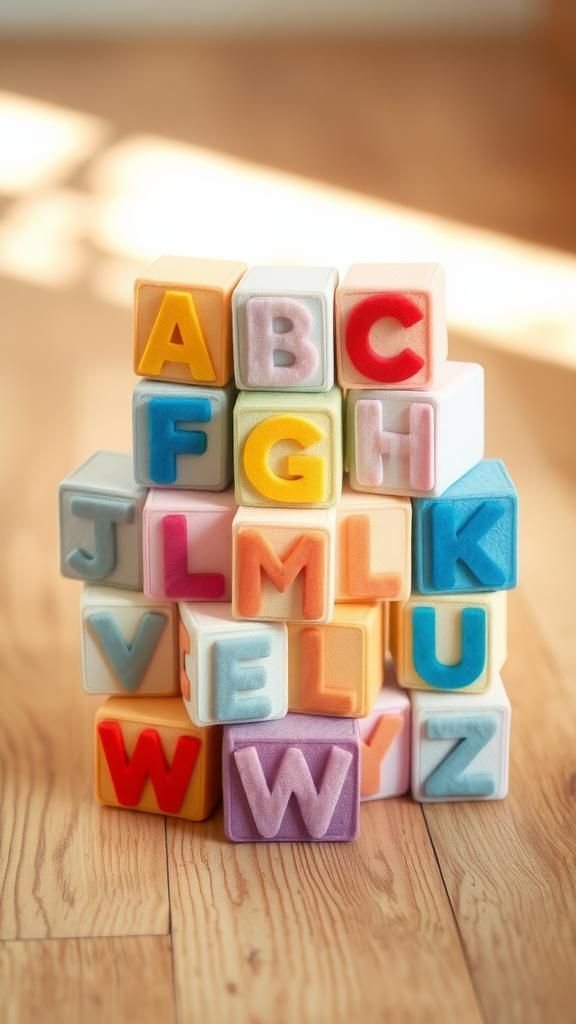
Soft alphabet blocks feel friendly to little hands, their plush faces calling for stacking and gentle exploration. The felt letters have a soft edge that invites tracing, and the contrast between background and letter creates a clear, approachable graphic.
They occupy a shelf with a tidy, handmade charm and often get lined up into simple messages that make mornings brighter. The blocks’ muted colors sit well in a child’s room without overpowering, and the overall tactile comfort helps sustain a calm playtime rhythm as fingers move from letter to letter.
Steps
- Cut cube-shaped pieces of felt and assemble them into box forms with adhesive, reinforcing corners for sturdiness.
- Cut letter shapes from contrasting felt and secure them to each face with fabric glue.
- Allow all glued seams to cure fully so the blocks withstand handling during play.
- Inspect edges and trim any loose fibers for a tidy finish before gifting to a child.