Disclosure: This post contains affiliate links, which means we may earn a commission if you purchase through our links at no extra cost to you.
I keep a little stash of wrapping materials that makes holiday evenings more tactile and cozy. There’s something about the crunch of paper, the scent of cinnamon, and a bit of ribbon that turns an ordinary present into a tiny ritual.
Over the years I picked up a handful of favorite festive holiday gift wrapping crafts that feel handmade without requiring a lot of fuss.
Each idea here grew from small experiments at a kitchen table, late-night gift sessions, and a few happy mistakes that became holiday staples. These wrapping crafts invite playful textures, warm scents, and a touch of whimsy to the season.
Table of Contents
Kraft paper with orange slice and twine flair

I always gravitate toward thick kraft paper when the mood calls for cozy minimalism. The coarse surface takes ink, pencil and little smudges in a homey way, while dried orange slices add a citrusy perfume that lingers in the room.
A thin length of natural twine offers contrast against the brown backdrop and the soft snap of the twine feels satisfying in my hands. Small cinnamon stick bundles or rosemary sprigs bring another aromatic layer that makes the whole wrap feel like a winter morning.
Steps
- Gather a sheet of kraft paper, dried orange slices, a bundle of cinnamon sticks, and a length of natural twine.
- Place the gift at the center of the paper and bring the edges up so the paper covers the box snugly.
- Fasten the paper with a strip of double-sided tape under one edge to hold the seam steady.
- Loop the twine around the package several times and secure by tying a neat bow over the top.
- Tuck a dried orange slice and a cinnamon bundle under the twine knot for scent and visual appeal.
Hand-stamped motifs on plain wrapping paper

There’s a quiet joy in stamping simple motifs across a plain sheet, watching little patterns form a rhythm. Ink pads leave slightly uneven impressions that feel human, not machine-made, and the faint smell of fresh ink carries memories of school projects.
I like organic designs like pine branches, stars, or tiny mittens that repeat with a gentle irregularity. The tactile ridges of the paper against the stamp give each impression a subtle depth, and the overall look read as thoughtful and handmade without being fussy.
Steps
- Select a large sheet of plain wrapping paper and a few small stamps with holiday-friendly motifs.
- Press a stamp into an ink pad and then onto a scrap surface to test the impression before working on the paper.
- Create a loose pattern by pressing stamps across the paper in staggered rows, allowing slight spacing variations.
- Let the ink settle and dry fully until the surface feels dry to the touch.
- Wrap the gift with the stamped paper and secure the final seam with tape under the flap.
Furoshiki-style cloth wrap with knot details
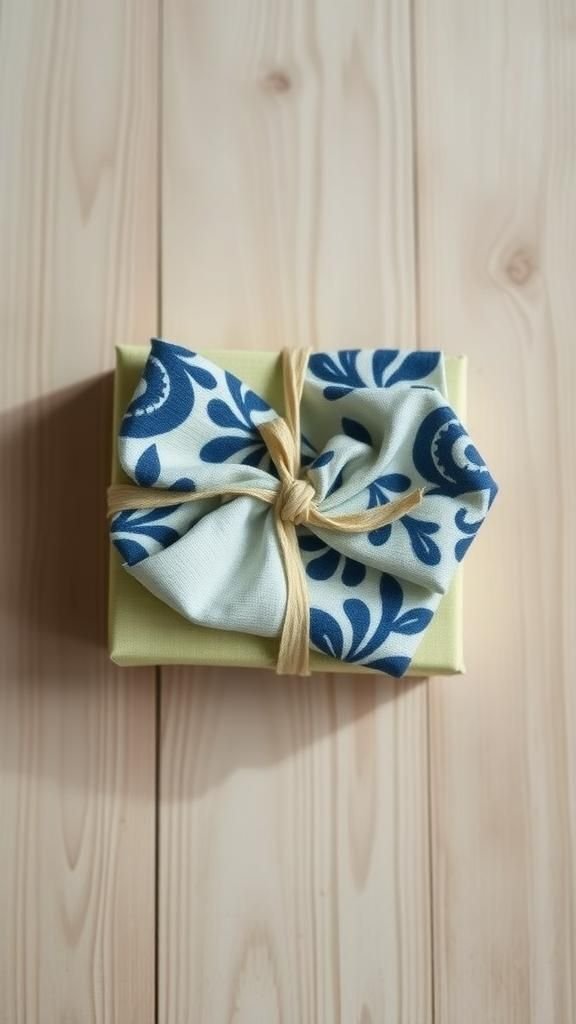
Cloth wrapping brings warmth and reusability to holiday packages, and the texture of soft cotton or linen always feels luxurious to the touch. I enjoy the quiet ritual of draping a square of fabric around a box and teasing the corners into an elegant knot.
The fabric’s pattern peeks through in unexpected ways, and a ribbon wrapped around the knot adds a gentle sheen. There’s a pleasure in seeing a gift that looks like a little textile bundle, promising something cozy inside and a new life for the fabric afterwards.
Steps
- Choose a square of fabric slightly larger than the gift and position the gift at the fabric’s center.
- Bring opposite corners up and cross them over the gift so the fabric covers the sides.
- Gather the remaining two corners, bring them together above the package, and form a snug knot.
- Tie a second decorative knot or loop for added interest and to keep the fabric gathered.
- Tuck any loose fabric edges under the knot to create a neat finish.
Vintage maps and sheet music turned wrapping paper

There’s an old-world charm in wrapping a present with a page of sheet music or a faded map. The thin paper rustles differently from modern rolls and carries an archival scent, while printed notes and contour lines create a sense of story.
I enjoy watching a map’s colors and notes slant across corners and edges, so the final parcel looks like a tiny fragment of a bigger life. A narrow band of ribbon or a small stamped tag adds a little modern contrast to the nostalgic canvas.
Steps
- Select a single large sheet from old maps or vintage sheet music that has pleasing typography or lines.
- Center the gift on the sheet and bring the paper sides over the box so that the print aligns nicely.
- Fasten the seam discreetly with a piece of tape placed under the overlapping edge.
- Add a slim ribbon or twine band across the middle and secure it beneath the package.
- Finish with a small tag or stamped circle placed atop the band for a timeless look.
Pressed botanicals beneath translucent paper layers

Pressed leaves and tiny flowers lend a fragile, botanical delicacy to gifts. When layered beneath a sheet of translucent paper, the shapes float like little silhouettes and create soft shadows when the light hits.
I often collect leaves after walks and watch them dry to a crisp, papery texture that keeps veins and curves intact. The scent is subtle but the visual effect reads as thoughtful and quiet.
Between the translucency and the natural silhouettes, every wrapped present becomes a small herbarium that invites closer inspection.
Steps
- Gather pressed leaves or flowers that are fully dry and flat, along with a sheet of translucent vellum paper.
- Position the botanicals on the gift surface where they will show under the translucent layer.
- Lay the vellum over the top so the plant shapes sit between the vellum and the base wrapping paper.
- Secure the vellum edges under the package with narrow tape placed discreetly beneath the seam.
- Add a length of thin twine across the top to hold everything in place and create a finished look.
Washi tape collage for colorful gift banding

Washi tape brings playful patterns and color without heaviness, and its slightly papery texture sits well on most wrapping papers. I like building overlapping bands in different widths and mixing florals with geometrics for a lively strip across the center.
The semi-matte finish of the tape catches light in a flattering way and the edges tear with a satisfying fibrous end. It’s a low-commitment flourish that feels handcrafted because the seams and overlaps reveal how it was layered, like a small collage made just for that person.
Steps
- Choose a palette of washi tapes with complementary patterns and widths to match the gift paper.
- Lay a long strip of tape across the center of the wrapped gift as a baseline band.
- Add additional strips above and below in alternating patterns, allowing slight overlaps for texture.
- Trim any excess tape at the edges by snipping close to the package corners.
- Press the tape edges firmly to ensure the bands lie flat and add a small tag atop the band.
Mini pinecone clusters with velvet ribbon accents

The tiny crunch of pinecones and the softness of velvet create a pleasing contrast that feels holiday-adjacent without shouting. I often collect small cones and brush away dust, appreciating how each one holds a slightly different shape.
A slender velvet ribbon adds a muted sheen that complements the pinecone’s woody texture. Together they read as cozy and slightly vintage, and when paired with a paper that has a warm undertone, the whole package feels like a quiet forest scene wrapped up for a friend.
Steps
- Select a couple of small, clean pinecones and a length of narrow velvet ribbon that matches the paper tone.
- Place the pinecones atop the wrapped gift where the ribbon will cross and hold them steady with a short loop of ribbon underneath.
- Wrap the ribbon around the package and tie a secure bow over the pinecones to keep them in place.
- Tuck any ribbon tails neatly or curl them slightly for visual softness.
- Optionally add a tiny sprig of evergreen tucked beside the pinecones for scent and color.
Hand-lettered kraft tags with metallic ink flourish

Hand-lettered tags have a warmth that printed labels can’t match, and metallic ink brings a quiet shimmer when it catches the light. I enjoy the grain of kraft paper against a smooth gold pen, the way curves of letters vary and feel personal.
Tags that carry a small handwritten note become miniature keepsakes, especially when rounded corners and slight smudges show the maker’s hand. The metallic sheen adds a celebratory air that feels appropriate for holidays without becoming over-the-top.
Steps
- Cut kraft cardstock into tag shapes and round the corners if desired for a soft look.
- Practice letterforms on scrap paper before writing directly on the tags to find a comfortable rhythm.
- Write names or short messages with a metallic ink pen, allowing the ink to dry between strokes.
- Punch a small hole at the top of each tag and thread a thin ribbon or twine through the hole.
- Attach the tag to the wrapped gift by looping the ribbon or twine around a bow or band.
Playful pom-pom clusters for cozy, textured toppers

Yarn pom-poms introduce a soft, tactile element that brightens a gift with color and roundness. I like the way the fuzzy edges catch light and bounce slightly when packages are moved, they feel a little like tiny winter creatures perched on top.
The variety of yarn weights and colors means each cluster can read playful or refined. Even a trio of small poms arranged asymmetrically brings personality to plain paper, and the tactile nature invites a short, affectionate squeeze when handed to someone.
Steps
- Create several small yarn pom-poms using a template or finger-wrap method, trimming fibers into a rounded shape.
- Gather a few pom-poms into a small cluster and hold them together at their centers.
- Secure the cluster with a short length of thin twine or thread wrapped around the pom bases.
- Place the pom cluster atop the wrapped gift and fasten by tying the twine under a ribbon or around the package.
- Fluff the pom surfaces gently to achieve an even, soft silhouette.
Cookie cutter ornament and ribbon keepsake combo

Metal cookie cutters double as charming little ornaments that hint at homemade treats and holiday baking. Their cool metallic sheen offsets warm paper tones, and a bit of twine threaded through a top edge turns them into wearable tags.
I like the balance between the rigid geometric shape and the flowing ribbon that loops through it. When hung on a tree after unwrapping, the cutter continues its life, carrying the memory of who it came from.
It’s a small nod to hospitality and shared kitchen moments.
Steps
- Choose a cookie cutter with a clear silhouette and thread a narrow ribbon or twine through its top opening.
- Position the cutter on the top center of the wrapped gift where the ribbon will secure it.
- Wrap the ribbon around the package and bring the ends back up to the top to tie a neat bow.
- Slide the cutter slightly so it rests over the knot and knot the ribbon to prevent slipping.
- Trim ribbon tails to a flattering length and fluff the bow to sit nicely around the cutter.
Stenciled snowflakes with pearlescent ink detail

Snowflake stencils deliver crisp, wintry geometry that contrasts nicely with soft papers. Pearlescent ink introduces a soft shimmer that catches lamps and candles, adding a subtle sense of frost.
I enjoy the slight variations that occur when ink gathers near stencil edges, giving each snowflake a delicate halo. The mix of sharp lines and shimmering highlights reads like a quiet snowfall captured on paper.
This approach often results in parcels that feel purposely crafted, like winter snapshots bound up for a friend.
Steps
- Secure a snowflake stencil over the chosen wrapping paper where a motif is desired.
- Dab pearlescent ink onto a sponge pad and transfer the ink through the stencil openings evenly.
- Lift the stencil carefully to reveal the crisp snowflake impression and allow the surface to dry.
- Repeat stencil placements in a balanced pattern across the paper, leaving gentle spacing between motifs.
- Once all ink areas are dry, wrap the gift and finish with a complementary ribbon.
Cinnamon stick bundles tied to rustic paper wraps

Cinnamon’s woody aroma evokes kitchens and winter mornings, and bundled sticks lend a sculptural accent to a wrapped parcel. I admire the contrast between the clean lines of a rectangular package and the irregular, textured ends of the sticks.
When grouped and bound with thin twine, they read as both ornament and scent deliverer. There’s a gentle crackle when handled and a warming scent that slowly releases into the room.
The overall effect feels reassuringly domestic and reminiscent of family gatherings.
Steps
- Gather three to five cinnamon sticks of similar length and align their ends in a neat bundle.
- Wrap a short length of thin twine several times around the middle of the bundle and knot it securely.
- Position the cinnamon bundle on top of the wrapped gift where a ribbon will cross.
- Thread the main ribbon under the gift and bring the ends over the top to tie a bow that holds the bundle.
- Tuck any ribbon tails to frame the cinnamon arrangement and add a small sprig of evergreen if desired.
Glitter-dusted edges for understated shimmer

A whisper of sparkle along the edges can lift a simple wrap into something celebratory without overpowering it. I prefer a fine, subtle dusting that catches glimpses of light rather than a dense sheet of glitter.
The tactile contrast between matte paper and a shimmering trim is pleasant when held, and the glints seem to animate as the parcel is passed around. Paired with a neutral palette, the effect reads refined and festive, like a faint frost at the boundary of a snowy field.
Steps
- Outline the package edges gently with a narrow line of clear adhesive to create a bonding surface for the sparkle.
- Sprinkle a fine glitter over the adhesive lines and allow the excess to drop away onto a tray.
- Tap the package lightly to remove loose glitter and reveal clean, glittered edges.
- Let the adhesive set fully so the glitter feels secure and does not flake off when handled.
- Complete the presentation with a simple ribbon placed parallel to the glittered edge.
Handmade seed paper tags that blossom after gifting

Tags embedded with wildflower seeds feel like small promises; they are tactile, speckled with seeds that peek through pulp. I enjoy the lumpy, handmade texture and the way light plays off the flecks of plant material.
The knowledge that the tag can be planted later adds an extra layer of meaning, turning a simple label into a potential garden memory. The earthy scent and papery resistance against fingers makes each tag feel substantial, and recipients often comment on the idea of planting something in honor of the giver.
Steps
- Blend recycled paper pulp with a selection of small wildflower seeds until the mixture is evenly speckled.
- Spread the pulp thinly onto a flat screen or mold and press gently to form a consistent sheet.
- Allow the sheet to dry fully until it becomes firm and slightly textured to the touch.
- Cut the dried sheet into tag shapes and punch a hole near the top for threading.
- Thread each tag with twine and place atop a wrapped gift, including a small note about planting.
Lace overlay and vintage button embellishment pairing

Lace adds a whisper of romance to a parcel, while a vintage button lends a tactile focal point that hints at family heirlooms. I like the contrast between delicate, translucent lace and sturdy paper, the lace’s openwork casting tiny shadows over the wrap.
Buttons with patina catch the eye and invite a closer look, often sparking a story about where they came from. The combination reads quietly feminine and nostalgic, like a pressed dress memory wrapped into a present for someone special.
Steps
- Cut a short strip of lace long enough to wrap around the gift’s width and place it across the center.
- Secure the lace ends beneath the gift with small pieces of tape so the overlay stays flat.
- Place a vintage button at the lace center and fasten it by looping thin thread or twine through the button holes.
- Tie the thread or twine at the underside of the gift to keep the button stable.
- Adjust the lace edges to create gentle ruffles and ensure the button sits flush and centered.
Newspaper comics and bold red twine for playfulness

Using colorful newspaper comics brings a sense of humor and nostalgia, with bright panels peeking beneath a bold band of red twine. The thin paper crinkles with a lively sound and the cartoon colors pop against more subdued ribbons.
I appreciate the thriftiness and the cheerful, casual tone it sends: it’s friendly and cheerful rather than formal. The red twine contrasts sharply, anchoring the playful print and giving the overall presentation a handcrafted, homespun energy that often sparks smiles from recipients.
Steps
- Select a comics page with strong colors and imagery that will look attractive when wrapped around a box.
- Center the gift on the comics sheet and bring the edges up so the artwork wraps across surfaces pleasingly.
- Secure the seam with tape hidden beneath the overlap to keep the look neat.
- Wind a length of bold red twine around the package several times and knot it securely at the top.
- Finish by fluffing twine tails or creating a small bow for an extra playful touch.
Mini stocking pouches as tiny gift holders

Mini stockings feel whimsical and tactile, their soft fabric hinting at treats inside. I enjoy the way felt or knit forms a small pocket that feels like a hidden surprise.
The cuff often offers an opportunity for contrast in color or texture, and the little loop at the top makes hanging or tying straightforward. These pouches turn small gifts into wearable decor for the season, and the act of slipping a token inside feels intimate and domestic, as though passing along a warm thought sealed in cloth.
Steps
- Select a small fabric pouch or craft a mini stocking from felt with a decorative cuff.
- Place the small gift inside the stocking pouch so it rests near the opening.
- Fold the cuff over slightly for a neat look and thread a loop of ribbon or twine through the top for hanging.
- Tie a short length of ribbon around the gift base to secure the stocking if needed.
- Present the package with the mini stocking resting against the main wrapped box or tucked under a bow.
Chalkboard tags for handwritten wishes in white

Chalkboard tags offer a tactile, matte surface for handwriting and create a pleasing contrast against glossy or patterned papers. The soft gray-white of chalk on black feels casual and intimate, reminiscent of cafés and handwritten greetings.
I like the slight smudges that come from erasing and rewriting, which give each tag a lived-in personality. Sleek twine or a thin ribbon threaded through the tag rounds out the presentation, yielding parcels that feel both contemporary and handmade.
Steps
- Cut small rectangles from chalkboard cardstock and round the corners for a friendly shape.
- Write names or short notes on each tag using white chalk pencil or a chalk marker for clarity.
- Wipe away any unwanted marks with a soft cloth and rework lettering until satisfied.
- Punch a hole near the top and thread a length of twine or ribbon to create a hanging loop.
- Loop the tag around a bow or tuck it under a ribbon band on the wrapped gift.
Metallic foil pleats for subtle festive geometry

Pleated metallic foil provides a rhythmic, sculptural accent that plays with light as the parcel moves. The crisp edges of tiny pleats throw fine shadows and mirrored highlights that feel elegant and architectural.
I appreciate the sound of the foil when it shifts and the way the pleats contrast against a matte wrapping paper. The result feels graphic yet celebratory, as if the gift were wearing a little metallic collar.
It reads as festive without being loud, perfect for notes and small boxes.
Steps
- Cut a strip of metallic foil paper to the desired length that will span across the gift surface.
- Form small accordion pleats along the strip by creating parallel creases at regular intervals.
- Lay the pleated strip across the wrapped package and secure the ends beneath the box with tape.
- Adjust pleat spacing gently so the metallic top looks even and rhythmic.
- Add a slim ribbon or tag over the center for a balanced finishing touch.
Layered tissue paper blossom for soft volume

Layering tissue paper creates a light, airy volume that reads like a miniature bouquet atop a gift. I enjoy the translucent tiers and the way edges soften with each layer, producing a petal-like silhouette.
The tactile thinness of tissue invites gentle handling, and the colors blend when stacked in graduated tones. Paired with a simple band, a tissue blossom adds lift and whimsy without adding bulk.
When someone unties the band, the paper shivers and settles like a small confetti cloud, which always feels celebratory.
Steps
- Stack several square sheets of tissue paper in complementary colors, aligned at the centers.
- Gather the layered sheets at the center point, forming a loose bundle with soft peaks.
- Secure the base of the bundle with a thin ribbon or band to hold the layers together.
- Gently separate and fluff the layers outward to create a rounded, blossom-like shape.
- Place the tissue blossom atop the wrapped gift and tie the ribbon under the box to keep it in place.
Origami crane topper with delicate paper creases

An origami crane perched on a gift reads as thoughtful and elegant, its sharp creases forming a delicate silhouette against simple paper. The thinness of origami paper allows for crisp folds that catch a cool studio light and cast small, precise shadows.
I appreciate the quiet precision involved and the way the crane becomes a small talisman that the recipient might keep. The paper’s sheen and the crane’s poised wings give a graceful lift to the parcel, suggesting calm and care tucked into the present.
Steps
- Choose a square of origami paper with a color or pattern that complements the wrapping paper.
- Form the classic origami crane by creating a series of precise creases to define the body and wings.
- Adjust the wings and tail to achieve a balanced, sculptural silhouette that sits well on top of the gift.
- Place the completed crane on the package and anchor it with a short ribbon or thin strip of paper beneath the body.
- Ensure the crane’s wings are slightly elevated to display its shape and create a sense of movement.