Fabric covered button jewelry projects carry so much charm, especially when tiny fabric moments become wearable keepsakes. I’ve adored fabric-covered button jewelry since finding a box of vintage swatches in my grandmother’s sewing room; those prints now shine as earrings, rings, and pendants.
Fabric button accessories feel personal, lightweight, and full of story, turning scraps into color-rich accents.
Best Sellers


As an Amazon Associate, I earn from qualifying purchases.
These fabric covered button jewelry projects range from minimal studs to bold bib necklaces, all celebrating texture and pattern. Fabric-covered button jewelry pairs beautifully with denim, silk, or knitwear, and makes heartfelt gifts.
From polka dots to brocade, fabric button jewelry adds softness to metal, creating playful, polished pieces with timeless appeal.
Petite Fabric Button Stud Earrings
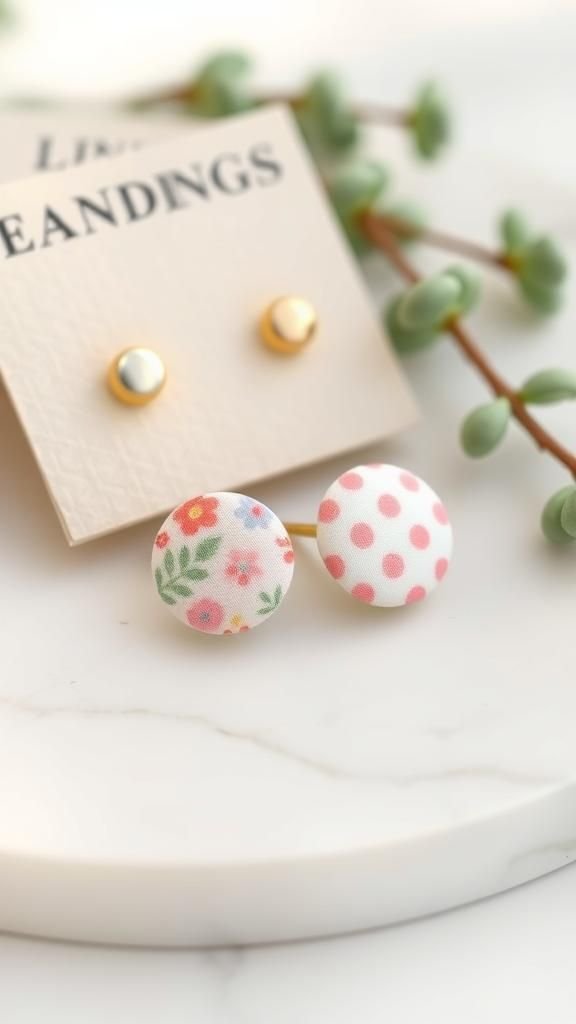
A pair of petite studs brings a whisper of print close to the face, offering a neat pop of color without stealing the show. Cotton, linen, silk dupioni, or velvet wraps the domed forms, while stainless steel, sterling, or gold-plated posts keep sensitive ears content.
Polka dots, micro florals, and ticking stripes feel crisp and versatile, and matte or satin fabric finishes shift the mood from casual to refined. These earrings complement tees, blouses, and blazers alike.
Slipped onto a linen earring card and tucked into a tiny tin or velvet pouch, they present beautifully for birthdays or bridesmaid sets.
Steps
- Cut small fabric circles and cover the button shells with a button-cover kit.
- Roughen flat pad earring posts slightly and mix a tiny amount of two-part epoxy.
- Glue covered buttons to the posts and keep upright until cured.
- Add butterfly backs and let the adhesive set fully before wearing.
Boho Dangle Button Earrings With Movement
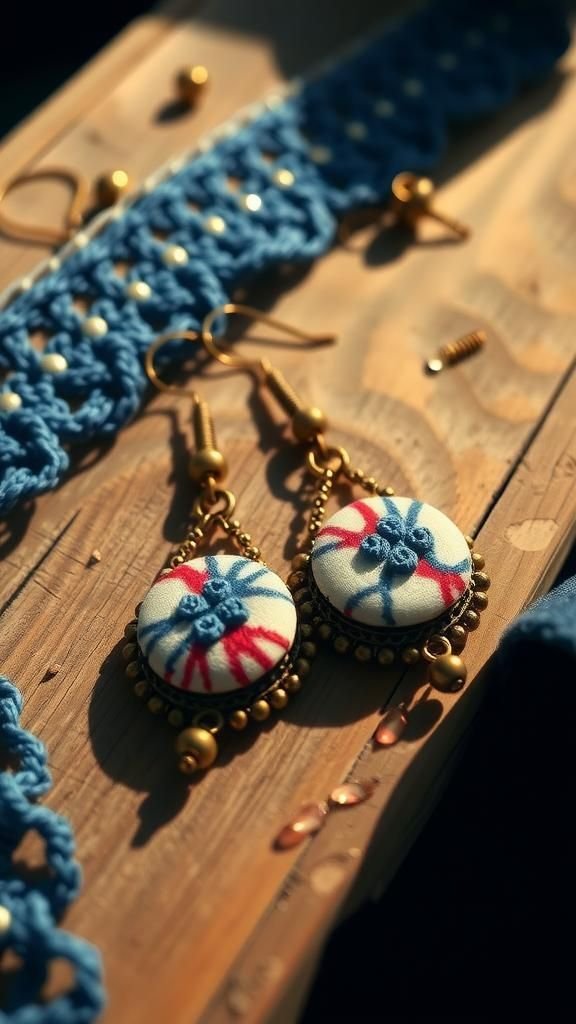
These dangles sway with lightness, mixing small and medium fabric buttons along short chain lengths for a breezy, festival-ready look. Antique brass, aged copper, or bright gold finishes add warmth next to earthy cottons and gauzy prints.
Ikat, paisley, and indigo shibori patterns bring a global spirit, while muted solids keep the design grounded. The airy silhouette frames the jawline and partners easily with flowing dresses or denim jackets.
A kraft earring card and muslin drawstring bag underline the relaxed vibe, turning the pair into a ready-to-gift accent that travels well for weekend getaways.
Steps
- Cover multiple buttons in coordinating fabrics and add wire loops or glued bail pads to their backs.
- Open jump rings and connect buttons to short lengths of delicate chain.
- Attach chains to ear wires, spacing the buttons for balanced movement.
- Secure all openings firmly and allow any adhesive to cure before wearing.
Hoop Earrings With Button Charms
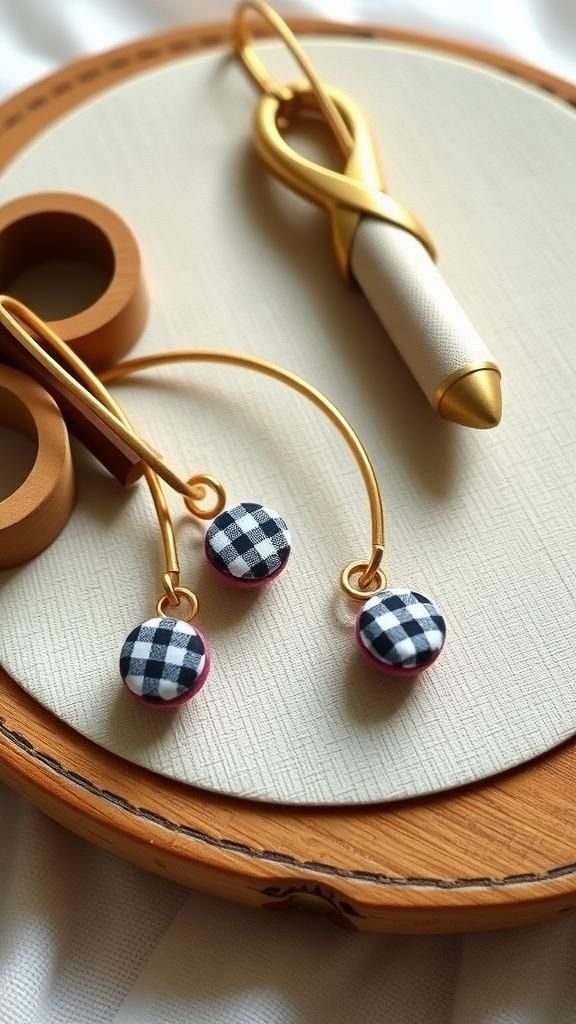
Slim hoops circle the face while a few tiny fabric buttons sway like charms at the base. Lightweight cottons, chambray, and silk prints keep the look breezy, with gold, rose gold, or gunmetal hoops setting the mood.
Gingham paired with petite florals offers a playful mix, while monochrome dots feel graphic and modern. The proportions flatter short haircuts and low buns and also peek through long waves.
Presented on a minimalist earring card with a stamped logo, the set feels boutique-ready. A small glass vial or narrow gift box shows the dangling shapes and protects the hoop form.
Steps
- Create mini covered buttons with shanks or glued-on loops.
- Slide the hoops through jump rings that hold the buttons.
- Add one to three charms per hoop, balancing weight and spacing.
- Close the hoops and polish with a soft cloth.
Bold Cocktail Button Ring Statement
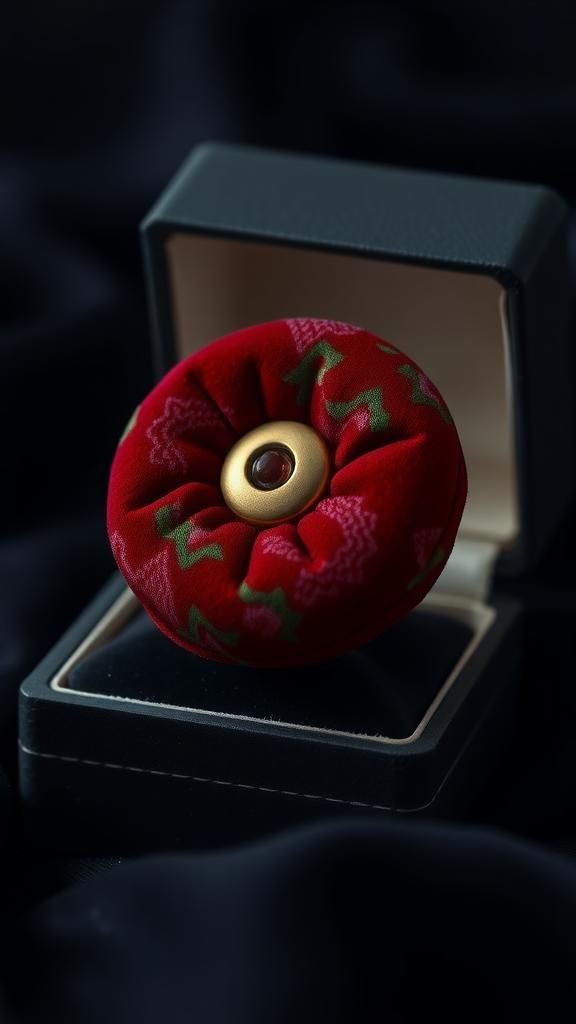
An oversized fabric button becomes a sculptural focal on an adjustable ring base, giving cocktail-hour drama with soft texture. Velvet, brocade, jacquard, or metallic-thread fabrics lend evening sparkle, while matte linen offers modern restraint.
Antique brass bases feel vintage, while high-polish silver leans sleek. The round dome complements square or almond nails and pairs well with little black dresses or tailored jumpsuits.
For gifting, a hinged ring box lined in satin heightens the reveal, and a small card noting the fabric’s origin adds a thoughtful detail for anyone who loves stories behind their jewelry.
Steps
- Cover a large button with a luxurious fabric, trimming neatly inside the shell.
- Lightly sand the ring pad and the button back for better adhesion.
- Epoxy the button onto the ring base and center carefully.
- Let cure fully before adjusting the band to fit.
Adjustable Stackable Button Ring Set
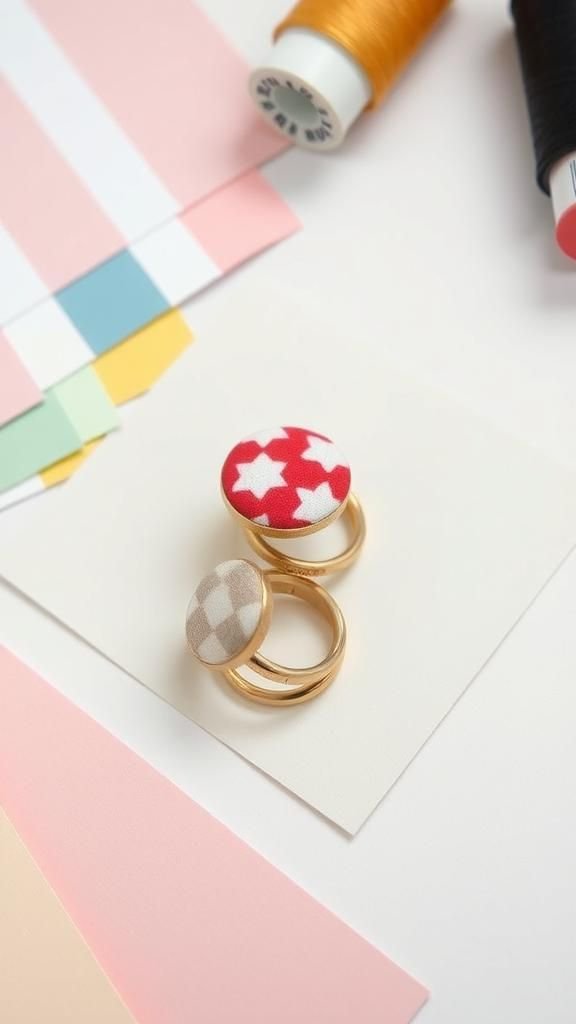
A trio of small rings invites playful stacking, mixing prints like stripes, ditsy florals, and color-block solids over slim bands. The low profile keeps the set comfortable for daily wear, and mixed metals encourage creative pairings across wardrobes.
Cotton poplin and silk remnants offer smooth finishes, while tweed or raw silk adds subtle texture. Rings spread across multiple fingers or cluster together for a punchier moment.
Slipped into a narrow jewelry tube with tissue and tied ribbon, the set reads thoughtful and fun, perfect for friendship gifts or party favors with hues matched to a celebration palette.
Steps
- Cover three small buttons in coordinating fabrics.
- Glue each button to an adjustable ring base and align carefully.
- Allow adhesive to cure, then polish the metal lightly.
- Stack and arrange to create different looks.
Charm Chain Bracelet With Fabric Buttons
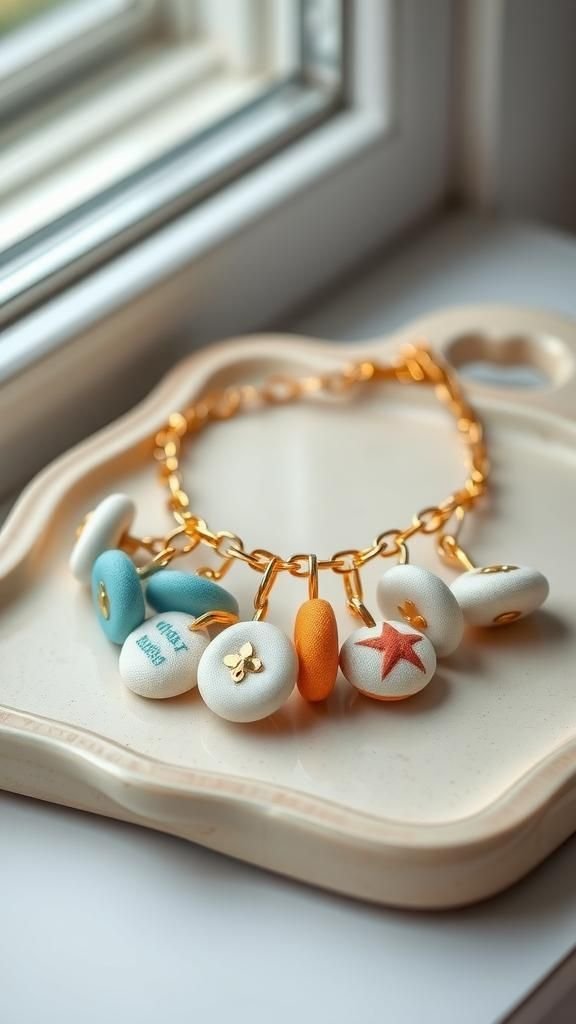
A simple chain bracelet transforms through a parade of mini fabric buttons that chime softly along the wrist. Brass, gold plate, or stainless links provide structure, while cotton and linen prints keep the look airy.
Colors can mirror a favorite outfit or echo seasonality, like mustard and rust for autumn or sea glass shades for summer. The movement catches light in a friendly way and layers nicely beside bangles or a watch.
Mounted on a kraft bracelet card and tucked into a small tin, it feels like a keepsake that invites collecting more charms over time.
Steps
- Make several small covered buttons and add small loops or bails.
- Measure the chain to fit and add a clasp with jump rings.
- Distribute the button charms evenly along the links.
- Close rings securely and let any glue set before wearing.
Stretch Bead Bracelet With Button Focal
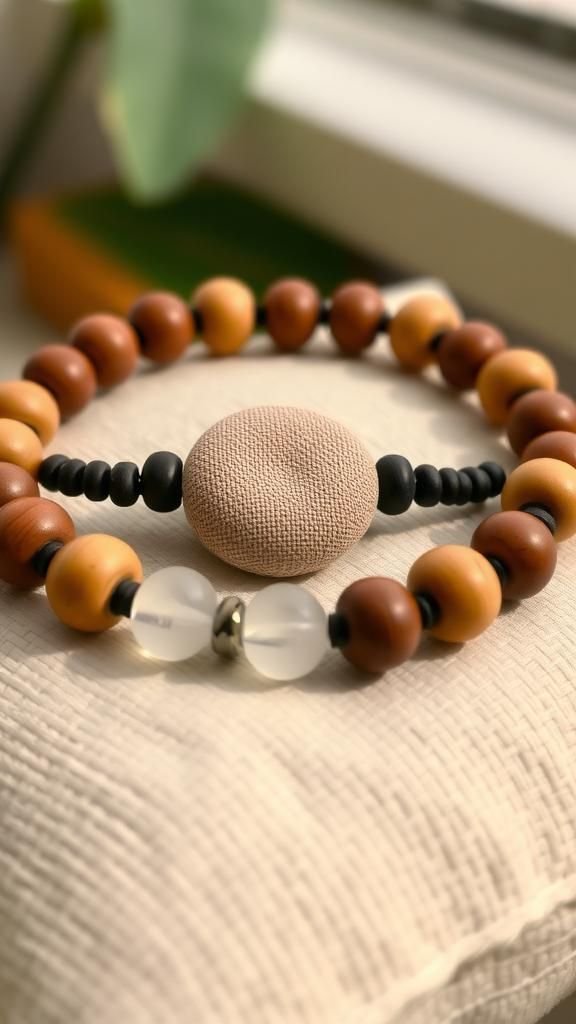
An elastic bracelet gains character through a single fabric-button focal framed by glass, wood, or stone beads. The interplay of soft textile and glossy or matte beads adds dimension, while the central dome draws the eye.
Earthy palettes with sandalwood and indigo cotton suggest a relaxed mood, and frosted glass with silk prints leans delicate. The silhouette slips easily under sleeves and stacks well with metal cuffs.
Presented in a clear lidded box on a linen pillow, the bracelet feels thoughtful for birthdays or thank-you gifts, and the focal can echo team colors or a favorite pattern.
Steps
- Make a medium fabric-covered button and glue it to a flat connector.
- String beads on elastic, adding the button connector at center.
- Tie surgeon’s knots, add a drop of glue, and hide the knot inside a bead.
- Let dry before stretching to fit.
Mixed-Metal Cuff With Button Cabochons
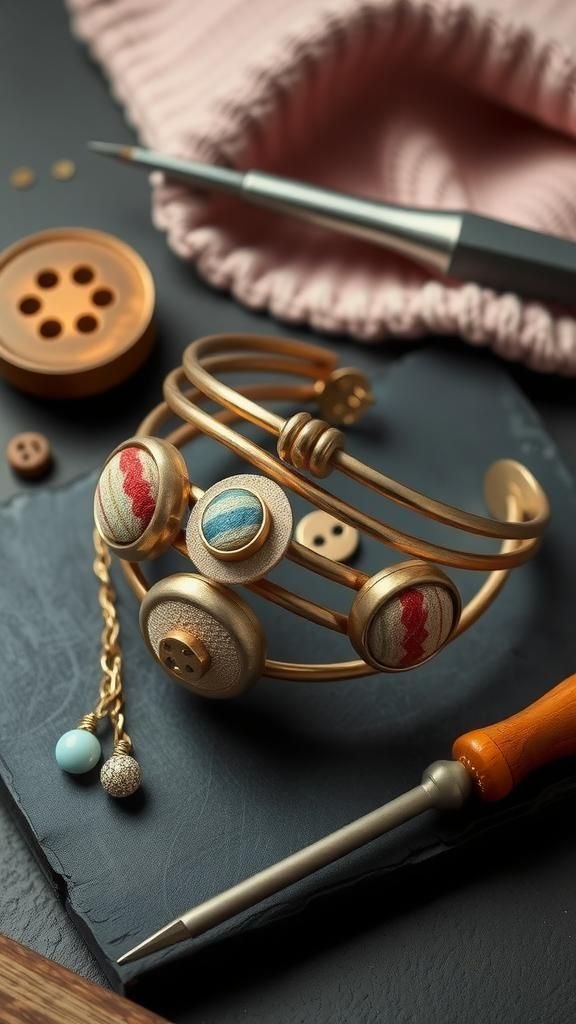
A sturdy cuff becomes a gallery for fabric button cabochons, blending textile softness with a metallic frame. Alternating bezels in silver, brass, and copper create rhythm across the wrist, while fabrics like chambray, tweed, and satin tell a tactile story.
Neutral palettes read chic, and jewel tones deliver drama. The piece balances structure and comfort, making an everyday statement that pairs well with knit sweaters or sleek blouses.
Nestled in a slim kraft box with a foam nest, it displays beautifully at a boutique table or vanity, inviting touch and closer inspection of each pattern.
Steps
- Cover multiple small buttons and remove shanks to create flat backs.
- Adhere buttons into cuff bezels or onto flat cuff pads with epoxy.
- Arrange spacing evenly and press until set.
- Allow full cure before wearing to prevent shifting.
Statement Bib Necklace Of Fabric Buttons
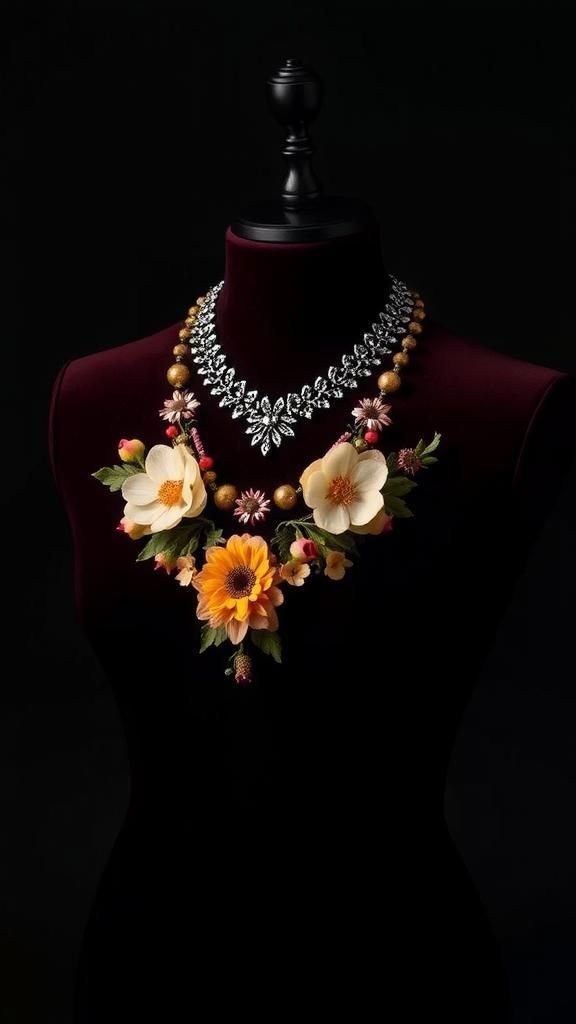
Clusters of fabric buttons form a lush bib that sits gracefully along the collarbone. A felt base supports domes in varied sizes, while ribbon or chain finishes the neckline.
Cotton lawns, Liberty-style prints, and velvet accents create a bouquet effect, and a monochrome spread looks sleek under blazers. Jewel-tone mixes feel festive for evening, and soft pastels flatter spring dresses.
The bib shape frames the face beautifully and turns a simple tee into an outfit. Displayed on a velvet bust or laid flat in a shadow box, it becomes art as much as adornment.
Steps
- Cover buttons in multiple sizes and plan a pleasing arrangement.
- Cut a felt bib shape and mark placement lightly.
- Glue buttons densely onto the felt, filling gaps with smaller sizes.
- Attach ribbon or chain at the ends and add a clasp after curing.
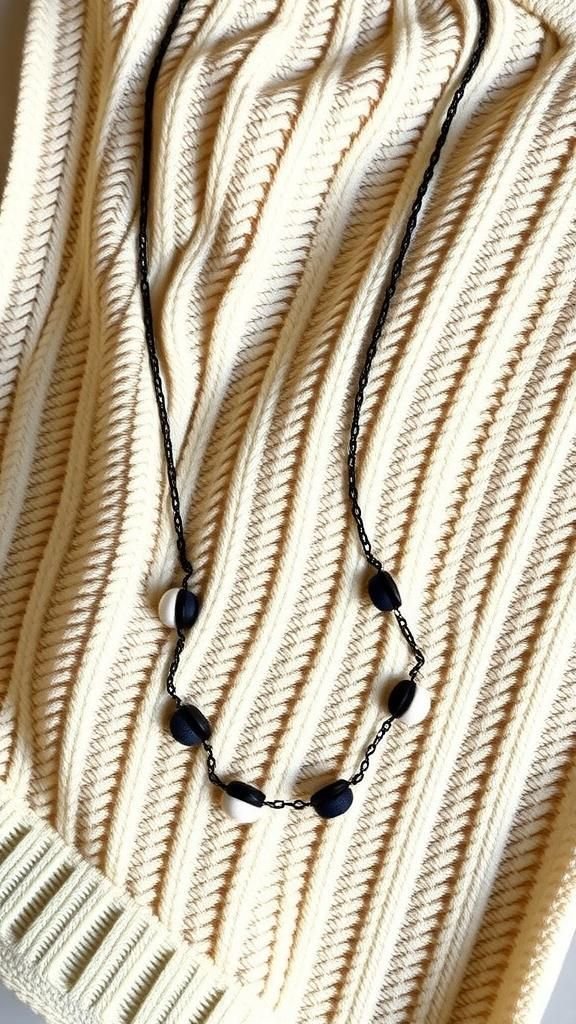
Minimalist Single-Button Pendant Necklace
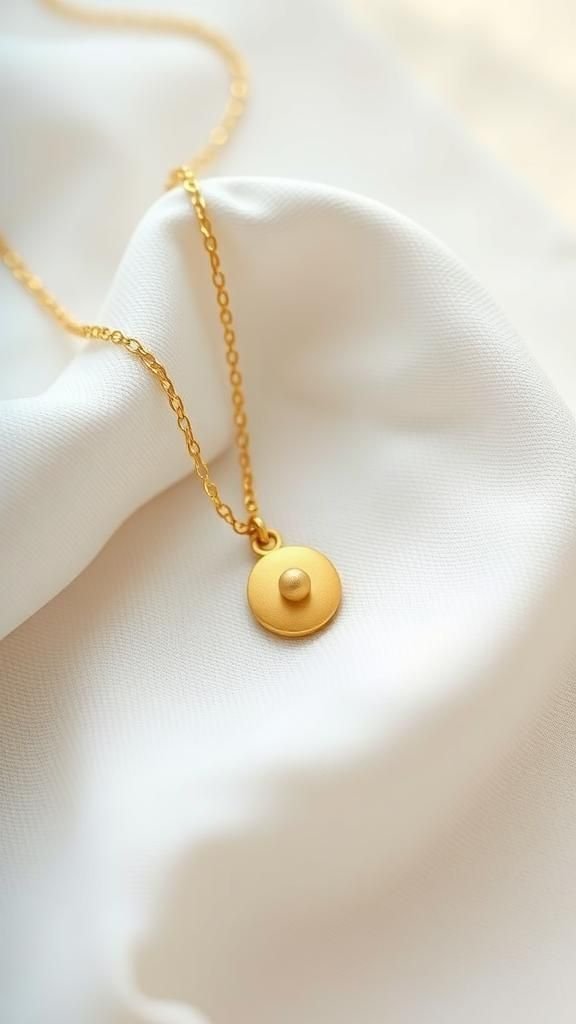
One covered button on a fine cable chain gives quiet elegance. A matte linen dome reads modern and understated, while silk charmeuse brings a hint of glow.
The pendant can sit at clavicle height for everyday wear or drop longer for layering. Hardware in sterling, gold fill, or oxidized brass changes the mood instantly.
This piece slips seamlessly from weekend looks to office attire. A slim necklace card inside a clear sleeve ensures a clean presentation, and a tiny tag noting fabric origin adds an intimate, thoughtful detail for anyone who enjoys a story with their accessories.
Steps
- Cover a medium button and add a small bail to the back.
- Thread the pendant onto a delicate chain.
- Add jump rings and a clasp to finish the chain.
- Polish the pendant surface and let any glue cure.
Layered Lariat With Graduated Buttons
A lariat format showcases a trail of graduated fabric buttons tumbling at the drop, creating graceful movement. Smaller domes near the neckline grow to a larger focal at the bottom, with silk, lawn, and voile offering smooth drape.
Mixed metals in the chain bring a subtle two-tone shimmer. The adjustable length plays well with deep V necklines and wrap dresses.
In a gift box with a ribbon-tied card describing the fabrics and sizes, the necklace feels thoughtful and refined. Hung on a tall display stand, the vertical line draws the eye from across a room.
Steps
- Cover buttons in three or four sizes and add discreet bails.
- Build a long chain with a lariat loop or Y-connector.
- Attach buttons in order of size along the drop for a graduated effect.
- Secure jump rings and allow adhesive to cure before wearing.
Velvet Choker With Button Centerpiece
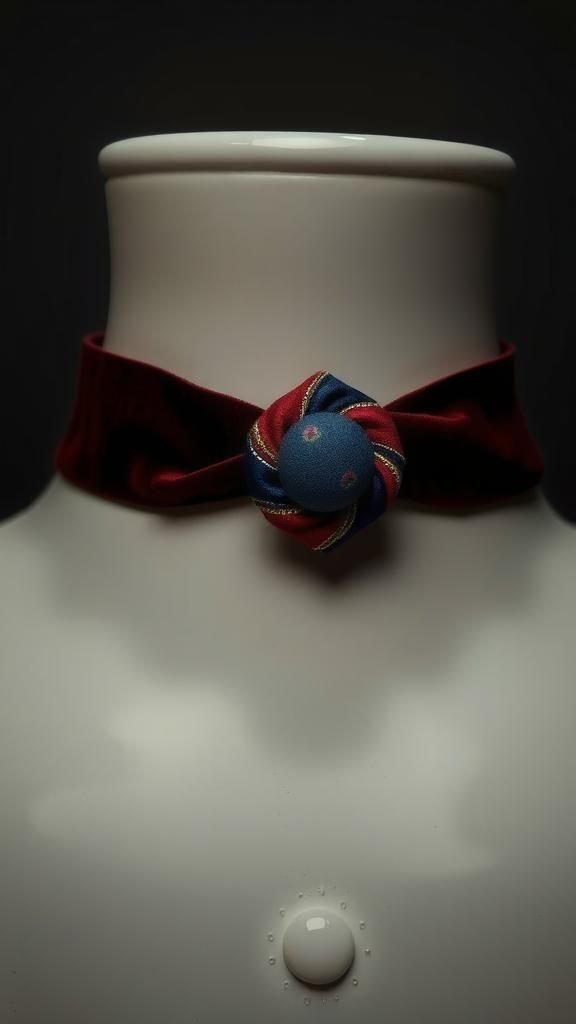
A strip of velvet sets a romantic mood for a centered fabric button, offering a soft, close-to-the-neck silhouette. The contrast between plush ribbon and a silk or brocade dome adds depth, while metal findings in gunmetal or antique brass anchor a vintage feel.
Black velvet with a jewel-tone button suits evening wear, and blush ribbon with a floral center reads sweet and modern. A small extender chain allows subtle fit changes.
Presented on a curved choker card or displayed around a ceramic neck form, the piece promises old-world glamour with an easy, comfortable finish.
Steps
- Cover a button in a luxe fabric and glue it to a small bezel.
- Cut velvet ribbon to size and add ribbon clamps to both ends.
- Attach the bezel at center with epoxy and let cure.
- Add jump rings, a clasp, and an extender chain.
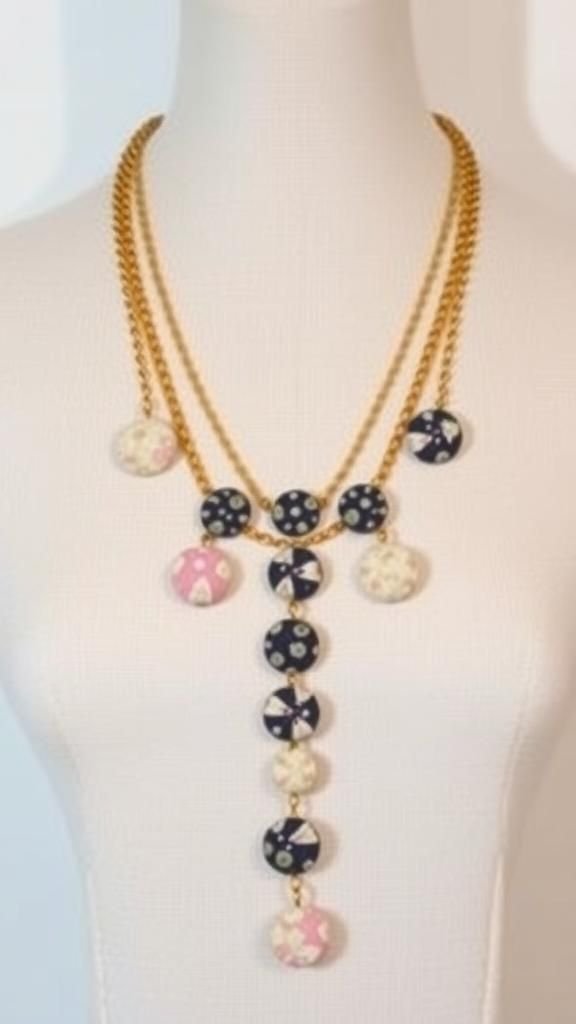
Long Opera Necklace With Scattered Buttons
A long chain sprinkled with petite fabric buttons creates a light, easy silhouette that layers beautifully over sweaters and dresses. The spacing feels airy, allowing each tiny print—gingham, ditsy florals, or tonal weaves—to shine without crowding.
Mixed bead accents like seed pearls or hematite add subtle sparkle between domes. Gold, silver, or matte black chain shifts the vibe from classic to contemporary.
The generous length slips on effortlessly. Wrapped around a slim cardstock spool inside a windowed box, the piece looks tidy and gift-ready, while on a tall display it drapes elegantly to show off the scatter.
Steps
- Cover several small buttons and add low-profile bails or loops.
- Measure chain to an opera length and add a clasp.
- Attach buttons at intervals with jump rings, spacing evenly.
- Tighten all connections and buff gently.
Delicate Anklet With Tiny Button Dangles
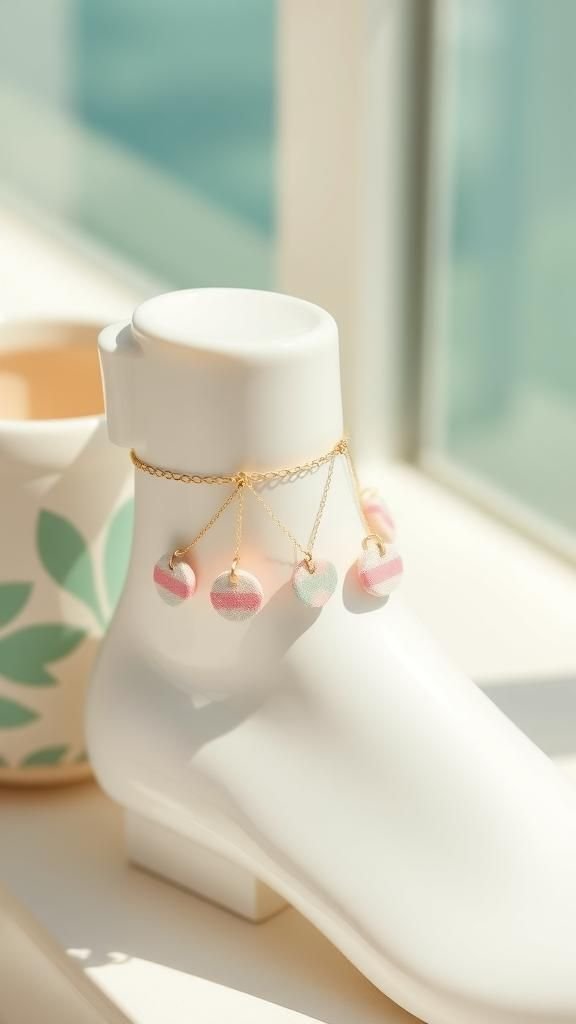
A slender anklet dotted with miniature fabric buttons brings playful charm to sandals and sneakers. Light cottons and lawn fabrics keep the dangles weightless, while stainless or 14k gold fill chain resists tarnish near skin.
Pastel dots and seaside stripes hint at vacations, and monochrome patterns add a cool, graphic angle. The tiny scale gives movement without fuss.
Packaged on a small anklet card with a coastal illustration and slipped into a clear envelope, it feels like a sweet summer memento. On a display ankle form, the dangles catch light with each gentle sway.
Steps
- Make extra-small covered buttons and add petite loops.
- Measure ankle length and cut chain, adding a tiny clasp and extender.
- Attach buttons along the chain with micro jump rings.
- Secure all joins and allow any glue to cure.
Brooch Bouquet Of Fabric Buttons
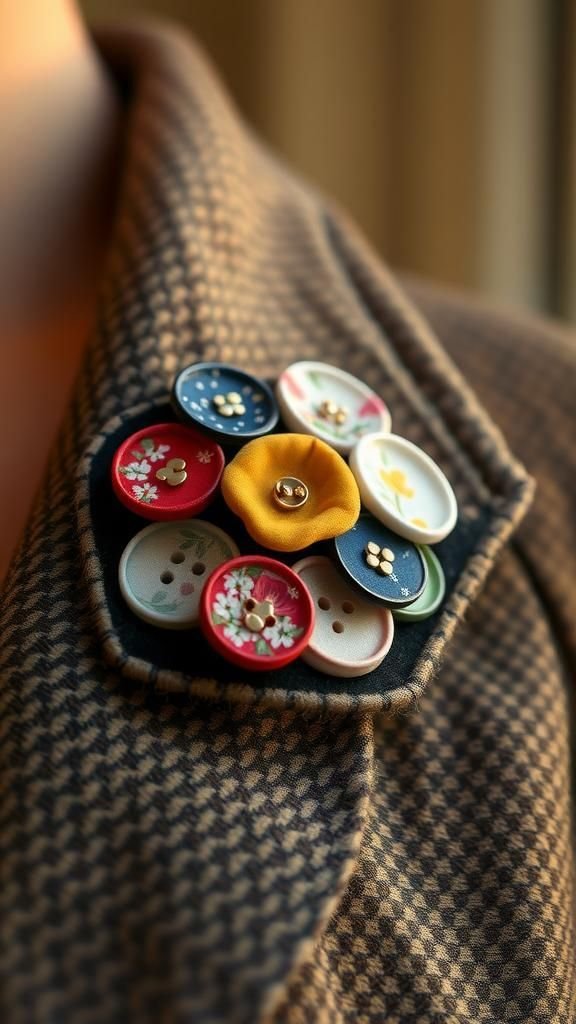
A brooch gathers fabric buttons into a small bouquet, evoking vintage corsages with modern prints. Felt or leather backing keeps the cluster tidy, and a sturdy locking pin holds firmly on coats, scarves, or hats.
Velvet, satin, and cotton mixes create a textural garden, with tonal shading or wildflower brights shaping the mood. The domed forms stack closely for a lush profile without heaviness.
Pinned to a ribbon-wrapped card or nested in a small trinket box, the brooch invites gifting for mothers, mentors, or anyone who loves a floral nod that never wilts.
Steps
- Cover buttons in mixed sizes and test a compact layout.
- Cut a backing shape and mark the pin placement.
- Glue the cluster onto the backing and attach the pin finding.
- Weight gently while curing to keep the profile flat.
Lapel Pin Trio With Patterned Buttons
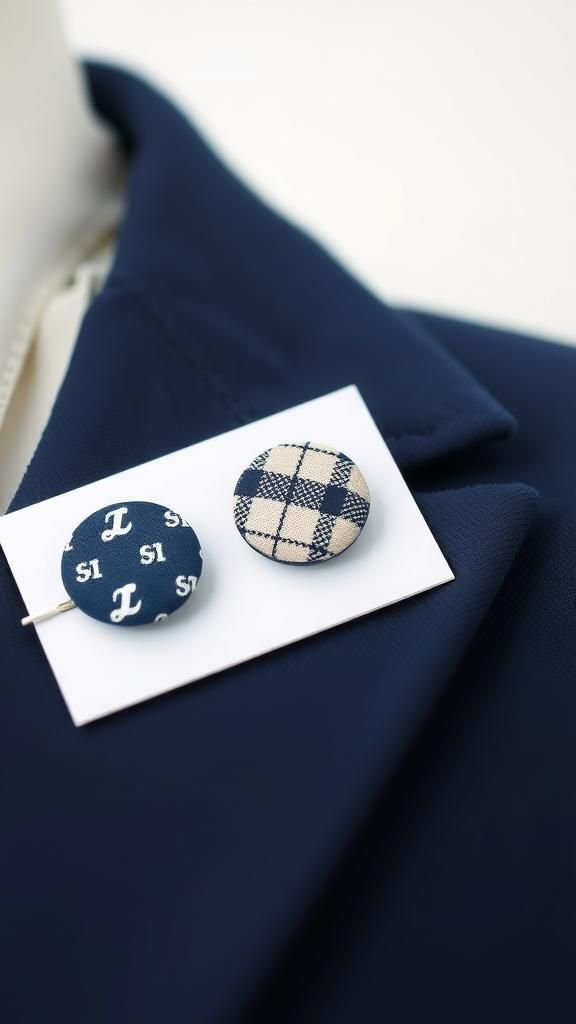
A coordinated trio of small lapel pins brings personality to jackets and cardigans. Each pin shows a different print within a shared palette, such as navy stripes, micro checks, and a tiny floral.
The set invites playful arrangements along a lapel or clustered near a pocket. Stainless clutch backs keep fabric pristine while securing firmly.
For color stories, think city neutrals or collegiate brights. Presented on a narrow card with three pre-punched spots, the trio feels collectible and display-ready, and it stores neatly in a slim tin that drops easily into a desk drawer or travel pouch.
Steps
- Cover three small buttons and remove shanks for flat backs.
- Adhere each to a tie tack or lapel pin blank with epoxy.
- Align prints consistently and allow adhesive to cure.
- Pin through fabric and add clutch backs.
Classic Cufflinks In Coordinated Fabrics
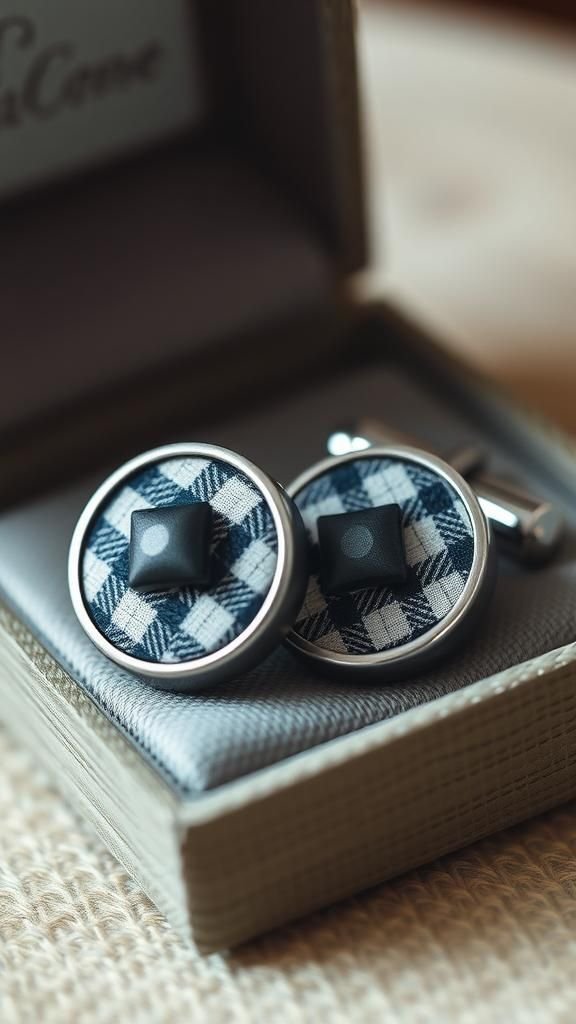
Fabric-button cufflinks blend textile personality with crisp tailoring. Smooth cotton poplin or silk twill keeps the dome refined, while tartan or herringbone leans heritage.
Silver-tone, gold-tone, or gunmetal settings shift from formal to fashion-forward. Matching pocket squares or ties build a cohesive story for weddings or work events.
The small surface shows pattern with restraint, offering charm without flash. Nestled in a hinged cufflink box with a linen insert, the pair feels heirloom-worthy yet fresh, and the fabric choice can echo wedding colors, alma mater hues, or a favorite suit lining for a subtle inside nod.
Steps
- Cover two medium buttons and remove shanks to create flat backs.
- Glue into cufflink bezels, pressing gently for full contact.
- Wipe away excess adhesive and align patterns.
- Let cure completely before wearing with a dress shirt.
Sleek Tie Pin With Matching Button Accent
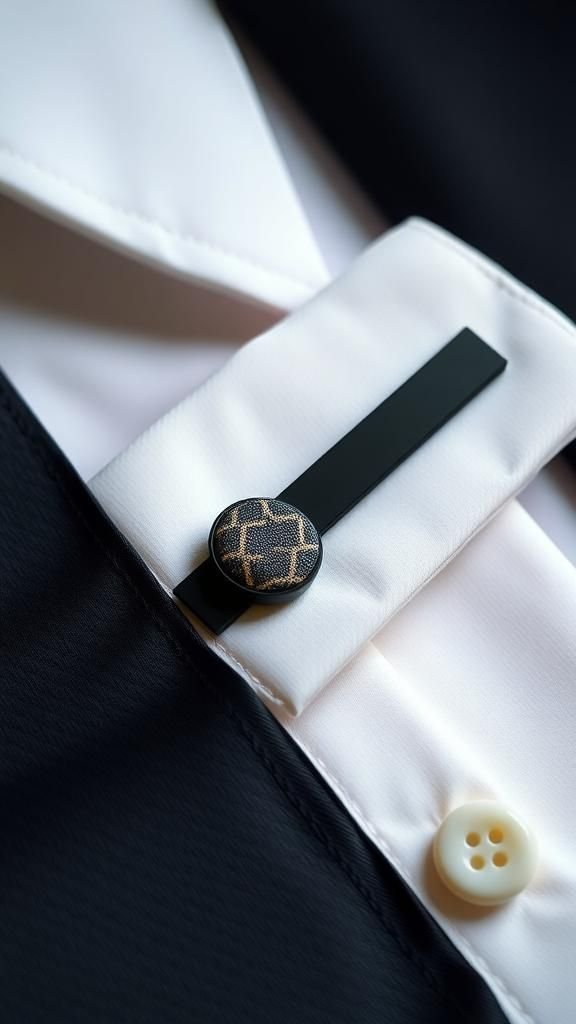
A slim tie pin gains a soft focal through a small fabric button set near the clip end. Solid silk or subtle micro-patterns keep the look clean against business shirts, while bolder prints add a wink during after-hours events.
Polished silver or matte black hardware frames the textile neatly. The piece pairs well with cufflinks in the same fabric for a coordinated set.
Presented in a narrow gift box with a foam insert, it stores safely and feels ready for milestones like graduations or promotions without losing a relaxed, creative personality.
Steps
- Cover a small button and trim the back flush.
- Adhere the button to a metal tie bar or pin using epoxy.
- Center carefully and secure with a clamp while curing.
- Polish the bar and test on a spare tie after drying.
Western Bolo Tie With Oversized Button Slide
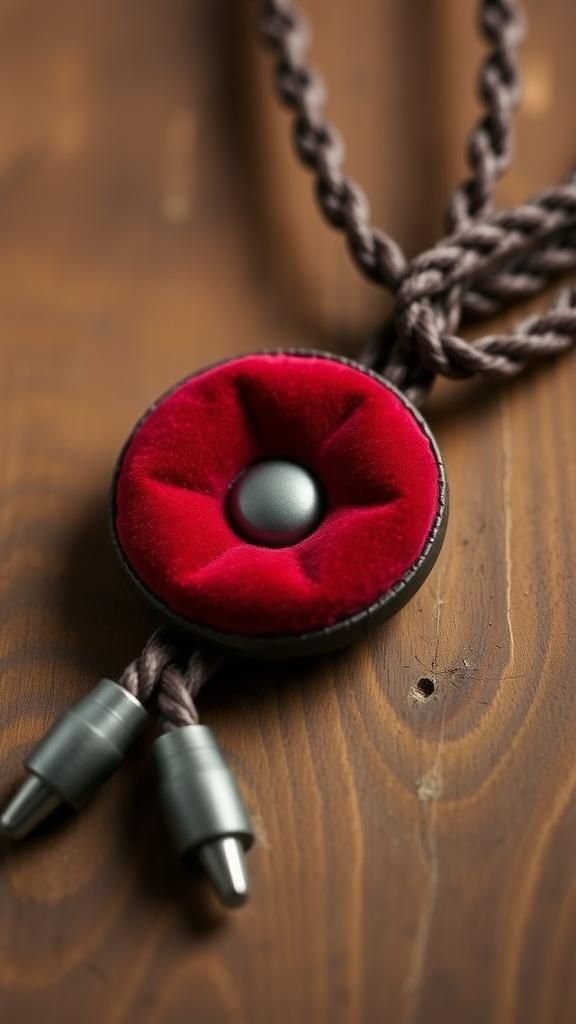
A bold fabric button becomes the slide for a bolo tie, blending western cues with textile charm. An oversized velvet or brocade dome sits in a metal bezel, gliding along braided leather cord.
End tips in silver, brass, or copper echo the slide hardware. Jewel tones, desert hues, or monochrome black create distinct moods, from gallery opening to campfire jams.
The adjustable slide sits high or low to match shirt styles. Displayed on a tall necklace card with a desert motif, the bolo reads artful and approachable for anyone who enjoys a little frontier flair.
Steps
- Cover a large button and set it into a bolo bezel with a dual-channel back.
- Thread braided cord through the bezel channels to create the slide.
- Add metal tips to the cord ends with a dab of glue.
- Let all adhesives cure before adjusting the slide on the cord.
Hair Barrette Adorned With Fabric Buttons

A classic French barrette turns into a petite gallery of fabric buttons, offering color and pattern along a sweep of hair. Cotton lawns, satin, and velvet mix to create depth, while prints can echo outfit accents.
A row of tiny domes across a metal clip feels polished for workdays and playful for weekends. Neutral bases blend with many hair shades, and bold brights highlight braids or half-up styles.
Presented on a curved display card shaped to the clip, it packs easily for gifting, and it looks charming perched on a vanity tray beside a favorite perfume.
Steps
- Cover several small buttons and remove shanks for a low profile.
- Roughen the barrette surface lightly for better adhesion.
- Glue the buttons across the clip in a neat row and weight gently.
- Allow full cure before styling hair.
Hand Chain Bracelet With Button Center
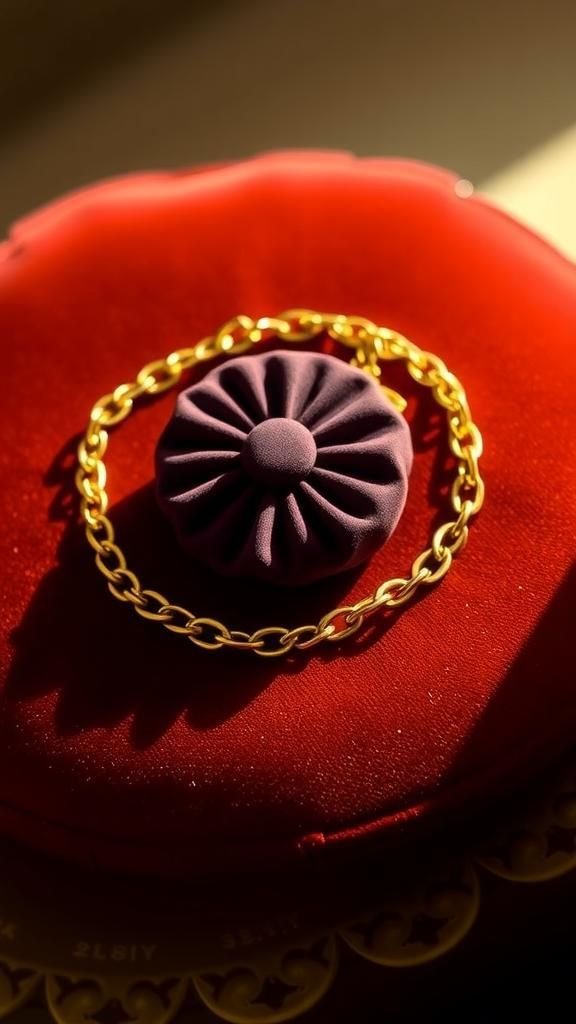
A hand chain links a slim bracelet to a ring with a delicate strand, framing the back of the hand with a fabric-button focal. The dome sits near the center, set in a bezel or connector, while fine chain in gold or silver traces elegant lines.
Solid silk or tiny geometrics keep the look refined; boho florals deliver festival charm. The silhouette feels airy yet expressive, layering easily with thin rings and bangles.
Displayed on a hand-shaped card or photographed on a velvet cushion, this piece invites curiosity and conversation at markets or parties.
Steps
- Cover a small to medium button and set it in a connector bezel.
- Build a bracelet chain and a ring loop sized to fit.
- Join bracelet and ring with a central chain passing through the button connector.
- Add clasps and test fit, adjusting links as needed.