Disclosure: This post contains affiliate links, which means we may earn a commission if you purchase through our links at no extra cost to you.
Embossed Metal Foil Art Tile Crafts turn small surfaces into gleaming stories. With embossed metal foil, foil art, and metal foil tiles, the raised textures catch light in mesmerizing ways.
These embossed tiles offer rich metallic finishes that make art tiles feel both nostalgic and modern.
I fell for metal embossing after rescuing a dented cookie tin and turning it into tiny art tiles for a kitchen wall. One embossed metal foil tile, tinted in teal and copper, became a keepsake gift, sparking a love for tile crafts that still grows.
Table of Contents
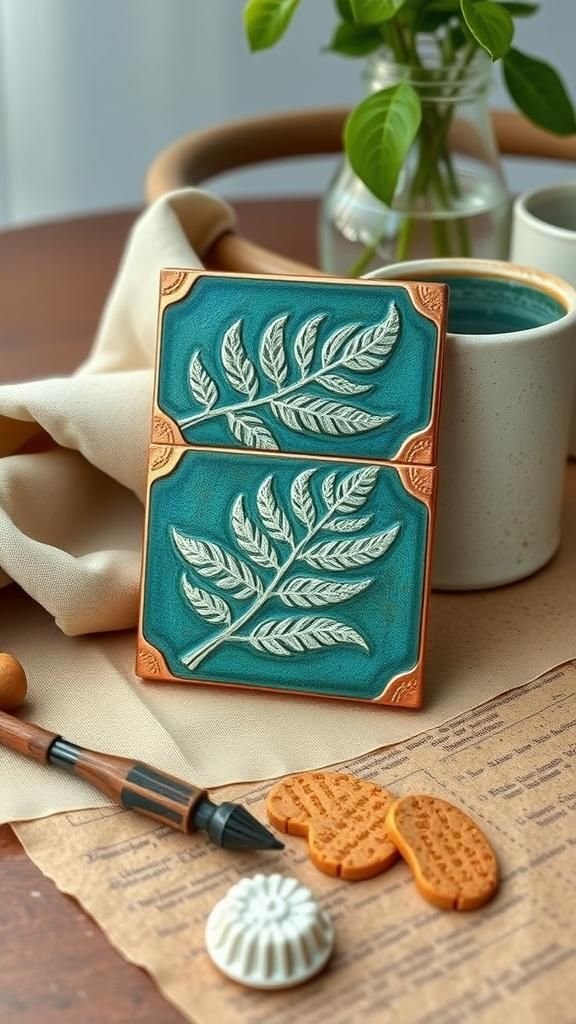
Rustic Patina Leaf Motif Metal Foil Tiles

An earthy leaf theme suits a rustic patina finish on metal foil tiles. Vein details wander across the surface, catching highlights along every ridge.
A mix of copper foil, antiqued greens, and muted browns forms a woodland palette that pairs well with reclaimed wood frames or stoneware mugs. Alcohol inks and microcrystalline wax lend depth and soft luster, while a clear resin topcoat brings glasslike clarity.
A felt backing adds quiet grip on tabletops. As a set, the tiles line a windowsill or nestle in a shadow box, a thoughtful nod to gardeners and nature lovers.
Steps
- Cut chipboard to tile size, cover with strong double‑sided tape, and apply heavy aluminum foil.
- Sketch leaf outlines and veins; emboss along lines with a stylus and add stippling around them.
- Shade with alcohol inks, blend lightly, and buff highlights with metallic wax.
- Finish with a clear resin topcoat and add felt to the back.
Geometric Art Deco Fan Embossed Foil Tile

Streamlined fan rays and crisp arcs echo glamorous Art Deco interiors. Bright gold or champagne foil contrasts with inky black accents for a luxe, evening-ready glow.
A brushed border and scored pinstripes give elegance without fuss, while enamel-like fills deepen the shadows between rays. The piece complements bar carts, mirrored trays, and marble vanity tops.
A velvet easel stand turns the tile into a chic vignette, while a series in alternating metals creates a smart gallery grid. Gift packaging in a black box with gold tissue adds a cinema‑era flourish worthy of vintage lovers.
Steps
- Cut a firm base, adhere foil, and lightly mark fan arcs with a compass or template.
- Emboss rays outward from a central point; refine edges with a ruler and stylus.
- Darken recesses with black ink or enamel, then buff the high points with metallic wax.
- Apply a glossy topcoat and mount on a small easel.
Moroccan Star Pattern Oxidized Copper Foil Tile

Interlocking stars and tessellated lines create rhythm worthy of a riad courtyard. Copper foil glows beneath layers of teal, lapis, and soft jade, invoking hand‑wrought lanterns and glazed zellige.
Grout-like shading in the channels deepens pattern definition, while a satin topcoat keeps a soft, aged sheen. The palette suits boho textiles, kilim pillows, and carved wood accents.
As a single charm, the tile crowns a bookshelf niche; as multiples, it forms a mosaic on an entry shelf. Wrapped with a tassel and a sprig of eucalyptus, it becomes a travel‑inspired keepsake.
Steps
- Prepare a square base with adhesive and cover with copper foil.
- Transfer a Moroccan star grid and emboss the lines, sharpening corners with a metal ruler.
- Tint panels with alcohol inks, patina solution, and subtle wax highlights.
- Protect with satin varnish and add mounting tape on the reverse.
Nautical Compass Rose Silver-Blue Foil Tile
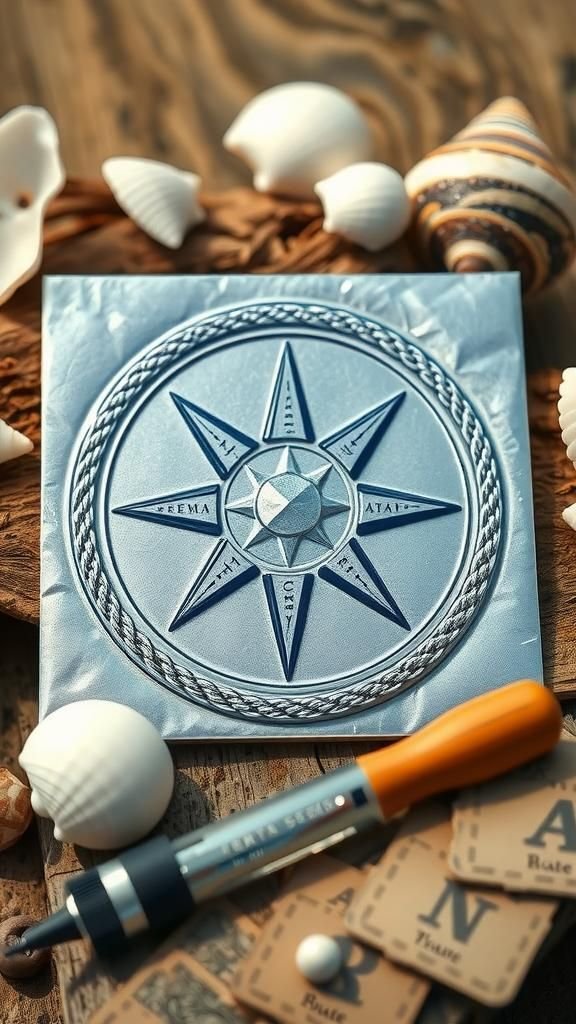
A compass rose radiates over brushed silver foil, with navy washes and powdery sky blues evoking sea charts and salt spray. Raised cardinal points catch bright glints, while a knurled border suggests rope trim.
Matte navy in the recesses contrasts with icy highlights, ideal for bathrooms, coastal kitchens, and lake cabins. A lacquer topcoat handles humidity and preserves the sheen.
The tile rests handsomely on a weathered driftwood stand or nests within a shadow frame beside shells. Wrapped in map paper with twine, it suits sailors, travelers, and anyone guided by the horizon.
Steps
- Foil a cut tile base and lightly mark a circle and compass points.
- Emboss directional points, inner star, and rope-like border with a stylus.
- Apply blue inks to recesses; polish the raised areas for crisp contrast.
- Coat with clear lacquer and mount to a small driftwood base.
Botanical Fern Imprint Verdigris Foil Coaster Set
Delicate fronds arch across copper or bronze foil, each leaflet preserved in raised relief. Verdigris gradients and mossy shadows deliver a garden‑path atmosphere, while matte edges balance the shine.
Durable cork backs keep tabletops quiet and steady. The set harmonizes with stoneware, linen napkins, and green glass tumblers, enhancing porch refreshments or tea breaks.
Tied with hemp cord and a botanical tag, the group becomes a welcoming housewarming surprise. When not in service, the tiles stack with charm or rest in a small tray, a tiny conservatory of leaves under glasslike protection.
Steps
- Create four small bases, cover with copper foil, and tape fern sprigs in place.
- Emboss around stems and leaflets to capture contours; add texture to the background.
- Brush on verdigris inks; buff highlights along the fronds.
- Add a protective topcoat and adhere cork to the backs.
Mandala Sunburst Rainbow Alcohol Ink Foil Tile

A radiating mandala forms concentric petals and dotted halos across bright aluminum. Rainbow alcohol inks blend from magenta to tangerine, lime, and sapphire, with gilded wax along the ridges for a warm glow.
The piece enlivens meditation corners, desk spaces, or gallery ledges with a joyful burst. A crystalline resin finish magnifies color depth and adds a smooth, touchable surface.
Paired with a small incense holder or quartz cluster, it becomes a mindful gift. Grouped with two or three tonal companions, it reads like stained glass when sunlight hits the metallic grid.
Steps
- Foil a square base and trace a circular mandala layout with light guidelines.
- Emboss petals, dots, and scallops, building depth toward the center.
- Blend rainbow alcohol inks outward; apply gilding wax to raised lines.
- Pour a thin resin coat and cure on a dust‑free surface.
Celestial Moon And Stars Midnight Foil Panel

A crescent moon floats among sprinkled stars over a deep indigo ground, the metallic surface peeking like distant constellations. Silver or pewter foil carries cool highlights, while charcoal shading in the background intensifies the night sky effect.
Fine dot textures describe clusters, and a brushed border encircles the scene. The panel suits nursery shelves, reading nooks, or bedside tables as a calming accent.
Mounted on matte black matboard, it feels gallery‑ready. A ribboned box with star confetti and a tiny moon charm turns it into a keepsake for stargazers and midnight readers.
Steps
- Prepare a rectangle base, apply pewter foil, and sketch a crescent and star placements.
- Emboss the moon, stars, and dotted clusters; add a soft brushed border.
- Wash indigo ink across the field and deepen shadows with charcoal alcohol ink.
- Topcoat with satin varnish and mount on a black mat.
Steampunk Gears And Cogs Aged Tin Tile

Intermeshing gears, rivet lines, and perforated grilles evoke a workshop bench frozen in time. Tin or aluminum foil gains depth from smoky browns and oily blues, while bronze wax warms the teeth of each cog.
Pseudo screw heads ring the edges, and cross‑hatched textures fill the negative space. The tile looks at home beside vintage gauges, Edison bulbs, and leather‑bound journals.
It frames nicely within a shadow box paired with a small key. Wrapped with kraft paper and a bronze ribbon, it suits tinkerers and fans of industrial stories in metal.
Steps
- Foil a sturdy base; trace overlapping gear shapes and rivet rows.
- Emboss teeth, hub details, and rivets; texture backgrounds with crosshatch patterns.
- Shade with brown and blue inks; highlight edges with bronze wax.
- Apply a protective coat and mount in a shallow shadow box.
Gothic Lace Filigree Blackened Pewter Accent Tile

Scrolling lacework creeps across pewter foil, creating delicate negatives against a softly blackened ground. The pattern reads romantic and mysterious, enhanced by hematite tones and pearl‑gray highlights.
Filigree edges taper into a beaded border, adding subtle rhythm. This ornate tile complements velvet, taper candles, and antique frames, lending a moody flourish to mantels or boudoir shelves.
A satin finish keeps the glow low and silky. As a gift, it arrives wrapped in tissue and ribbon, tucked within a small velvet pouch that hints at secret letters and whispered stairways.
Steps
- Cover a base with pewter foil and trace a lace filigree pattern.
- Emboss scrolls, beads, and fine openings; refine with ball‑tip stylus.
- Darken recesses with black ink, then gently polish raised lace.
- Finish with satin varnish and edge the tile with black wax.
Southwest Aztec Diamond Turquoise Foil Plaque Tile

Bold diamonds step across the surface in a cadence borrowed from woven blankets. Turquoise and rust tones layer over warm aluminum or copper foil, with charcoal lines in the channels for definition.
The palette pairs beautifully with terracotta pots, woven baskets, and sun‑bleached wood. A raw‑edge leather thong transforms the plaque into a hanging accent, while a desk stand gives a sharp profile view of the relief.
Packaged with a dried chili and kraft shred, it brings desert warmth to the recipient’s shelf or office corner.
Steps
- Apply foil to a rectangular base and map stepped diamond motifs.
- Emboss lines and facets, deepening the channels for shadow.
- Flow turquoise and rust inks over the surface; wipe back to reveal highlights.
- Add a clear coat and punch two top holes for a leather hanger.
Minimalist Linear Stripe Brushed Aluminum Accent Tile

Cool aluminum foil gains sophistication through understated parallel bands and crisp negative space. A brushed grain runs in one direction while gently raised stripes intersect, creating soft shadow play without ornament.
Graphite and smoke‑blue tints deepen select channels, keeping the palette calm and architectural. This tile pairs well with concrete planters, monochrome prints, and glass vessels.
A magnetic backing turns it into an elegant note holder on a steel board. Given in a linen envelope with a tiny silver cord, it suits those who prefer quiet design and clean geometry.
Steps
- Foil a square base and establish a brushed grain with light scoring.
- Mark parallel lines and emboss alternating stripes to varied heights.
- Tint a few channels with diluted gray-blue inks; polish high points.
- Attach a magnetic sheet to the back and apply satin varnish.
Honeycomb Hex Pattern Golden Foil Trivet Tile
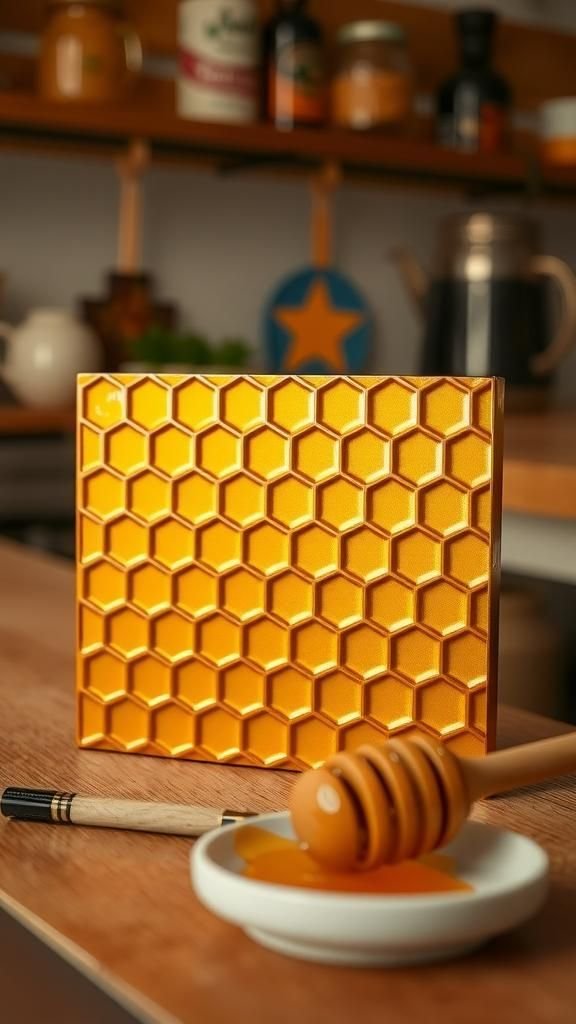
A golden honeycomb grid creates a lively field of hexagons, each cell slightly domed for a tactile feel. Amber and caramel inks flow into recesses, while beeswax‑colored highlights glow along the ridges.
The look complements warm kitchens, stone countertops, and wood boards. Heat‑resistant pads on the underside protect surfaces, making this tile a handsome resting spot for teapots or serving bowls.
Wrapped with a small honey dipper and gingham ribbon, it sweetens housewarming or hostess moments. Displayed on a plate stand, it reads like a sunlit window in miniature.
Steps
- Foil a thick base and lay out a hexagon grid with a template.
- Emboss outlines and softly dome each cell for gentle relief.
- Shade recesses with amber inks; buff highlights for a golden glow.
- Add heat-resistant feet and a durable clear coat.
Art Nouveau Iris Relief Pearl Foil Tile

Sinuous stems and unfurling petals sweep across a pearl‑silver field, channeling the grace of Art Nouveau posters. Lavender and mulberry tones nestle into the recesses, while opaline highlights skim the high edges of the iris.
A slim border with beaded corners frames the blossom. The tile flatters glass‑front cabinets and boudoir vanities, blending with satin ribbons and cameo trinkets.
A velvet‑lined box elevates the gifting moment, and a discreet sawtooth hanger supports wall display. The final glow feels like moonlight caught in a flower’s curve.
Steps
- Cover a base with pearl aluminum foil and sketch flowing iris lines.
- Emboss stems, petals, and beaded corners, smoothing the contours.
- Wash lavender inks into recesses; polish the raised relief gently.
- Coat with clear gloss and add a small hanger on the back.
Seashell Ripple Texture Pearlized Foil Accent Tile

Radiating ripples flow outward like sand lines left by a retreating tide. Pearlized foil shimmers between pale aqua and misty gray, while subtle mica sparkles echo sea spray.
The pattern pairs with driftwood frames, sea glass, and linen throws, making a breezy coastal vignette. A water‑resistant topcoat supports bathroom or beach house display.
Packaged with a tiny shell and a note card, this tile makes a gentle souvenir from the shore. When grouped, alternating ripple directions form a hypnotic wave wall for a small gallery shelf.
Steps
- Foil a base with pearl aluminum and sketch concentric ripples.
- Emboss flowing grooves at varying widths to mimic tidal lines.
- Tint with pale aqua and gray inks; add a hint of mica shimmer.
- Protect with a water-resistant clear coat and frame in driftwood.
Patchwork Quilt Motif Mixed-Metal Foil Display Tile

A patchwork grid combines squares of brass, copper, and pewter foils, each with unique textures like herringbone, crosshatch, and dotted stipple. Jewel-toned inks drift across sections, with oxblood, emerald, and sapphire creating a cozy heirloom spirit.
Blackened seams outline the blocks, referencing stitched sashing. The tile pairs with quilt stacks, heirloom buttons, and vintage scissors for a nostalgic tableau.
A stand elevates it on a sewing shelf, while a shadow frame turns it into a miniature textile in metal. Wrapped with baker’s twine and a button tag, it charms quilters and makers.
Steps
- Prepare a base and panel it with different metallic foils in a grid.
- Emboss varied textures in each block and define seams with straight-edge lines.
- Glaze sections with jewel-tone inks, then buff highlights on the highest points.
- Seal with clear varnish and mount in a shallow frame.
Calligraphy Monogram Antique Gold Foil Keepsake Tile

A sweeping initial in flourished calligraphy rises from antique gold foil, framed by a laurel wreath and dotted accents. Oxidized umber in the lows contrasts with champagne highlights on the letterform, lending weight and ceremony.
The palette pairs with wedding stationery, silk ribbon, and ivory blooms. A velvet‑backed easel offers elegant display on mantels or desks, while a hinged box keeps it safe as a milestone memento.
Presented in tissue with a wax‑seal sticker on the lid, it marks engagements, anniversaries, or new homes with luminous warmth.
Steps
- Foil a square base with antique gold and sketch a monogram and wreath.
- Emboss the initial, thicken strokes, and add laurel leaves and dotted details.
- Antique the recesses with brown ink; brighten the highs with light wax.
- Apply gloss varnish and mount on a velvet-backed easel.
Raised City Map Street Grid Silver Foil Tile

A favorite neighborhood appears as a raised grid of avenues, rivers, and parks over brushed silver foil. Graphite washes fill narrow streets, while teal marks waterways and small squares hint at plazas.
The modern monochrome palette suits offices and studio shelves, especially near architectural books and drafting tools. A tiny heart or star marks a meaningful location.
Framed in black with a white mat, the tile becomes a personal landmark. As a gift, it arrives wrapped in tracing paper with a map pin tucked inside, perfect for homecomings and farewells.
Steps
- Foil a base and transfer a simplified street grid from a map printout.
- Emboss streets, river edges, and park outlines; thicken key avenues.
- Shade streets with gray ink and tint water features with teal.
- Varnish and frame with a contrasting mat; add a small marker symbol.
Floral Damask Pattern Cranberry Foil Wall Tile

Opulent damask flourishes bloom across cranberry foil, with burgundy depths in the recesses and champagne light on the crests. The motif feels plush and romantic, pairing with velvet throws, mercury glass, and gilt frames.
A narrow scalloped edge finishes the border, while a high‑gloss coat invites reflected candlelight. On a small easel or within a baroque frame, the tile elevates a vanity or powder room.
Wrapped in tissue with a sprig of dried rose, it becomes a heartfelt token for those who love grand interiors in miniature.
Steps
- Foil a base with cranberry metallic sheet and trace a damask repeat.
- Emboss scrolls and petals, keeping centers high for strong light play.
- Glaze recesses with burgundy ink; polish the crests for contrast.
- Apply high-gloss varnish and add a scalloped edge detail.
Celtic Knotwork Emerald-Gold Interlace Foil Tile

Interwoven bands twist and return in endless paths over warm gold foil. Emerald stains fall into the channels, emphasizing over‑under crossings that gleam on the ridges.
The pattern feels both ancient and precise, pairing with carved wood, linen, and stoneware. A matte edge and a rune‑like corner dot motif complete the frame.
This tile perches gracefully on a bookshelf between mythology volumes, or stands within a small oak frame. Presented with twine and a sprig of clover, it honors heritage while glowing with quiet sophistication.
Steps
- Foil a square base with gold and mark the interlace layout.
- Emboss over-under bands, keeping crossings crisp and raised.
- Stain the channels with emerald ink and buff the gold strands.
- Finish with matte varnish and frame in simple oak.
Meditative Zen Wave Suminagashi-Inspired Silver Tile

Undulating lines echo ink-on-water marbling, flowing in gentle waves across silver foil. Soft grays and stone blues pool in troughs, while airy highlights skate across crests.
The surface feels serene and rhythmic, perfect near incense bowls, pebbles, or bonsai. A satin topcoat preserves the calm sheen without glare.
As a grouping, panels arranged in a triptych create a meditative horizon. Gifted in a kraft sleeve with a smooth river stone, the tile invites quiet pauses and slow breaths.
Steps
- Foil a rectangular base and draft gentle parallel wave lines.
- Emboss alternating curves to different heights, creating rolling relief.
- Flow diluted gray-blue inks into troughs; wipe back the ridges.
- Apply satin varnish and mount on a simple wood block stand.
Holiday Snowflake Sparkle Ice Blue Foil Tile

Crystalline snowflakes branch over ice‑blue foil, each arm etched with tiny points and facets. Opal glitter and frosty white accents settle in recesses, while chrome-bright highs flash along the edges.
The look suits mantel garlands, winter tablescapes, and festive shelves. A ribbon loop transforms the tile into a hanging ornament, or it rests on a mini easel beside twinkling lights.
Nested in tissue with silver cord, it makes a seasonal token for friends, neighbors, or hosts. After the holidays, it still charms as a wintry window vignette.
Steps
- Foil a base with ice-blue metallic and draw snowflake geometries.
- Emboss branching arms, facets, and tiny dots; add a beaded border.
- Shade channels with cool gray ink and add a touch of fine glitter.
- Topcoat with clear gloss and add a ribbon hanger.