Disclosure: This post contains affiliate links, which means we may earn a commission if you purchase through our links at no extra cost to you.
I can still remember the little thrill of finding a floral pick or a tiny frame tucked on a low shelf at Dollar Tree. Those trips felt like scavenger hunts where a simple glass jar or a plain candle holder carried promise.
Dollar Tree Home Decor Crafts became a hobby that turned spare minutes into small, satisfying projects.
Over time the projects piled into a messy, joyful pile on my dining table. Dollar Tree Home Decor Crafts taught me to notice textures, colors, and the way a ribbon or a dab of glue can change how a room feels.
Table of Contents
Upcycled Dollar Tree glass jar lanterns with lace

I found that a plain glass jar can glow like a tiny shrine when paired with lace and warm light. The lace softens the glass edge and casts delicate shadows across the tabletop.
Holding the finished lantern felt odd and familiar at once, like a thrifted find reimagined. The coolness of the glass contrasts with the fuzzy ribbon that loops around the neck, and nearby the faint scent of candle wax invites a slow, quiet evening.
Steps
- Gather a clear glass jar, a lace trim, battery tealight, ribbon, and hot glue.
- Apply a thin bead of glue around the jar’s upper third and press the lace into place until secure.
- Tie ribbon around the jar neck for extra texture and tuck the battery tealight inside.
- Arrange several jars together for a clustered glow on a table or mantel.
Tiny faux succulent terrarium from a plastic cloche

The tiny world inside a clear cloche can feel peaceful and oddly alive, even when only faux succulents are involved. I liked the matte of the faux soil against the glossy cloche top, and the little leaves that catch light at different angles.
The scene felt miniature and tidy, like a calm corner of a garden captured in glass. Running a fingertip along the base offered the faint roughness of glued sand and the smoothness of painted stone.
Steps
- Collect a clear plastic cloche, faux succulents, craft sand, small pebbles, and adhesive.
- Spread a thin layer of craft sand across the base and press tiny pebbles into the surface for variation.
- Place faux succulents into the sand, arranging leaf tips to catch light naturally, and secure with adhesive.
- Position the cloche over the scene and set on a shelf with soft indirect light.
Dollar Tree mirror tile mosaic tray for coffee table

A rectangular serving tray covered in mirror tiles became a tiny stage for everyday things. The mirrored surface caught afternoon light and flashed fragments of a houseplant across the ceiling.
Running a hand over the edge revealed the ridged grout lines and the smooth glass faces. I enjoyed the way ordinary mugs looked slightly transformed when reflected upside down.
The tray had weight and presence, like a small reflective altar that highlighted worn ceramic and brass candlesticks alike.
Steps
- Gather a wooden serving tray, mirror tiles, mirror adhesive, grout, and a sponge.
- Arrange mirror tiles across the tray surface to form a pleasing pattern before gluing them down.
- Apply adhesive to each tile base, press into position, and allow to set.
- Spread grout over the tiles, wipe away excess with a damp sponge, and polish the tile faces once dry.
Painted faux wood bead garland for shelving display

Holding the garland felt playful; each bead warmed slightly in my hand as if recalling sun on a porch. The painted beads offered a matte, almost chalky finish that contrasted with the slick string glimpsed between them.
Draped along a shelf, the garland added movement and a friendly rhythm that made stacked books look intentional. Sometimes a small knot or a stray brushstroke gave it character, turning a simple strand into a tiny, textured story across the woodgrain.
Steps
- Pick up wooden beads, cotton cord, acrylic paint in chosen hues, and a large needle.
- Paint beads in desired colors and let them dry thoroughly on a protected surface.
- Thread the beads onto the cord using the needle, spacing them for a balanced look.
- Tie off the cord ends and arrange the garland over a shelf or draped between hooks.
Framed seasonal prints with simple Dollar Tree frames
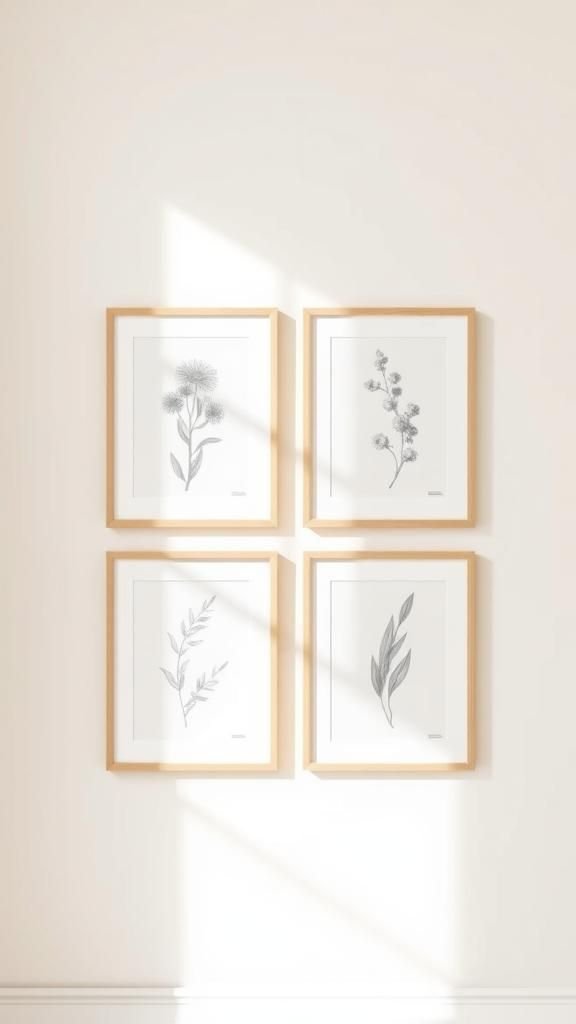
A thin frame can change the mood of a hallway. I slipped in black and white botanical clippings and watched the frames harmonize with a pale wall.
The lightweight plastic frames had tiny nicks, but those imperfections read like history rather than flaw. From across the room the prints felt curated and calm, each edged cleanly, each line of leaf or script crisp.
The collection created a kind of visual punctuation on my wall, quiet but undeniably present.
Steps
- Select a set of small plastic frames, printed artwork, and acid-free mounting paper.
- Trim prints to fit and mount onto the backing for a flat, centered appearance.
- Insert the mounted prints into the frames and secure the backing.
- Hang the framed pieces in a small grid or staggered arrangement to suit the wall space.
Chalkboard sign makeover for entryway seasonal notes
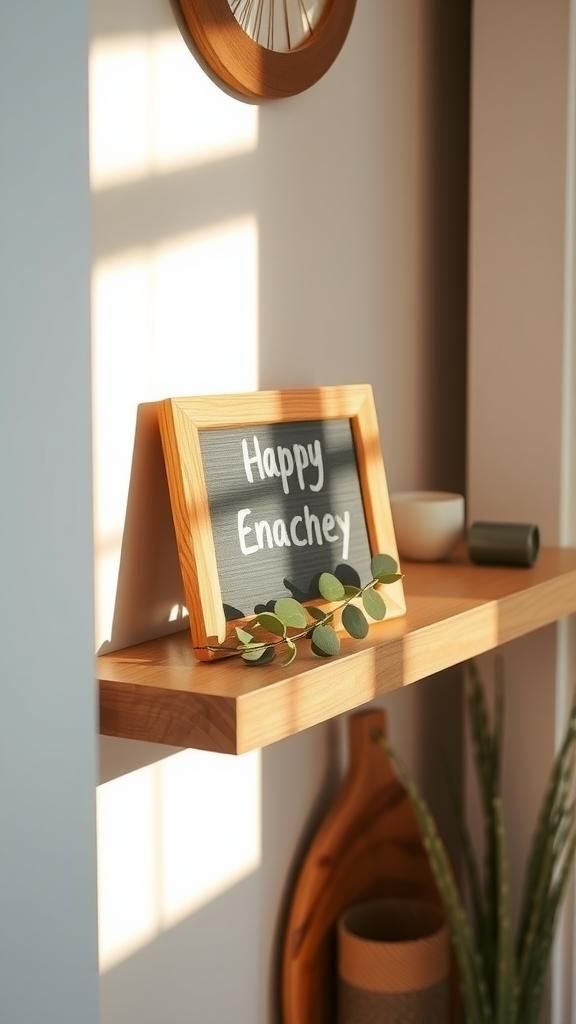
A tiny chalkboard sat by the door, cozy and earnest. The matte black surface absorbed light and highlighted the chalk lines when a new message appeared.
I liked the small smudges of old chalk along the edge; they felt human, like footprints into the day. Layered on a narrow shelf and surrounded by a sprig of faux eucalyptus, the sign read like a small conversation starter.
Adjusting a handwritten word always brought a brief, satisfying focus to the morning.
Steps
- Find a small chalkboard sign, colored chalks, and decorative ribbon or twine.
- Wipe the board clean with a damp cloth to provide a fresh writing surface.
- Practice the chosen message on paper, then write it onto the board with chalk, adding small accents.
- Hang or lean the chalkboard in the entryway and tuck in a sprig of faux greenery.
Tiered tray vignette with thrifted Dollar Tree finds
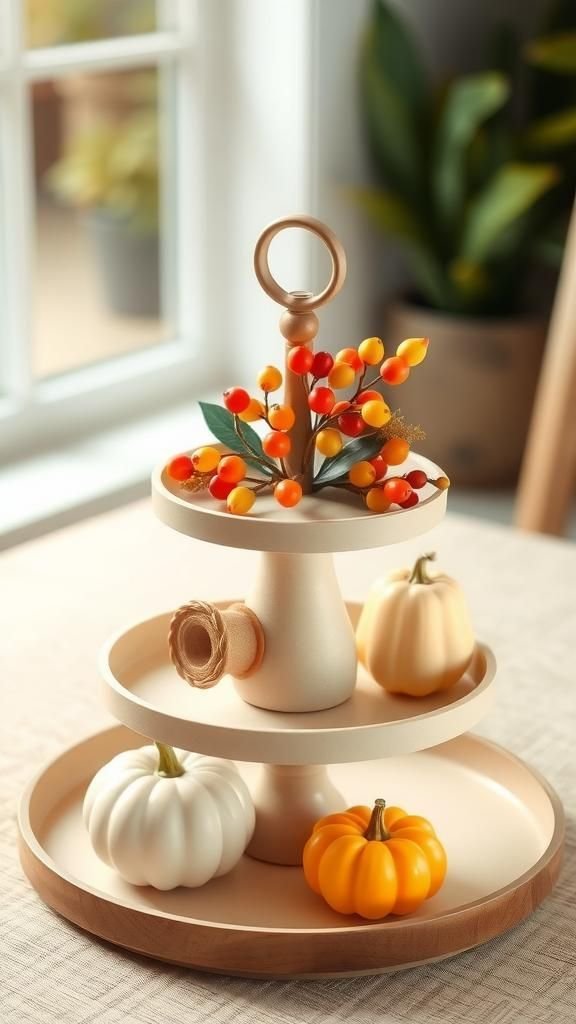
A tiered tray became a tiny stage where unexpected pairings felt natural. A ridged ceramic bud vase sat beside a small wooden spool, and a cluster of faux berries threaded through like punctuation.
Running a fingertip along the tray’s rim exposed flecks of paint and the faint scent of dust, both oddly comforting. The layered levels created a mini landscape that changed with the seasons, each element pulling the eye from top to bottom like a little story told in objects.
Steps
- Acquire a tiered tray, small accent pieces from Dollar Tree, and filler elements like faux berries or mini pumpkins.
- Place taller items on the top tier and arrange lower pieces to create balance and depth.
- Tuck filler elements around the base of larger items to soften edges and fill gaps.
- Step back and tweak placements until the vignette reads as a cohesive little scene.
Rustic faux concrete planter from a plastic tub

A glossy plastic tub can take on a weathered personality when finished with a textured coat. The surface lost its shine and adopted the dull, gritty feel of poured concrete that felt surprisingly weighty under the fingers.
Nestled on a windowsill, the planter read like a scavenged find from a flea market. Tiny paint specks and a faint chalky residue told of multiple afternoons spent adjusting placement and watching light migrate across the rim.
Steps
- Gather a plastic tub, textured craft medium or thick paint, acrylic paint in gray tones, and a handful of small stones.
- Apply the textured medium in uneven layers to mimic poured concrete and allow to dry.
- Add gray and off-white paint washes to create depth and the look of weathering.
- Place a small potted plant or faux greenery inside and rest the planter on a sunny sill.
Seasonal wreath built from Dollar Tree faux greens

A round wreath hung on a thin, painted door and instantly felt like an invitation. The faux greenery had a slight plasticky sheen but smelled faintly of the craft store shelf, a clean, neutral note.
Interspersed faux berries added little pops of color that the eye kept returning to. When I stepped back the wreath read as a composed circle of quiet color, a gentle punctuation at the threshold that made coming home feel like stepping into a tiny ceremony.
Steps
- Choose a foam wreath form, a selection of faux greenery stems, seasonal accents, and floral wire.
- Layer greenery around the foam form, securing stems with floral wire as you arrange them.
- Tuck seasonal accents into gaps and fix them in place so they remain stable.
- Hang the wreath and allow the arrangement to settle for a day before final adjustments.
Shabby chic mason jar utensil holder makeover

A mason jar with chipped paint looked like something rescued from an old kitchen when it wore a layer of chalky white and a frayed ribbon. The jar’s rim caught light where the paint thinned, revealing glimpses of glass beneath.
Tucked into a pantry corner with wooden spoons peeking out, it felt like a fragment of a lived-in home. The texture of the ribbon and the hint of uneven paint gave the piece a gentle, well-used charm that invited casual handling.
Steps
- Find a mason jar, chalk-style paint, sandpaper, ribbon, and a small brush.
- Paint the jar with a light coat for a chalky finish and let dry fully.
- Gently sand a few edges to reveal glass and create a worn appearance.
- Tie a ribbon around the neck and display with utensils or faux stems.
Mini bead curtain tassels for a cozy doorway touch

A string of tiny tassels swayed in the doorway, catching light in a way that felt playful rather than fussy. Each tassel carried a soft rustle that announced movement like a small greeting.
The texture of the threads against fingertips felt soft and slightly rough where fibers separated. The curtain added a hint of privacy without blocking the air, and the pastel colors made the passage feel warmer and more intimate, as if the threshold itself had learned to whisper.
Steps
- Select embroidery floss in chosen colors, wooden beads, cotton cord, and scissors.
- Create tassels by wrapping floss, securing tops, and trimming to even lengths for consistency.
- Thread wooden beads onto cords and attach tassels at intervals along a main cord.
- Hang the tassel string in a doorway or as a decorative room divider.
Textured candle clusters on a painted wooden board

Grouping candles on a painted board gave them a shared identity. The candle wax had a matte warmth that contrasted with the board’s smoother painted grain.
Tiny drips and uneven tops made each candle feel like a slow little landscape. The scent, when lit, was faint and comforting, a mellow presence that suggested quiet nights.
The arrangement summoned a relaxed mood, where cutting across the room felt like stepping into a low-lit corner reserved for reading and slow conversations.
Steps
- Choose candles of different heights, a wooden board, sandable paint, and adhesive pads.
- Paint the board and allow it to dry until the finish reads soft and matte.
- Position candles on the board in an appealing cluster and secure each with an adhesive pad.
- Place the board on a coffee table or sideboard, keeping candle placement stable and level.
Cozy fabric-covered votive holders with layered textures

A tiny votive wrapped in soft fabric felt like a small hug on the tabletop. The cloth’s weave showed close-up, a pattern of threads that invited a gentle touch.
Candlelight warmed the fibers and softened the overall silhouette until edges blurred into a warm halo. The mixture of linen, knit, and frayed cotton created visual interest and a comfortable, lived-in effect.
Set among books and a steaming mug, the votives turned an ordinary evening into something that felt intentionally quiet.
Steps
- Gather glass votive holders, scraps of fabric, craft adhesive, and scissors.
- Cut fabric pieces slightly larger than each votive to allow for wrapping and texture overlap.
- Adhere fabric to the votive surface, smoothing for subtle texture and leaving slight frayed edges for softness.
- Place battery tealights inside and tuck the votives among books or on a bedside table.
Geometric wall art using Dollar Tree foam shapes
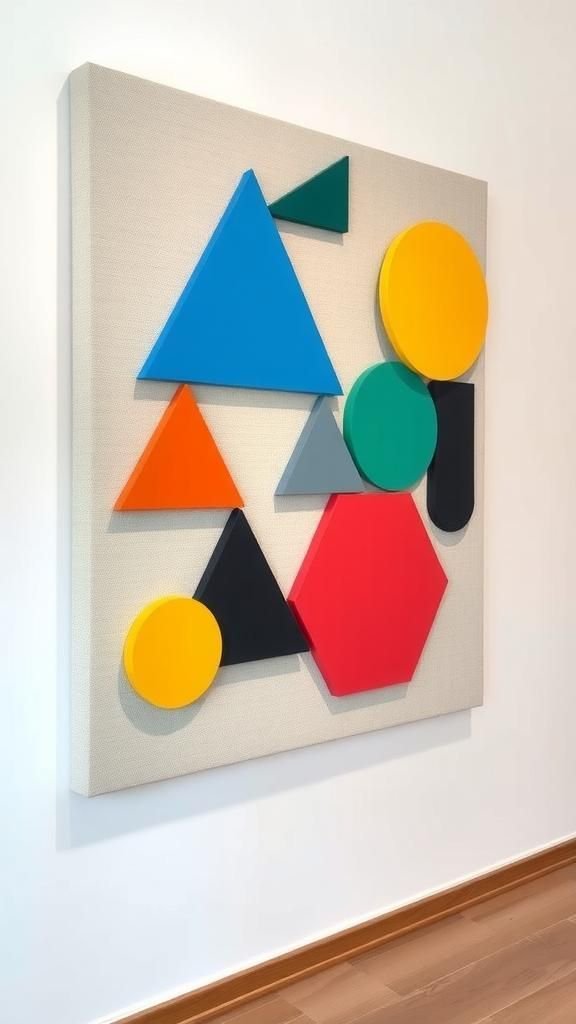
A composition of foam triangles and discs leaned against a wall like a modern found object. The foam’s soft matte finish absorbed light, turning angles into planes of gentle shadow.
Colors met at edges and produced surprising harmonies that felt thoughtfully arranged rather than manufactured. The tactile difference between foam and the painted backing created a subtle relief that invited a moment of close inspection.
Each piece looked like a small study in balance, a conversation between color, shape, and a calm wall space.
Steps
- Purchase foam shapes, a stretched canvas or foam board, acrylic paints, and craft adhesive.
- Arrange the shapes into a geometric composition on the board until satisfied with the balance.
- Glue the shapes in place and add painted accents or washes around them for cohesion.
- Allow everything to dry and then hang the artwork in a hallway or above a console.
Sherbet-hued planter dip-dye technique on ceramic pots

A subtle gradient on a small ceramic pot reminded me of sherbet melting into a glass. The soft transition of color felt dreamy and youthful, like a summer afternoon folded into the plant’s soil.
Fingers left faint smudges on the rim, evidence of curious handling while deciding where to place the pot. The glaze had a satin sheen that reflected light without glare, making the planted greens look fresher.
The overall effect was breezy and unexpectedly cheerful on a narrow sill.
Steps
- Choose small ceramic pots, acrylic paints in two to three pastel hues, and a wide soft brush.
- Apply the lightest color at the top and blend downward with the next shade to create a gradient effect.
- Smooth transitions with a damp brush to achieve a soft dip-dyed look, letting layers dry between applications.
- Seal if desired and pot a small plant to sit inside for a bright windowsill display.
Button-embellished picture frame for nostalgic charm

A wooden frame scattered with mismatched buttons read like an heirloom made from keepsakes. The buttons’ glossy and matte finishes caught light in different ways, creating tiny highlights that danced whenever the frame shifted.
Each button carried a memory of color and weight, and together they formed a playful border that softened the photo within. The tactile contrast between cool frame wood and warm polymer buttons invited a gentle inspection, bringing an unexpectedly intimate quality to a simple family snapshot.
Steps
- Collect a plain wooden frame, a selection of buttons in various sizes and finishes, and craft adhesive.
- Lay out the buttons around the frame to explore placement and balance without fixing them permanently.
- Adhere buttons in chosen positions, layering smaller ones into gaps for visual interest.
- Allow the adhesive to cure completely before displaying a photograph inside the embellished frame.
Minimalist bookends made from concrete-painted blocks

A pair of small blocks anchored the edges of a book stack with a quiet insistence. The surface, painted to mimic concrete, had faint brush textures and micro-variations that made each block feel slightly different.
The weight of the pieces turned the books into a tidy cohort, and the neutral tone let spines of all colors sing without clashing. The overall look read austere but personal, like a little architectural detail carved out of a weekend afternoon.
Steps
- Obtain small wooden blocks, textured gray paint or concrete-effect paint, and painter’s tape.
- Paint the blocks with layered washes to build a subtle concrete look, allowing texture to develop.
- Add light distressing or speckling for authenticity and seal with a matte finish once dry.
- Place the blocks at the ends of a row of books to serve as practical bookends.
Whimsical paper tassel garland for a cheerful nook

A string of paper tassels swung gently beneath a shelf, each one whispering with movement. The paper’s crisp edges created a playful rustle that punctuated silence with a small music.
Colors ranged from muted to bright, and the randomness of tassel lengths gave the garland an unstudied charm. It felt like a casual celebration that could live year-round, a strip of cheer that nudged a bare wall toward personality without shouting.
The paper caught afternoon light in shallow glints and thin shadows.
Steps
- Choose tissue paper sheets in chosen colors, twine, and a glue stick.
- Fold and cut the tissue to form tassels, rolling and securing each at the top for a neat finish.
- Attach tassels along the twine at comfortable intervals, allowing slight variation in length.
- Hang the garland along a wall, shelf edge, or over a small window to add color and texture.
Distressed metal-look candle holder from thrifted finds

A candle holder faux-aged to read like hammered metal carried a small heroic aura. The patina had greenish notes and faint rust specks that made it feel timeworn in a pleasing way.
Light from a candle reflected irregularly off the uneven surface, producing tiny highlights and dark valleys. The piece occupied a corner with quiet dignity, complementing wooden furniture without competing.
Brushing fingers along the holder revealed deliberate imperfections that felt like evidence of a life lived slowly.
Steps
- Pick a plain candle holder, metallic paints, patina green paint, and a small dry brush.
- Layer metallic base paint, then gently apply patina green in concentrated spots for an aged look.
- Add fine rust speckling with a stipple tool or brush for texture and depth.
- Seal the finish with a matte varnish and place a candle to test how light interacts with the surface.
Rustic hanging planter from a repurposed wire basket
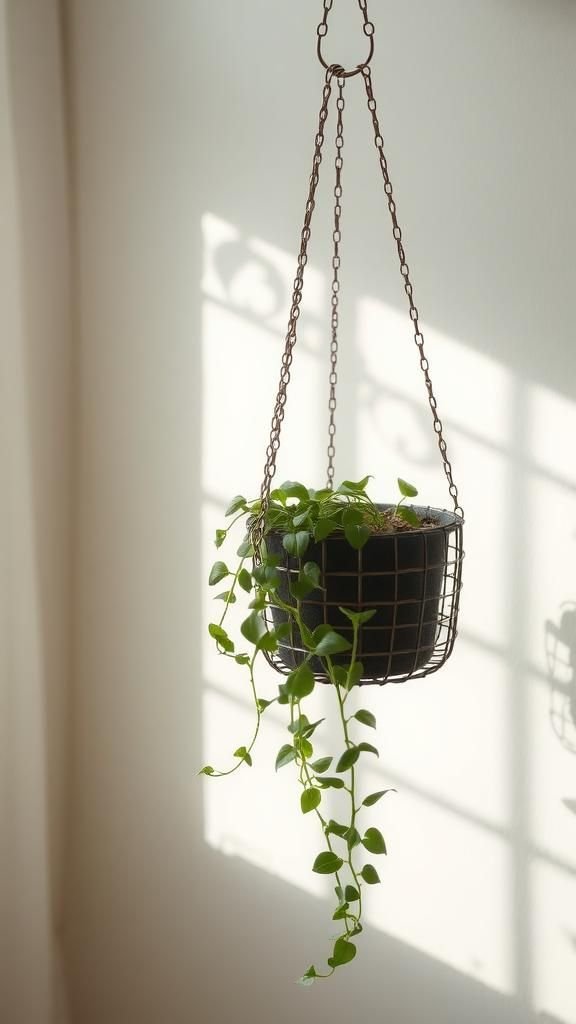
A small wire basket suspended from a hook looked like a found object turned gentle container. The metal’s coolness juxtaposed with the softness of a trailing plant tucked inside, creating a pleasing tension.
Tiny soil crumbs and the faint scent of indoor earth clung to the rim, tangible echoes of growth. The basket cast lace-like shadows on the wall at sunset, and each leaf seemed to lean toward the light.
The whole arrangement felt lively yet relaxed, like a room breathing slowly.
Steps
- Find a small wire basket, coco liner or moss sheet, hanging chain or rope, and a potted trailing plant.
- Line the basket with the liner and add the plant, arranging roots and soil for stability.
- Attach the chain or rope securely to the basket and hang from a sturdy hook.
- Adjust plant placement so leaves can trail naturally and catch available light.
Paper mache letter initials with textured finishes

A pair of oversized initials leaned against a shelf and read like a small declaration without words. The paper mache surface held tiny ridges and dips that made paint pockets and highlights, and each brushstroke registered as a quiet decision.
When placed near family photos the letters felt companionable, adding a sculptural punctuation to the flat images. The texture invited a closer look, and dust settling into crevices caught the light in ways that made the forms feel older than they were.
Steps
- Purchase paper mache letters, gesso or primer, textured paint or medium, and fine brushes.
- Prime the letters to create an even base and allow to dry.
- Apply textured paint layers, building up ridges and gentle irregularities for interest.
- Allow to cure fully before placing the initials on a shelf alongside photos or trinkets.