Disclosure: This post contains affiliate links, which means we may earn a commission if you purchase through our links at no extra cost to you.
I have a soft spot for small, tactile projects that rescue leftover materials and turn them into cozy objects. Collecting wine corks over months felt like gathering little sculptures; there was texture under my fingertips and a faint vineyard scent that kept bringing me back to the idea of making something out of them.
DIY Wine Cork Crafts became a relaxed habit, a weekend ritual that mixed slow handiwork with a touch of nostalgia.
Over evenings I tried many ideas, from textured coasters to tiny planter accents, and found that each project taught me about glue lines, grain, and color variations. These DIY Wine Cork Crafts encouraged small experiments and the kind of quiet focus I really enjoy.
Table of Contents
A rustic round wine cork coaster set

When I laid a circle of corks on the table, the soft, warm surface felt immediately welcoming. The cork ends showed little rings like mini tree trunks and the side grains added a sculptural rhythm that made each coaster feel handcrafted.
I appreciated the gentle give under a cold glass and the quiet way condensation seemed to steady itself. Light bounced off the cork differently depending on the angle, so a set on the coffee table created a low, organic pattern that invited people to pick one up and linger.
Steps
- Arrange corks in a tight circular pattern on a flat surface until the size feels right.
- Apply a bead of strong craft adhesive between each cork to hold the layout firmly together.
- Place a heavy book or flat weight over the assembled coaster for several hours to allow bonds to set.
Keychains that keep little stories alive

A cluster of cork keychains grew from a drawer of corks and a desire to attach small memories to everyday objects. Each keyring carried a tiny weight and a faint scent of oak, and the cork surface wear developed into a personal patina after a week of pockets and jingles.
I liked how names or short dates sank into the cork when pressed with a simple metal stamp, turning a neutral scrap into something that felt private and carried the memory of a bottle opened with friends.
Steps
- Trim a cork lengthwise to create a slimmer charm piece suitable for a keyring.
- Insert a small eye screw into one end until it sits snug without splitting the cork.
- Thread a split ring through the eye screw and add a key or tag for everyday carry.
A bulletin board that breathes corky texture

Covering a board with corks turned a bland wall square into something tactile and surprisingly cozy. My fingers enjoyed wandering over the mosaic of ends and sides, each cork offering a slightly different tone and pattern.
The board absorbed pins without fuss and developed a lived-in look as notes and postcards layered over time. The edges where corks met the frame created tiny ridges that cast soft shadows, making the whole piece feel more like a collected surface than a manufactured product.
Steps
- Cut a foam or cork backing to the desired board size and lay corks in a tight mosaic pattern across that backing.
- Secure each cork to the backing with a bead of adhesive, maintaining even spacing for a uniform surface.
- Allow the adhesive to cure fully, then mount the board on the wall and begin pinning notes and photos.
Tiny planters with a corky charm
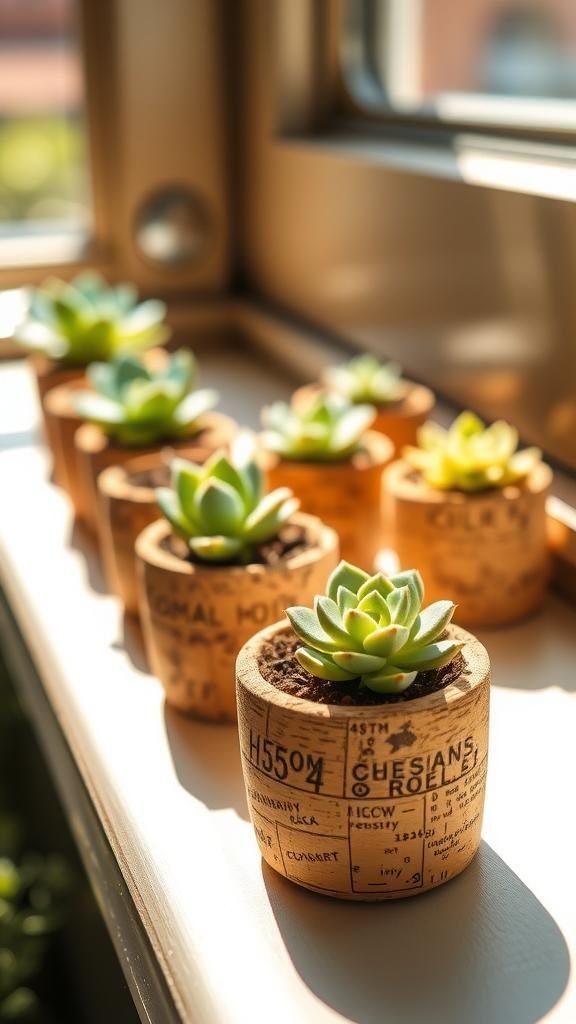
Holding a tiny succulent in a cork planter felt whimsical and oddly satisfying. The light weight of the cork and its matte surface contrasted with the glossy green leaves of small plants, creating a miniature landscape.
I noticed how the cork absorbed a hint of soil dust and how morning light warmed its tones. Clustered on a sunny sill, the planters created a casual rhythm and invited close inspection; the tiny plants made the corks feel like sculpted pebbles in a small, living arrangement.
Steps
- Hollow out the center of a cork using a slender tool until a cavity forms to hold a small plant and soil.
- Place a small amount of potting mix inside the cavity and nestle a tiny succulent or cutting gently into the cork.
- Position the cork planters on a sunny windowsill and mist sparingly to avoid overwatering the small soil quantity.
Napkin rings with a cozy, homemade look

I remember setting a table where each napkin ring carried a story from a different evening; the warm tone of cork complemented ceramic plates and wooden cutlery. Fingers liked the slight resistance as napkins slipped through a ring, and the sound was muted, almost hush-like.
The rings picked up little dents and smudges that made them feel more personal after each use. On festive nights they seemed to anchor place settings, adding an approachable, low-key charm that matched both casual dinners and low-light gatherings.
Steps
- Slice corks into uniform rings of the desired thickness using a sharp blade on a stable surface.
- Smooth any rough inner edges with fine sandpaper until the napkin slides comfortably through the hole.
- Arrange the finished rings around folded napkins on the table, adjusting spacing for an inviting presentation.
A textured trivet that holds heat and stories
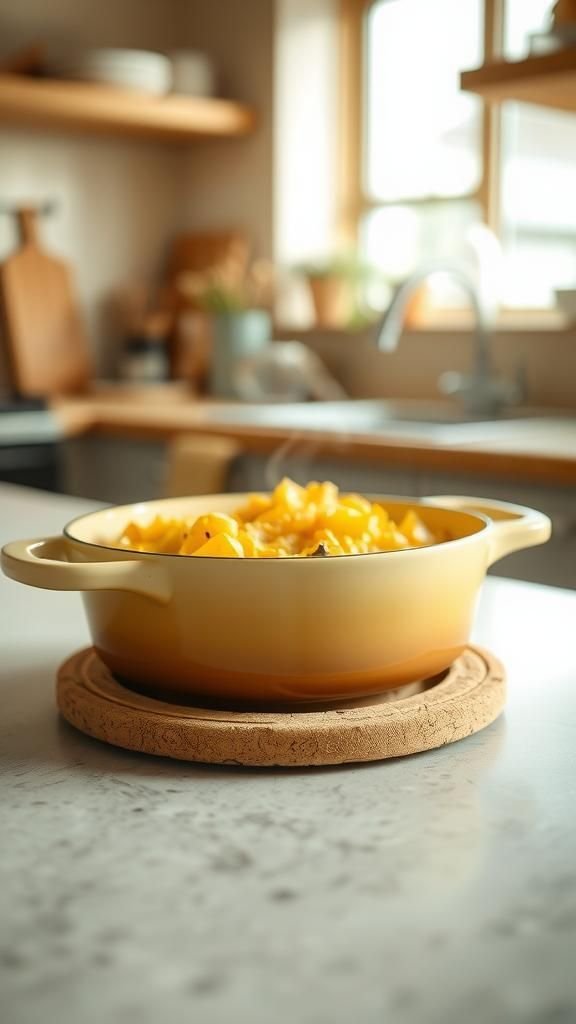
There was comfort in placing a recently baked dish on a cork trivet; the soft heft of cork felt gentle beneath a steaming pot. The surfaces absorbed ambient kitchen scents and the tiny circular patterns created a pleasing, almost rhythmic backdrop to the metal of cookware.
I liked how the trivet showed use without losing character—small scorch marks and darkened edges blended into the overall texture. In the bustle of meal prep, the trivet offered a quiet visual pause and a tactile counterpoint to smooth countertops.
Steps
- Lay cork halves or slices in a heat-friendly pattern on a protective surface until the trivet footprint looks balanced.
- Bond pieces together with a heat-resistant adhesive, ensuring firm contact between each cork element.
- Let the assembly set completely before placing hot pots on top to protect the kitchen surface.
A soft cork bath mat with subtle warmth
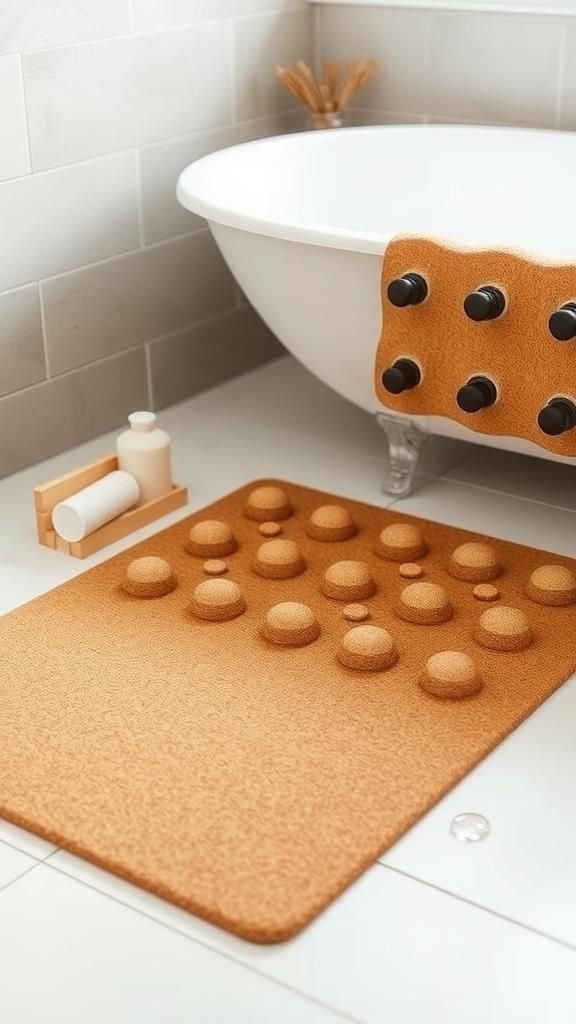
Stepping onto a cork mat after a shower felt gentle and grounding, like a brief moment of calm. The tiny pits and grains gave a gentle, massaging quality under bare feet, and the surface stayed pleasantly dry compared with fabric mats.
I enjoyed how the mat blended with neutral tiles, its warm beige tones absorbing light differently through the day. Over time it gathered faint impressions from wet toes and bath salts, turning into a quiet record of mornings and late-night routines rather than a pristine object.
Steps
- Arrange a grid of cork disks on a water-resistant backing until the mat size suits the bathroom entry.
- Adhere the cork pieces securely to the backing and allow the glue to cure thoroughly away from moisture.
- Rinse lightly after use if needed and let the mat air-dry to maintain its texture and longevity.
A seasonal wreath with cork petal texture

I once looped corks into a circular arrangement and found the overall silhouette felt surprisingly floral. From a distance the wreath read like layered petals; up close the textured cork ends offered a pleasant, matte contrast to leafy greens.
Hanging on a door it collected breezes and shadow, each cork catching highlights and casting tiny shadows that changed through the day. The wreath seemed to invite people to pause and mention the scent or touch, becoming a small conversational anchor on cool afternoons.
Steps
- Form a sturdy circular base and press corks against it in overlapping rows to recreate a petal-like surface.
- Secure corks with an adhesive compatible with both cork and the base material, keeping the pattern consistent.
- Attach a hanging loop and display the wreath on a door or wall, checking that all corks remain firmly set.
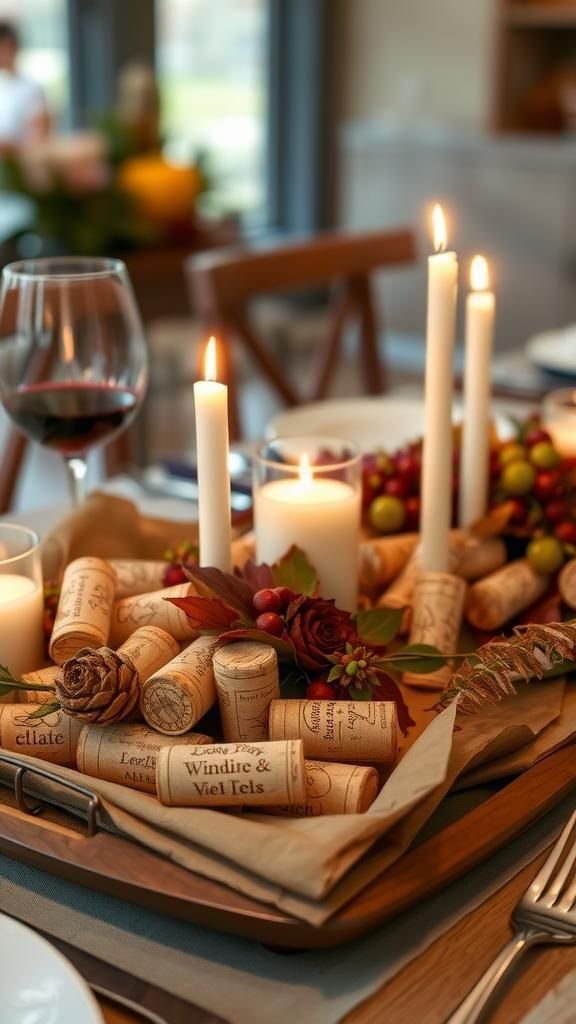
A charming tabletop candle cluster centerpiece

Arranging candles among a bed of corks gave the table an intimate glow and an earthy backdrop that softened flicker. The matte cork texture contrasted with glass and flame, and the little crevices caught warm light in a way that made the whole centerpiece feel calm and lived-in.
I enjoyed moving it from coffee table to dining table and noticing how the scent memory of wine lingered faintly, like a trace of the evenings that produced the collection. It created a low, warm focus that encouraged slow conversation.
Steps
- Place a selection of pillar or votive candles on a heatproof tray and surround them with corks to form a clustered base.
- Ensure corks stay clear of direct flame by maintaining a small buffer zone around candle wicks.
- Light candles and enjoy the gentle glow, attending to them as needed for safety during use.
A playful cork key holder on a hallway wall

A slim board studded with corks became an instant spot for dropping keys and odd notes. Each cork protruded like a tiny peg with an approachable softness, and the light grain made the whole piece seem snack-sized and friendly.
I liked listening to the small clack when a key was hung and watching how the corks developed tiny dents from repeated use. It became one of those home objects that felt unassuming but reliable, the sort of thing people reached for without thinking as they shuffled out the door.
Steps
- Mount a narrow wooden board on the wall and glue corks horizontally at regular intervals to act as pegs.
- Allow adhesive to cure fully before placing keys on the cork pegs to ensure stability.
- Check periodically that corks remain secure and press gently if any feel loose after frequent use.
Cork letters spelling out simple sentiments
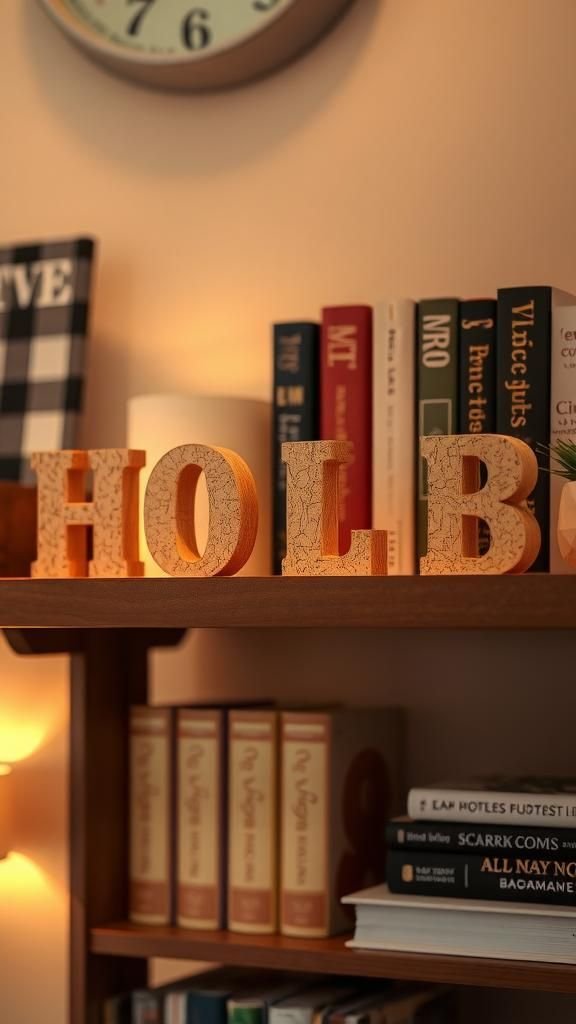
Cutting and arranging corks into block letters added a playful, tactile message to a shelf. The letters showed little rings and side grain that changed with each viewing angle, creating a lively texture.
I liked the way light picked out the top edges, making the message appear almost carved. Placed near a stack of books or a plant, the letters brought a handmade voice into the room.
They absorbed dust and soft shadows in a way that felt homey rather than precious, blending into daily life with ease.
Steps
- Sketch the outline of each letter on a thin backing board and glue corks within those outlines to build up the letter shape.
- Trim any corks that extend beyond the letter edges and sand lightly for a neat profile.
- Seal lightly if desired for durability, then place letters on a shelf or mantel as decor.
A mosaic picture frame full of tiny tales

I swapped a plain frame for one tiled with varied cork ends and found the portrait within gained a textured border that felt like a hand-stitched edge. The cork surfaces caught light unevenly, producing a gentle sparkle around the image.
Holding the frame, the weight was pleasantly earthy and the small ridges invited touch. Over time the frame collected soft fingerprints and tiny smudges that made it feel like a handled keepsake.
It turned ordinary photos into something wrapped in the warm, understated character of reclaimed material.
Steps
- Lay cork ends closely together on the flat border of a picture frame until the entire frame edge is covered.
- Affix each cork with a strong bond and let the frame rest flat while the adhesive cures.
- Insert the photo and hang or display the finished frame, enjoying the added texture around the image.
A miniature roof for a birdhouse using corks

Draping corks across a little rooftop created a scaled texture that looked like tiny shingles. From a bench across the yard, the roof shimmered in dappled sunlight, each cork catching a highlight.
The muted tones of the cork matched weathered wood, and when rain hit the roof it made a soft, muffled sound rather than a sharp patter. Watching small birds land, I felt like the house belonged to the garden, not an add-on; the cork roof read like an organic choice that blended with plant life and aged gracefully over seasons.
Steps
- Lay corks in overlapping rows along the slope of a small birdhouse roof to mimic shingles, ensuring even coverage.
- Secure each cork with weather-resistant adhesive suitable for outdoor use and allow the roof to set fully.
- Position the birdhouse in a sheltered spot and observe how the cork roof weathers gently over time.
A set of cork magnets for the kitchen door
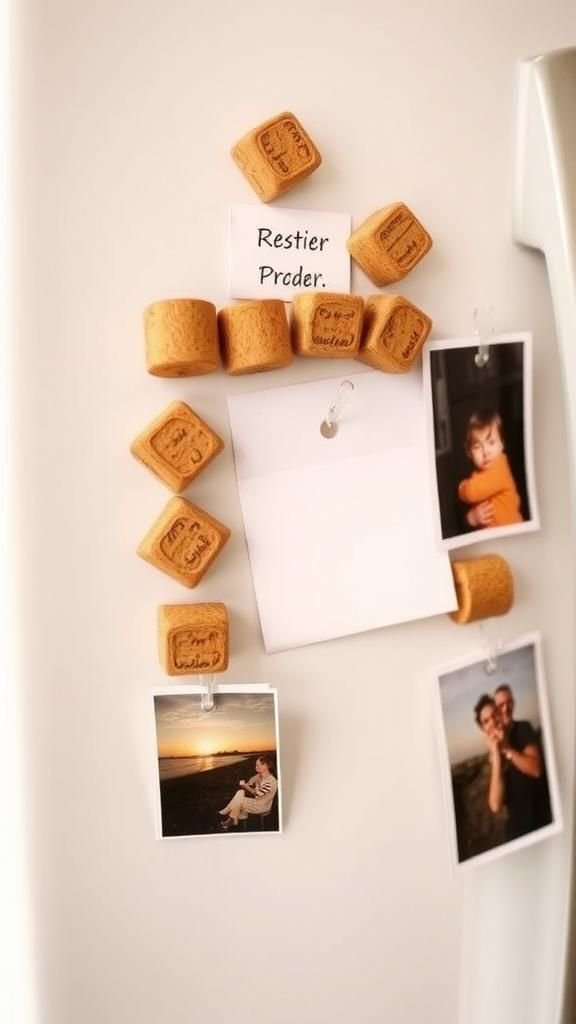
Tiny cork circles stuck to the fridge felt casual and warm, holding grocery lists and scraps without fuss. The cork surface was soft to the touch and muted the sound of magnets clacking into place.
I enjoyed the small palette of tan and brown cork tones against stainless steel, an understated contrast that made each note feel more homely. Over time the magnets gained little impressions from fingers and the odd spilled jam, making the kitchen door look lived upon rather than arranged—an honest display of daily life.
Steps
- Cut cork into small disks and attach a round magnet to the back of each disk with a strong adhesive.
- Allow the magnets to set fully before placing notes on the fridge to ensure a firm hold.
- Arrange magnets to secure lists and papers, swapping designs as desired for a playful kitchen display.
Cork stamps that add subtle ink textures
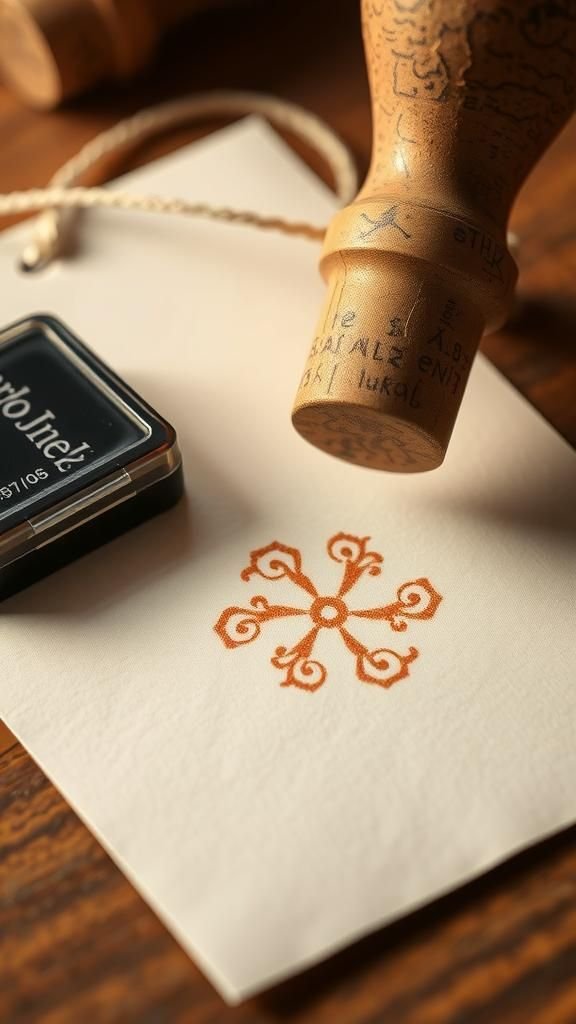
A homemade stamp carved from a cork offered a gentle, imperfect mark that felt personal when pressed into ink. The soft resistance of cork meant impressions had warmth and small irregularities that printed like handwriting.
I liked the smell of ink against the faint vineyard scent of cork and the quiet ritual of pressing cards and tags. Stamped patterns looked approachable and hand-made, their edges feathering slightly on textured paper and adding a friendly, human touch to notes and labels left around the house.
Steps
- Shape a cork face to form the desired simple motif and press it into a soft carving block or cut surface for clarity.
- Apply ink to the shaped face and press the cork firmly onto paper or cardstock to transfer the design.
- Clean the cork surface after use and store it flat to preserve the carved shape for future stamping.
A drawer knob makeover with cork comfort

Replacing cold metal knobs with cork-topped pulls added a soft handshake to opening drawers. The plush give of cork felt quiet under fingertips and warmed quickly to touch.
Light highlighted the little rings on the ends and the side grain created subtle striping. The look of cork against painted drawer faces was unexpectedly chic, lending a casual, hand-assembled feel to everyday furniture.
Over weeks, small smudges and slight darkening from repeated contact made the knobs feel well-used and comfortable rather than new.
Steps
- Unscrew existing knobs and fit an eye screw or bolt into a cork piece to create a custom knob head.
- Attach the cork knob assembly to the drawer front using the original hardware or a suitable replacement.
- Tighten securely and check the fit, making small adjustments if needed to ensure smooth drawer operation.
A whimsical cork mobile for gentle breezes

Watching a cork mobile turn in a slow draft reminded me of tiny boats bobbing on a still pond. Each cork had a private patina and made a quiet, muted clink when the pieces met.
Suspended against a pale wall, the shapes cast moving shadows that felt poetic without fuss. The arrangement added a touch of movement to a room without dominating it, offering a low-key, meditative presence that changed with sunlight and window breezes.
It became one of those small things that draws the eye when the room is otherwise still.
Steps
- Thread corks onto thin cord or wire and space them thoughtfully along the length to achieve visual balance.
- Attach the strands to a lightweight ring or driftwood to create a hanging mobile structure.
- Hang the mobile in a gentle-draft area and adjust strand lengths to encourage soft, harmonious motion.
A cork jewelry display with quiet character

Laying necklaces and earrings across a cork board felt like arranging small treasures into a soft landscape. The cork held pins and hooks with gentle resistance, and the muted background made metals and stones stand out.
I enjoyed the way light reflected differently off polished gems and matte cork, creating a pleasing contrast. Each time I reached for something the cork left a tiny indent that became part of the piece’s visual history, a subtle record of use that made the display feel personal rather than curated for a show.
Steps
- Mount a corkboard on the wall or inside a cabinet and add small pins or hooks for hanging jewelry.
- Arrange necklaces, bracelets, and earrings across the board, spacing items to avoid tangling.
- Replace pieces as worn and refresh the display occasionally by rotating jewelry locations for balance.
A centerpiece of cork and seasonal botanicals
Combining cork with sprigs of seasonal greenery created a low, layered centerpiece that felt grown rather than arranged. The soft cork tones calmed the brighter colors of berries and leaves, and the assembly smelled faintly of earth and citrus depending on the greens chosen.
During a meal the centerpiece sat quietly, catching candlelight and offering a natural backdrop to plates and conversation. Over several evenings the botanicals settled and dried slightly, lending the piece an evolving quality that felt honest and unhurried.
Steps
- Place a low tray and arrange a bed of corks as a base, then nestle botanical sprigs and accents among them.
- Balance the composition visually, distributing color and texture evenly across the tray.
- Replace or refresh botanical elements as needed to maintain a lively, seasonal appearance.
A rustic wine cork clock face for the wall

A clock made of cork felt quieter than a metal or plastic face, absorbing ticking into a softer presence. The concentric rings of cork ends created a subtle timeline around the hands, and I liked watching light graze the tiny ridges as hours passed.
The tactile surface invited an absent, unconscious touch when passing by, and the object seemed less like a tool and more like a calm companion to daily rhythms. It fit well in a kitchen or reading nook where busy timekeeping softened into a comfortable background hum.
Steps
- Cut corks to uniform lengths and arrange them radially on a round backing to form the clock face.
- Install a clock mechanism at the center, ensuring hands move freely above the cork surface.
- Mount the finished clock on a wall and set the time, enjoying the muted presence it brings to the room.
Cork coasters with painted edge accents
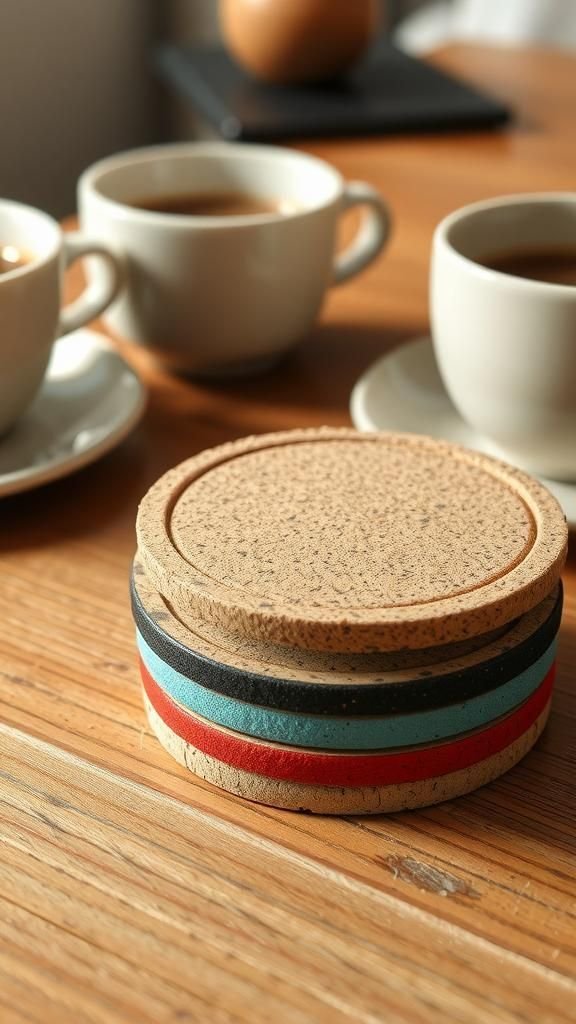
Adding a thin band of color to the coaster edges gave each piece a playful personality without stealing the cork’s natural charm. The painted rims peeked around cups and mugs, offering a little surprise when lifted.
I liked how the tactile cork and the smooth paint created a contrast under fingertips, and how the colors coordinated with ceramics on the table. Over time the paint saw gentle abrasion at contact points, which made the coasters feel lived-in and softened the initial crispness into something comfortable and familiar.
Steps
- Slice corks into flat coasters and sand edges gently for a smooth profile.
- Paint a thin band of color around the coaster edges and allow the paint to dry thoroughly.
- Seal lightly if desired and place coasters under cups to protect surfaces while enjoying their visual pop.