I always end up making little heart garlands when February rolls around. There’s something about tiny hearts moving in a draft and a table sprinkled with scraps that warms up a room and my mood.
DIY Valentine Heart Garland Crafts have become my cozy ritual for turning leftover materials into something that feels thoughtful without being fussy.
Best Sellers


As an Amazon Associate, I earn from qualifying purchases.
This collection grew from afternoons spent with tea and paper, chasing color combos and textures. Each idea here is a small invitation to play with materials, to remember the tactile pleasure of creating, and to bring a bit of handmade cheer into a space.
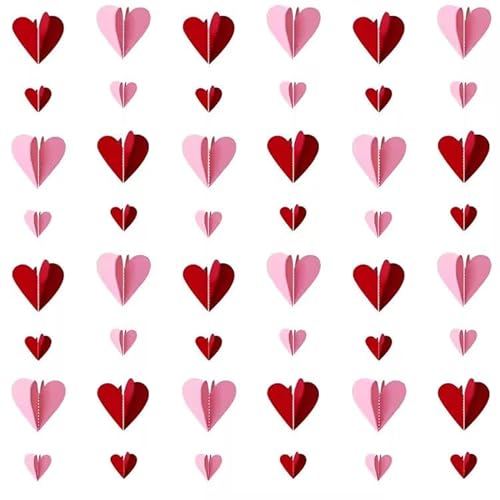
Simple folded paper hearts strung on twine

The crisp snap of paper and the soft loop of twine make this heart garland one of those quiet pleasures. I enjoy the way patterned sheets contrast with plain cardstock, the faint rustle when a breeze brushes across the mantel.
It often sits above a window, catching a slant of late afternoon light and casting little heart shadows on the wall. Making a few in different scales gives the strand a playful rhythm.
It feels like a tiny, paper parade that brightens an ordinary evening.
Steps
- Gather patterned paper and plain cardstock, then lay pieces out for color pairing.
- Fold sheets into small heart shapes along a center crease, then trim outlines to create hearts.
- Pierce a tiny hole near the top of each heart and thread them onto a length of twine.
- Space hearts evenly along the twine and knot the ends for hanging.
Felt heart bunting with soft, cozy textures
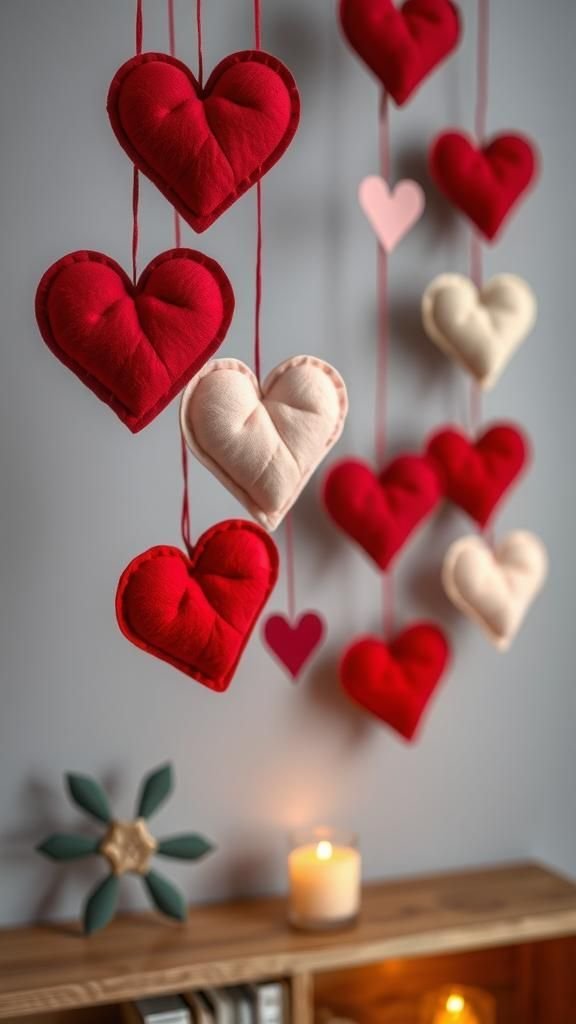
Felt hearts bring warmth in both sight and touch; they carry a muffled hush compared with paper. I love arranging rich scarlet, blush pink, and cream tones together so each heart reads as a soft jewel.
The edges have a plush quality and the garland acquires a gentle weight that lets it hang with calm gravity. When the heater clicks on in the evening, the colors feel even cozier against a neutral wall.
There’s a homemade charm to these that invites lingering and small smiles.
Steps
- Trace heart shapes onto different felt pieces, then cut out a variety of sizes.
- Stitch two felt hearts together around the edges, leaving a small opening to add batting if a puffed look is desired.
- Thread hearts onto a ribbon or thin cord, spacing them with small knots or beads for separation.
- Tie loops at each end of the ribbon for hanging.
Fabric scrap hearts for a colorful, frayed look
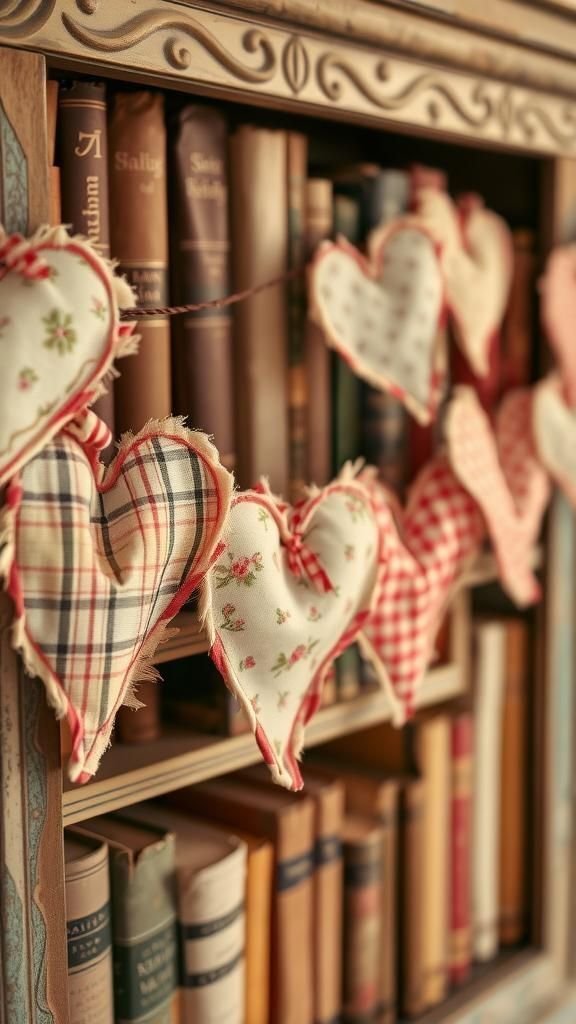
This garland feels honest and a little wild, with frayed edges and mismatched prints that tell tiny fabric stories. I often reach for old dress scraps or faded cottons, layering prints that wouldn’t normally live together and loving the accidental combinations.
Each heart has a slightly different weight and the string sways in an irregular rhythm that makes the whole piece feel alive. It sits well over a doorway or slung across a bookcase, bringing an unbuttoned, homey energy to a room.
Steps
- Cut heart shapes from assorted fabric scraps, allowing for some frayed edges.
- Pair fabrics for a front and back, then stitch around the edges leaving a small gap for turning.
- Turn hearts right-side out and topstitch around the perimeter to secure the raw edges.
- Thread hearts onto a rustic cord, spacing them unevenly for a casual look.
Delicate lace hearts for a vintage touch
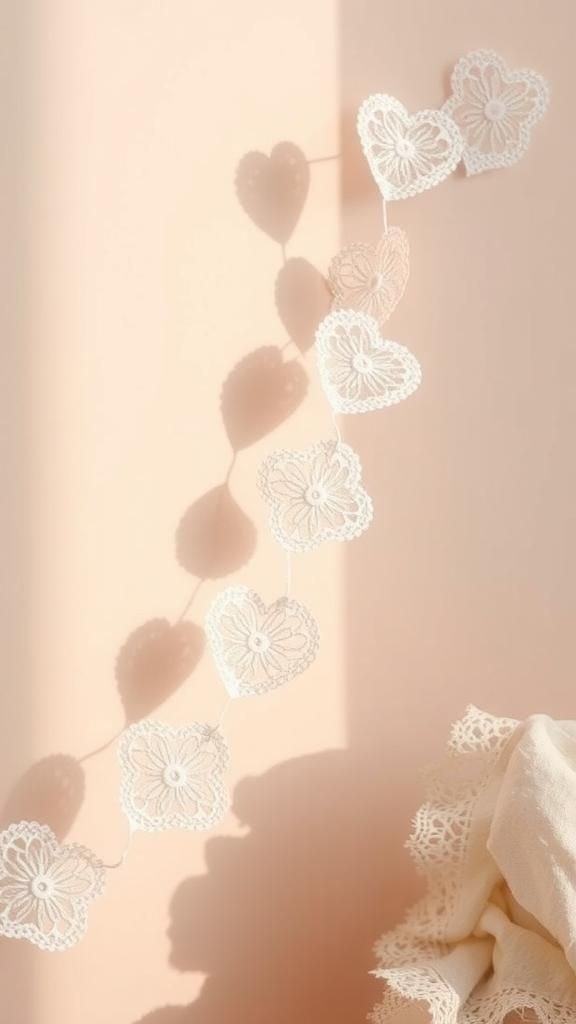
There’s an airy elegance in lace hearts that always catches my eye. Light filters through openwork patterns and casts delicate shadows on the surface beneath.
I imagine these hung across a bedroom headboard or over a brunch table, their faint movement adding a whisper of romance. The texture feels almost like a memory—thin and intricate—with an old-summer quality.
When layered over a darker background the lace becomes more pronounced, turning modest scraps into something quietly ornate.
Steps
- Trace heart shapes onto vintage lace or lace-trimmed fabric and cut carefully around motifs.
- Back each lace heart with lightweight fabric for stability, then stitch the layers together along the edges.
- Punch small holes near the tops and thread hearts onto a satin ribbon or fine twine.
- Hang the garland where light can pass through the lace for shadow play.
Pom-pom hearts for playful, fluffy garlands
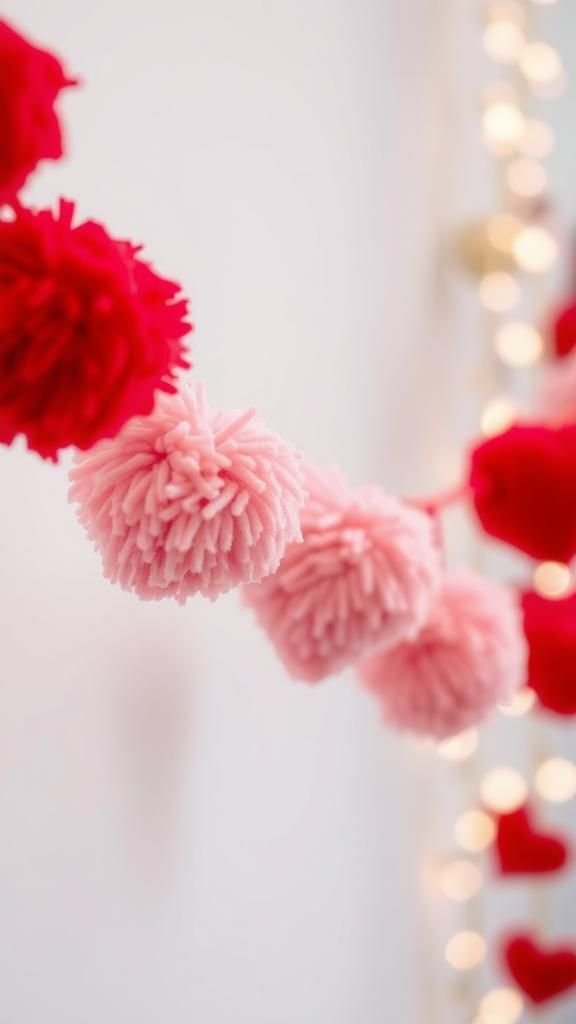
Pom-pom hearts have a joyful, tactile presence that makes me grin every time. The little tufts catch light and add a bounce to the garland’s silhouette.
They read as cheerful and a touch whimsical, especially when mixed in contrasting shades. I remember wrapping a strand around a lamp for a party and the soft halo it created when the light skimmed the fibers.
There’s a childlike quality to them that invites touch and casual admiring from anyone who passes by.
Steps
- Create pom-poms in two sizes and press them into heart outlines or form clusters to suggest heart shapes.
- Secure pom-pom clusters together with a needle and thread to keep the heart silhouette stable.
- Thread the completed pom-pom hearts onto a durable cord, spacing by eye for a lively rhythm.
- Tie ends of the cord and drape the garland where it can be stroked and admired.
Button heart garland with nostalgic charm

Button hearts feel like rummaging through an old tin and finding small treasures. The glossy plastic and mother-of-pearl buttons catch light differently, giving each heart a little gleam.
I enjoy sorting through hues and sizes until something clicks; the tactile clink as buttons meet is oddly satisfying. Hung across a mantle or framing a mirror, the garland reads like a curated memory.
It’s a slow, fiddly process but the end result has that thrifted warmth that suggests time and care.
Steps
- Sort a collection of buttons by color and size, then arrange them into heart shapes on a flat surface.
- Sew buttons together through overlapping holes, building up the heart silhouette until stable.
- Attach small loops of thread or thin ribbon to the back of each heart for threading.
- String the button hearts onto a cord, spacing them with small knots or beads.
Origami heart chain for crisp, geometric beauty
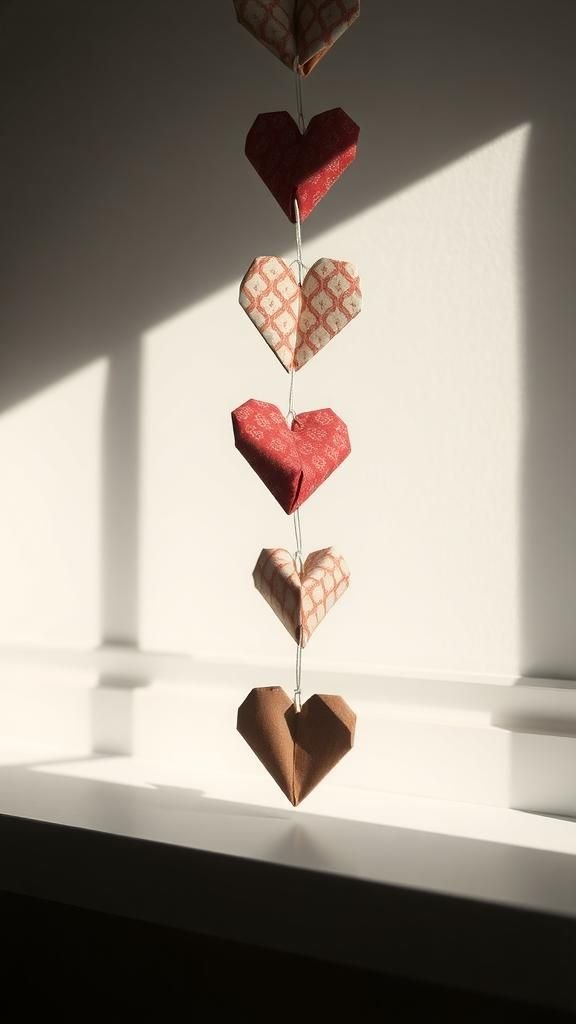
The crisp geometry of origami hearts brings a neat, almost meditative quality to a garland. I enjoy the quiet repetition as each heart sits with precise creases and clean edges, creating a rhythmic chain that feels tidy and sweet.
Patterns from washi paper introduce small scenes or motifs, so every heart seems to tell a little story. Hung in a vertical cluster near a window, the paper catches light and shows off each fold like tiny sculptural pieces.
Steps
- Select lightweight patterned washi paper and cut into uniform squares.
- Fold each square into a compact origami heart following a standard paper-heart diagram.
- Link hearts together by threading through small openings or by knotting a thin cord between them.
- Trim and secure the final ends for a clean hanging loop.
Burlap heart garland for rustic farmhouse vibes

Burlap hearts bring an earthy, tactile presence that feels grounded and familiar. The coarse weave and neutral tone create a pleasing contrast when paired with brighter accents like red ribbon or tiny wooden beads.
I like how the fabric’s roughness softens over time and from handling, giving each heart a slight worn-in personality. Hung over a kitchen window or paired with mason jars, this garland set evokes Sunday mornings and comfort.
Its straightforward character pairs well with other handmade bits around the house.
Steps
- Trace heart shapes onto burlap and cut them, allowing for a slightly irregular edge for texture.
- Back each burlap heart with lightweight fabric or interfacing to reduce fraying.
- Sew or glue a small loop on top of each heart to allow threading onto twine.
- Thread hearts onto a rustic string, spacing them evenly and finishing with knots.
Sequin heart garland that catches every light
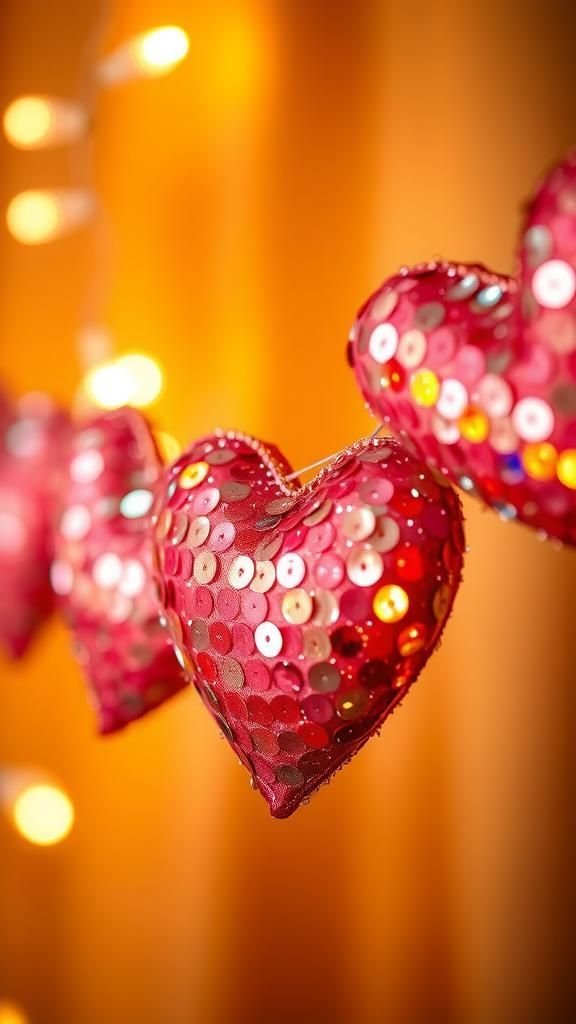
Sequin hearts are that playful touch that makes a room feel celebratory without going overboard. Each tiny reflective disc flips as the garland moves, sending speckles of light across nearby surfaces.
I often see these as a party accent or a little theatrical flourish on a mantel. They have a slick, glossy feel that contrasts nicely with softer textures like knit throws or paper bunting.
Watching the light bounce off them is oddly calming, turning an ordinary corner into a spot that gleams when evening lamps come on.
Steps
- Cut heart shapes from stiff felt and cover the front surfaces with sequins sewn or glued in overlapping rows.
- Back the sequined pieces with another felt heart to hide stitches and provide stability.
- Punch small holes at the tops and thread them onto a thin metallic cord.
- Space the sequin hearts evenly and secure the ends for hanging.
Watercolor paper hearts with blended color washes
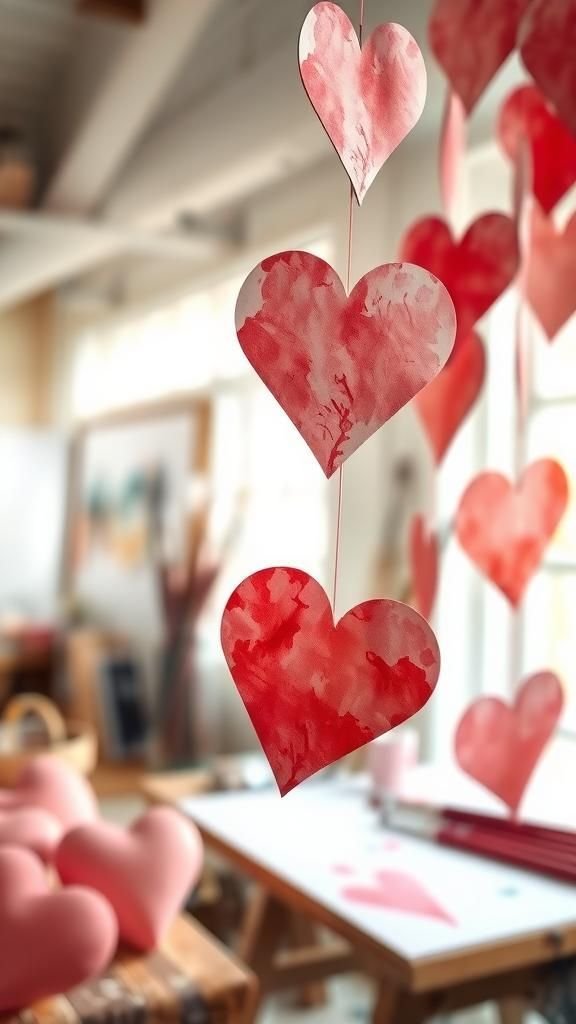
Watercolor hearts feel like tiny, wearable pieces of painting. The way pigments bloom and meet creates unpredictable blends that I find endlessly pleasing.
Each heart reads like a small abstract study, with soft edges and gradient washes that suggest cloudlike color. They bring a subtle artistic touch when strung together, like a row of miniature canvases.
Often I experiment with salt or splatter details, which adds that spontaneous, painterly character. Hung near natural light, the colors deepen and invite a quiet, gallery-like vibe at home.
Steps
- Paint sheets of watercolor paper with loose washes and allow them to dry fully.
- Cut hearts from the painted sheets, preserving interesting color transitions and edges.
- Punch tiny holes near the tops and thread the hearts on a natural cord.
- Space and balance the painted shapes so the garland shows a pleasing flow of color.
Pressed flower hearts with botanical silhouettes
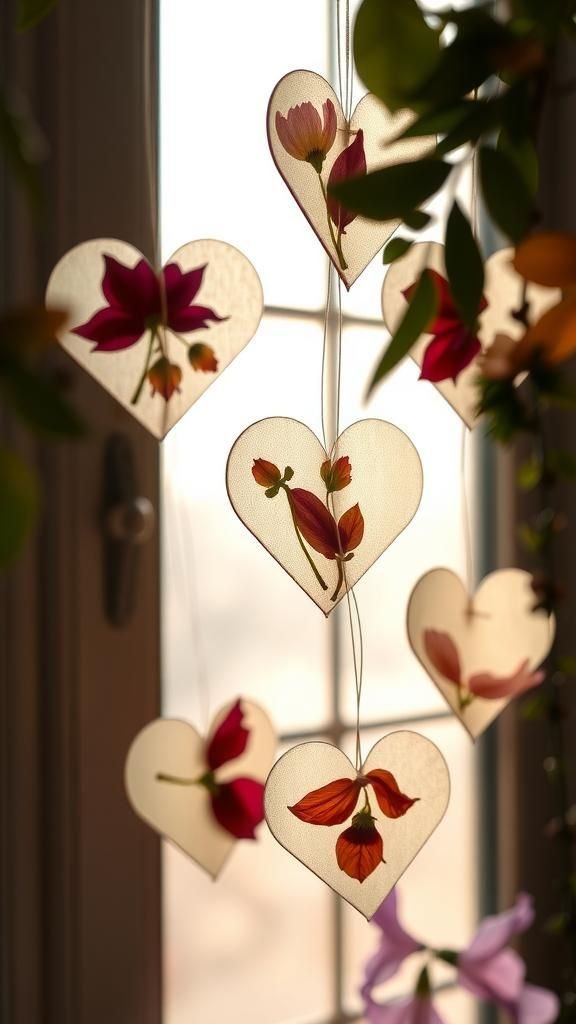
Pressed flower hearts feel like a pocketful of spring. Tiny petals and preserved stems press flat beneath translucent paper, creating delicate botanical silhouettes.
The scent of dried florals lingers faintly when handled, and the visual effect is fragile and intimate. I like hanging them in a sunny corner where the petals come to life with backlight, casting minute floral shadows.
Each heart becomes a keepsake of a particular bloom or weekend walk, translating small outdoor moments into indoor charm.
Steps
- Press small flowers and leaves between absorbent paper until fully dried and flattened.
- Sandwich pressed botanicals between two pieces of translucent vellum or clear craft plastic cut into heart shapes.
- Seal the edges with an iron-on laminating strip or clear adhesive sealing to protect the specimens.
- Punch holes at the tops and thread the hearts onto a fine ribbon for hanging.
Beaded heart garland with shimmering, tactile strands
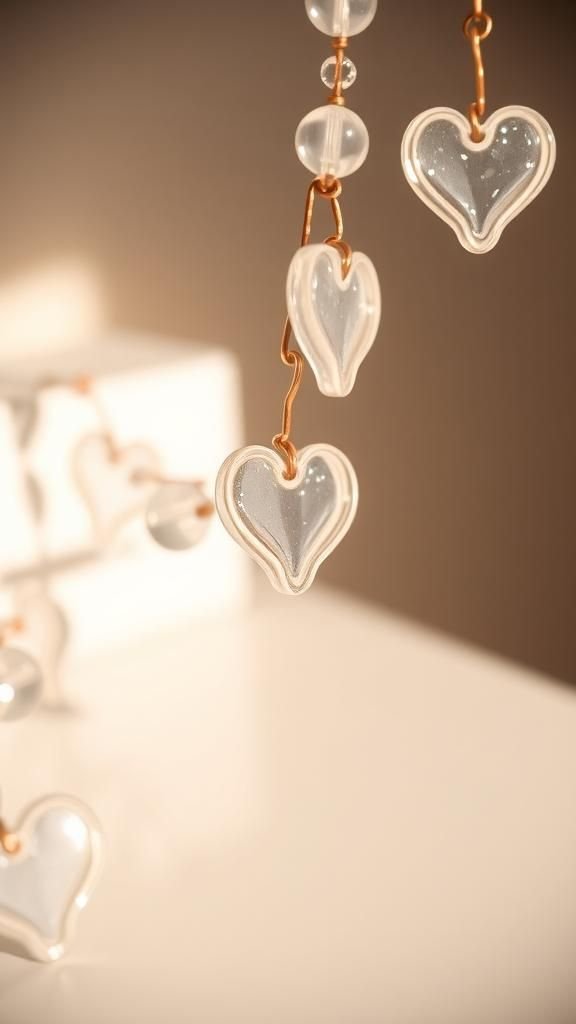
Beaded heart garlands combine sparkle and rhythm in a way I always enjoy. Tiny glass and crystal beads catch light and the strand has a pleasing weight when it swings.
Some hearts are constructed as wire silhouettes densely wrapped with beads, others are clusters of beads forming a heart silhouette that feels almost jewelry-like. The sound of beads clinking is a small, satisfying punctuation.
Hung across a window or looping around a mirror, the garland takes on a jewel-like presence that elevates a room without demanding attention.
Steps
- Create heart outlines from flexible wire, shaping each into the desired size and silhouette.
- Thread glass beads onto the wire or wrap beaded string around the outline to build up the heart shape.
- Secure loose ends by twisting the wire and tucking them neatly to avoid snagging.
- Connect the beaded hearts on a sturdy cord or chain, spacing by eye for balance.
Cinnamon stick infused hearts for warm, cozy scent

Cinnamon stick hearts bring scent into the garland experience, and that warm spicy aroma immediately sets a comforting tone. The natural brown texture of cinnamon pairs nicely with deep reds and cranberry ribbons.
I remember passing one by and getting a faint whiff that felt like a baked treat in the oven. Beyond the scent, the woody texture and slender silhouette add a rustic counterpoint to softer heart shapes.
Hung near a kitchen or entryway, these hearts invite a moment of breath and memory.
Steps
- Bundle cinnamon sticks into small heart-shaped formations and bind them with thin floral wire or twine.
- Add accents like dried orange slices or tiny dried flowers for visual interest and scent variety.
- Securely wrap each bundle so the shape holds together when handled.
- String the cinnamon stick hearts onto a natural cord and hang where the aroma can circulate.
LED-lit heart garland for gentle evening ambiance
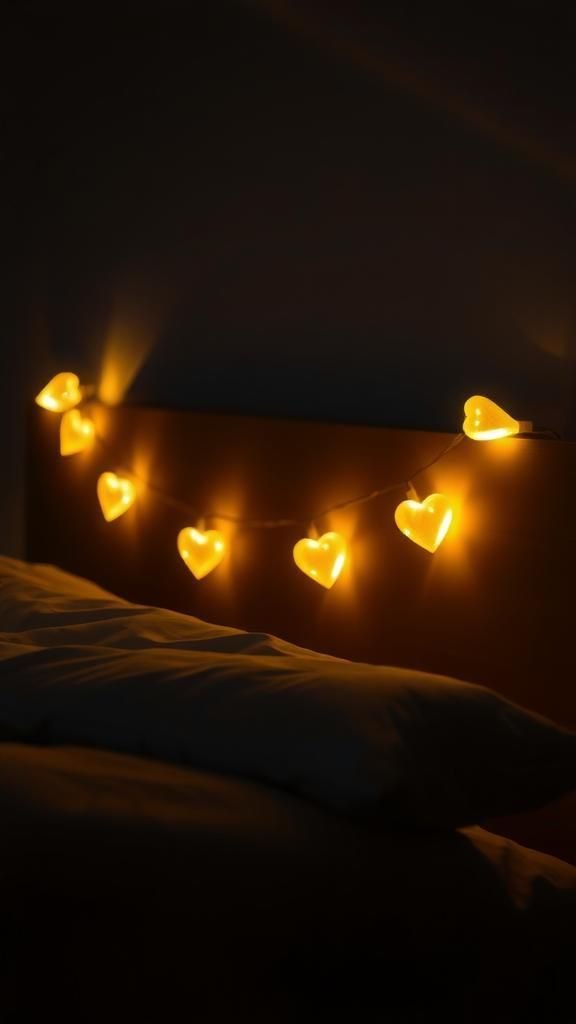
An LED-lit heart garland turns ordinary hearts into small sources of glow that feel intimate and calming. Tiny lights nestled inside translucent hearts cast a warm halo that softens a room at night.
I like how the light transforms materials, making paper look luminous and fabric hearts glow from within. It becomes a quiet companion during a late reading session or a low-key dinner.
The mood it creates is relaxed and slightly magical, a simple way to add soft illumination without harsh brightness.
Steps
- Choose small battery-powered LED fairy lights and select heart coverings that allow light to pass through, such as vellum or thin fabric.
- Create heart shapes and leave an opening to slip a light through or wrap the lights gently around the heart form.
- Secure the light source inside each heart and close the opening with stitching or adhesive.
- Arrange the lit hearts along a cord, hiding battery packs behind furniture or in a decorative pouch.
Newspaper and book-page heart chain with literary flair

Hearts cut from newspapers and pages have a charming, slightly irreverent quality. The black type and columns create an unexpected graphic pattern when repeated along a strand.
I like the thought of recycling yesterday’s headlines into something tender, or turning a favorite book into a subtle homage. The paper texture is thin and slightly translucent under light, and when many hearts are layered the effect is textural and collage-like.
It’s a modest way to bring stories into decor without overwhelming a space.
Steps
- Select pages from newspapers, maps, or unwanted books and cut out heart shapes in mixed sizes.
- For durability, back the paper hearts with lightweight cardstock or laminate them using clear adhesive sheets.
- Punch holes at the tops and thread the hearts onto jute or thin ribbon.
- Arrange the hearts with slight overlaps for a collage look and hang the garland where light can reveal the print.
Mini wreath heart garland combining two motifs
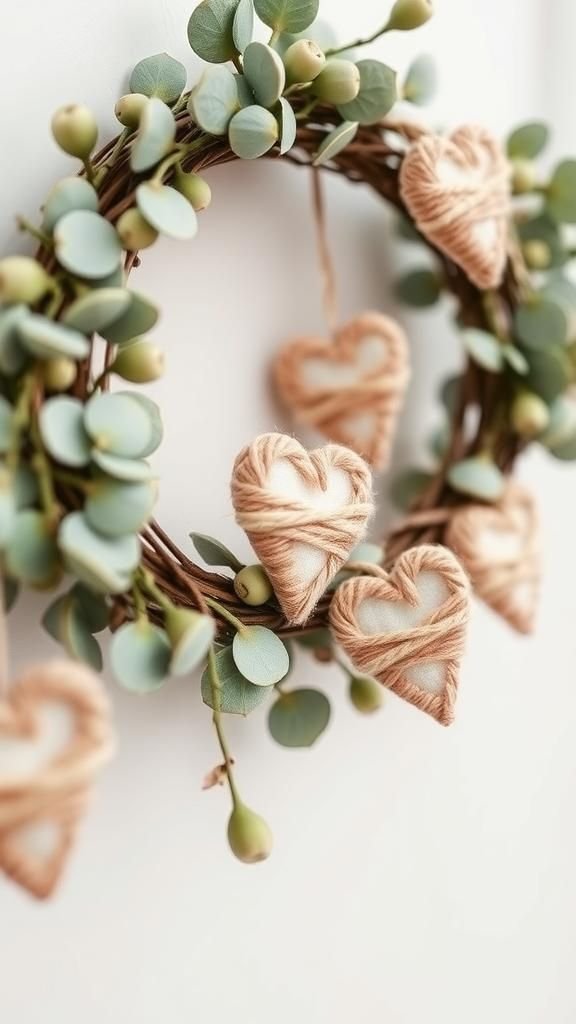
Mini wreath hearts have a charming hybrid quality, combining the circular embrace of a wreath with the familiar heart silhouette. Tiny greenery, felt leaves, or wrapped threads form soft wreaths that read as cozy and celebratory at once.
When strung together, they feel festive yet restrained, a lovely option for a door frame or around a mirror. I enjoy mixing textures here — a eucalyptus sprig beside yarn-wrapped wire — which creates a small scene around each heart and invites a slower look.
Steps
- Form small wire rings in heart shapes and wrap them with greenery, yarn, or thin fabric strips to create a wreath effect.
- Secure loose ends by tucking or stitching them under the wrapping material.
- Add tiny accents like dried flowers or miniature bows for variety.
- Connect the mini wreath hearts on a cord or ribbon for hanging.
Knit heart garland with cozy hand-stitched charm
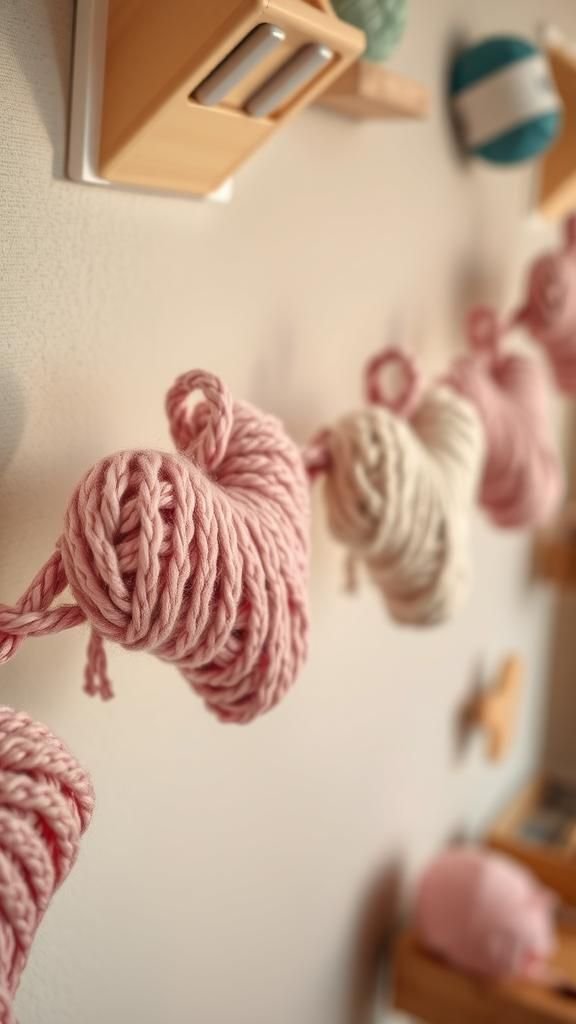
Knitted hearts bring a snug, home-knit feeling that’s hard to beat. The subtle ribbing and soft stitches create a fabric language that reads as comforting and intimate.
I find that knitting creates slight irregularities that add personality — a loose stitch here, a tighter row there — and those small deviations tell the story of hands at work. Hung alongside photos or over a bookshelf, the garland feels like a warm reminder of slow craft and quiet afternoons with a cup of tea.
Steps
- Knit small hearts using a simple heart pattern, experimenting with different yarn weights for varied textures.
- Stuff the knitted hearts lightly to give them a gentle puff, then close the openings with matching yarn.
- Sew small loops onto the tops for threading or string the hearts together by a length of yarn.
- Drape the garland over a mantel or along a staircase for a cozy display.
Air-dry clay hearts with stamped patterns

Air-dry clay hearts carry a quiet handcrafted presence that feels slightly sculptural. I enjoy pressing small stamps or found textures into the surface to create impressions, then letting the clay dry to a matte finish with a soft, earthy feel.
Painted edges or a light wash can highlight the textures without overwhelming the form. Hung on a ribbon, the clay hearts have a grounded weight and gentle honesty, like tiny handmade keepsakes that anchor a festive display with tactile substance.
Steps
- Roll out air-dry clay and cut heart shapes in a consistent size.
- Impress patterns with stamps, lace, or found textures, then use a small hole punch to create hanging holes.
- Allow the hearts to dry thoroughly according to the clay instructions, then sand any rough edges gently.
- Add a light wash of acrylic or stain if desired and thread them on a cord once dry.
Doily heart garland with paper lace elegance
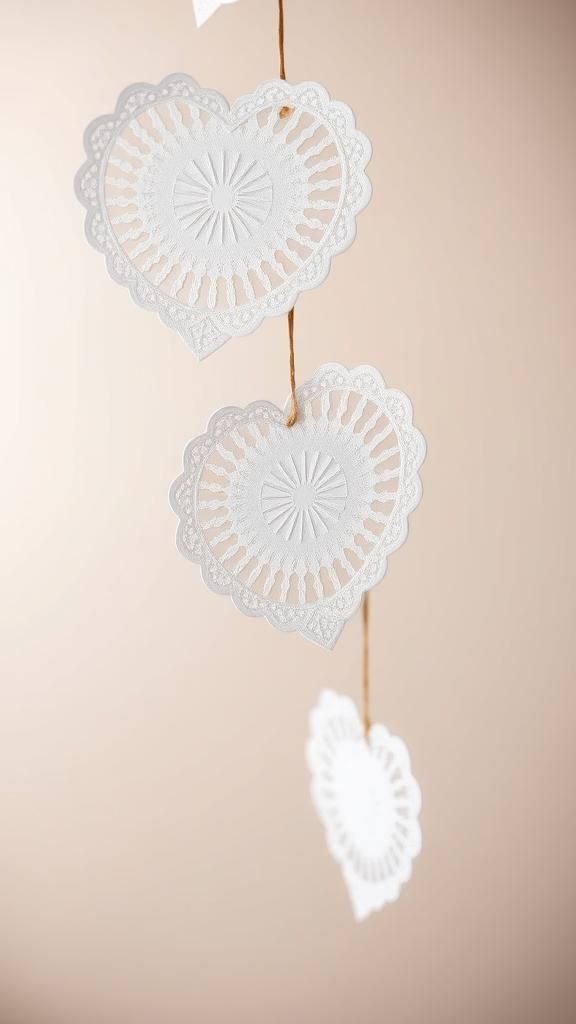
Paper doily hearts have a delicate, slightly nostalgic quality that feels like afternoon tea. The lace-like patterns create pretty negative spaces that read as intricate without being fussy.
When layered against colored backing, the delicate cutwork pops and becomes unexpectedly modern. I like how they flutter with the slightest air movement, adding a whisper of motion to a shelf or window frame.
Their lightweight nature makes them easy to drape in unexpected places for a touch of refined charm.
Steps
- Fold paper doilies and trim them into heart shapes, keeping the scalloped edges intact for lace-like detail.
- Back each doily heart with colored paper or thin cardstock for contrast and added stability.
- Punch small holes at the tops and thread the hearts onto baker’s twine or thin ribbon.
- Arrange and hang the garland across a mantel, window, or party backdrop.
Ribbon and tassel hearts for layered movement
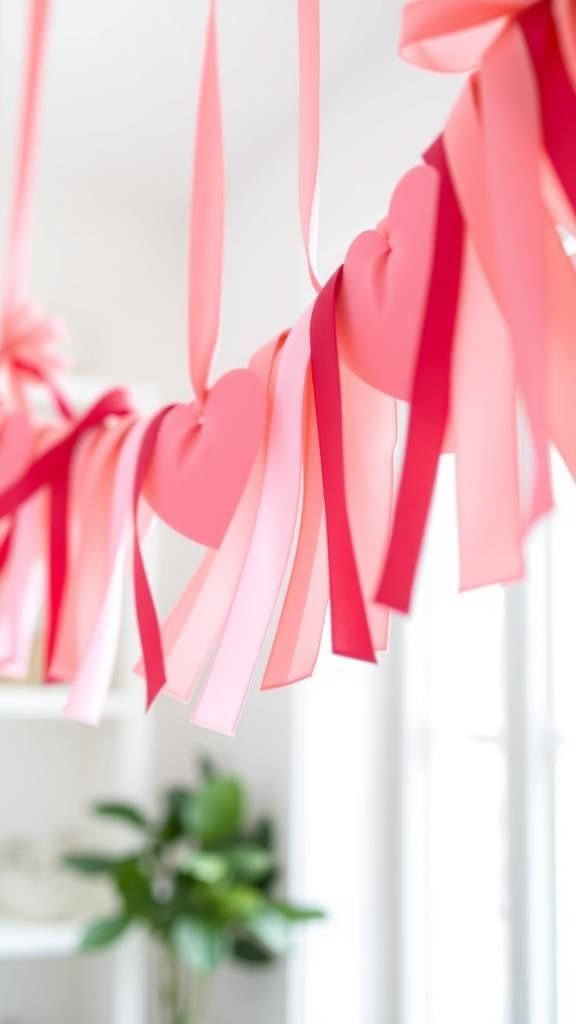
Combining hearts with ribbon tassels gives the garland a lively, layered silhouette. The long, flowing tassels pick up movement and add vertical interest, turning a simple string of hearts into a more dramatic display.
I usually balance heavier ribbon with lighter organza for contrast, enjoying the way different fabrics flutter at different speeds. Hung at varying heights, the composition feels dynamic and a little theatrical without being over the top.
It’s a playful way to mix texture and length for a visually rich effect.
Steps
- Create heart shapes from a sturdy material like felt or cardboard and cover with ribbon or fabric as desired.
- Make tassels from complementary ribbons or threads and secure them to the bottom of each heart.
- Attach hearts to a main ribbon or cord, alternating heights for visual movement.
- Hang the garland where the tassels can sway freely.
Metallic foil hearts with sleek reflective shimmer

Metallic foil hearts bring a crisp shine that can feel modern and slightly glamorous. The reflective surfaces bounce light and create sharp highlights, which plays nicely against matte backgrounds.
I enjoy cutting them in mixed scales so the reflections vary across the strand, turning the garland into a shifting facet of light. They have a more polished presence than softer materials, which can be great for balancing home decor that leans minimalist.
When grouped with softer textures, the metallics add an energizing contrast.
Steps
- Cut heart shapes from metallic foil paper or thin mirrored acrylic sheets, taking care with sharp edges.
- Back foil hearts with cardstock for stability and to protect surfaces.
- Punch holes at the top and thread onto a thin wire or cord, spacing to favor reflective interplay.
- Hang the garland where it can catch daylight or lamp light for maximum shimmer.