Disclosure: This post contains affiliate links, which means we may earn a commission if you purchase through our links at no extra cost to you.
Decorative Tape Resist Canvas Art Projects turn blank surfaces into crisp color stories with tape resist canvas art, decorative tape patterns, and playful resist painting. I first tried a small canvas on a rainy weekend and loved how the clean edges appeared like magic when the tape peeled away, revealing tidy geometry under messy color.
These Decorative Tape Resist Canvas Art Projects make quick wall updates, giftable minis, and bold statement pieces.
The mix of painter’s tape, washi, and acrylics invites easy experiments while keeping lines sharp. Friends still ask about that first tape resist canvas art panel, and it remains a bright reminder that simple materials can spark big smiles.
Table of Contents
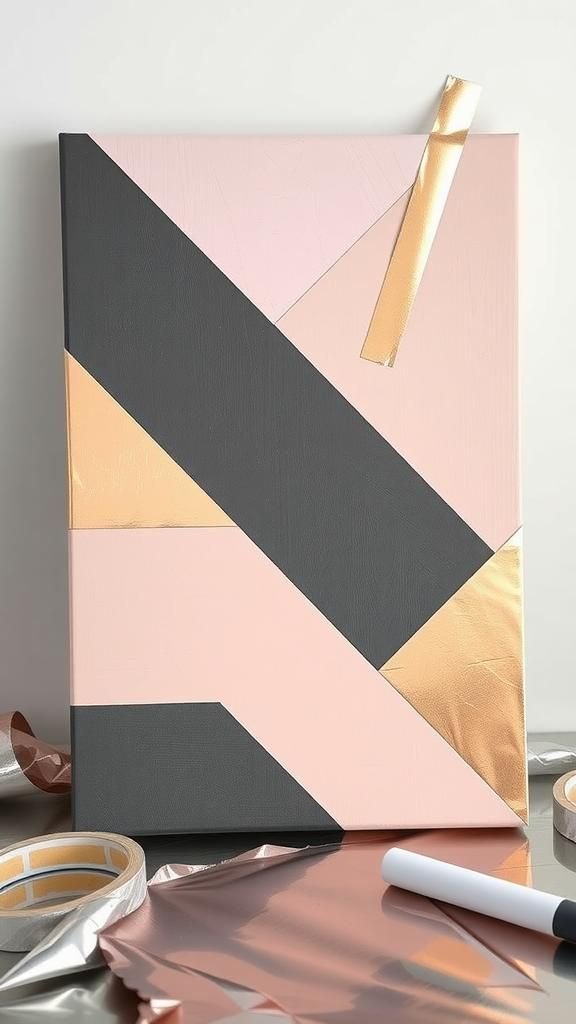
Bold Geometric Color-Block Canvas

A lively color-block layout creates modern energy and crisp organization on any wall. Masked segments frame rich acrylic fields, letting warm and cool hues play against sharp white lines.
A palette of cadmium reds, sunny yellows, teal, and charcoal builds striking contrast, while satin or matte varnish softens glare. Painter’s tape and washi tape mix well, offering varied edge thickness for visual rhythm.
This piece suits living rooms, studio corners, or youthful bedrooms, and slides comfortably into a gallery grid. Wrapped with a ribbon and a swatch card, it becomes a cheerful housewarming or dorm-ready surprise.
Steps
- Mask intersecting polygons with painter’s tape across the canvas.
- Fill each section with acrylic color, alternating warms and cools.
- Let layers dry, apply a protective varnish if desired, then peel the tape.
Ombre Striped Resist Panel
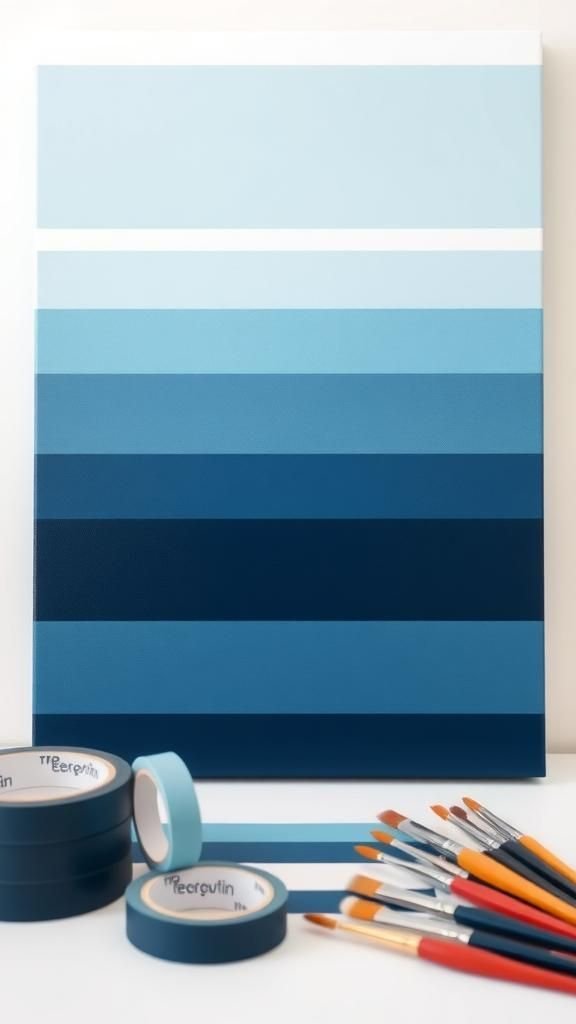
Gradual color transitions meet crisp stripes, creating a soothing rhythm that calms busy spaces. Long bands of tape carve pale-to-dark gradients, inviting sunset or ocean palettes.
Soft blues drifting to navy, or blush moving into berry, feel fresh under a satin finish. Washed edges inside the stripes contrast with the sharp masked lines, lending an airy balance.
This narrow panel fits entryways and above-console displays, especially when paired as a duo. A gift-ready idea for new apartments or studio refreshes, it tucks easily into slim wrapping and pairs nicely with a handwritten paint-chip bookmark.
Steps
- Lay parallel strips of tape across the canvas to form stripes.
- Blend an ombre from light to dark across the exposed areas.
- Dry thoroughly, remove tape, and seal with a light varnish.
Herringbone Neutrals With Metallic Accents
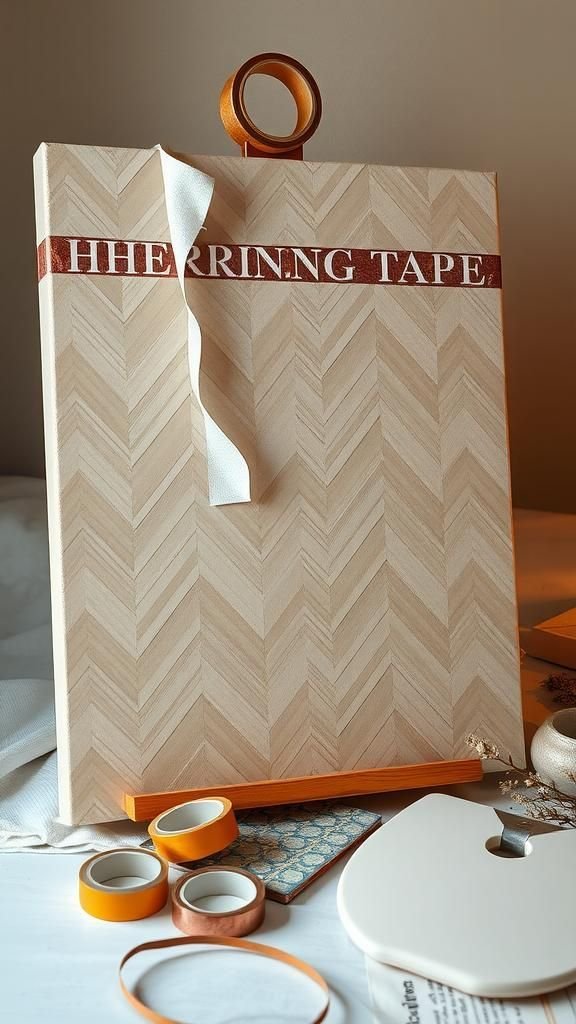
A herringbone layout brings tailored order through repeating angles and measured spacing. Muted taupe, greige, and warm ivory create a soothing foundation, while metallic accents in antique gold or brushed copper add glimmer.
Narrow and medium tape widths stagger across the surface, giving a parquet-style look that pairs well with mid-century furnishings and clean-lined decor. The soft shine catches evening light, turning a quiet wall into a subtle focal point.
Thoughtful as a wedding or anniversary gift, it sits comfortably above a console tray or leans on a mantel alongside candlesticks and small framed photos.
Steps
- Mark a central axis and apply diagonal tape strips to form a herringbone pattern.
- Paint alternating sections in layered neutrals with occasional metallic highlights.
- Allow to dry completely before peeling tape and adding a clear coat.
Skyline Silhouette Over Sunset Gradient
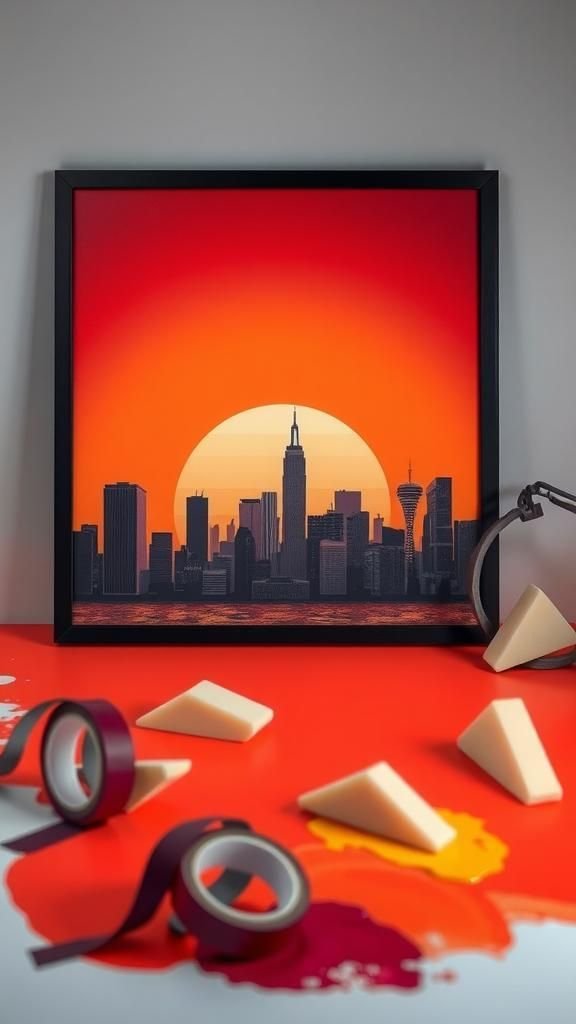
A taped skyline creates a crisp city outline rising from a glowing gradient. Burnt orange, magenta, and ultramarine merge into a late-evening backdrop, while the masked buildings hold a graphic silhouette.
Subtle splatters across the sky lend atmosphere without stealing focus. Matte varnish reduces glare, keeping the glow consistent.
This theme suits modern lofts and travel lovers who appreciate urban energy. Paired with a black frame, it anchors a hallway or office nook.
As a farewell gift for someone moving to a new city, it offers a personal nod to skylines that mark memorable chapters.
Steps
- Tape the building outlines and block out windows or rooftops as desired.
- Blend a sunset gradient across the sky area and add light speckles.
- Let dry, peel tape to reveal the skyline, and finish with varnish.
Leafy Negative Space Botanical Study
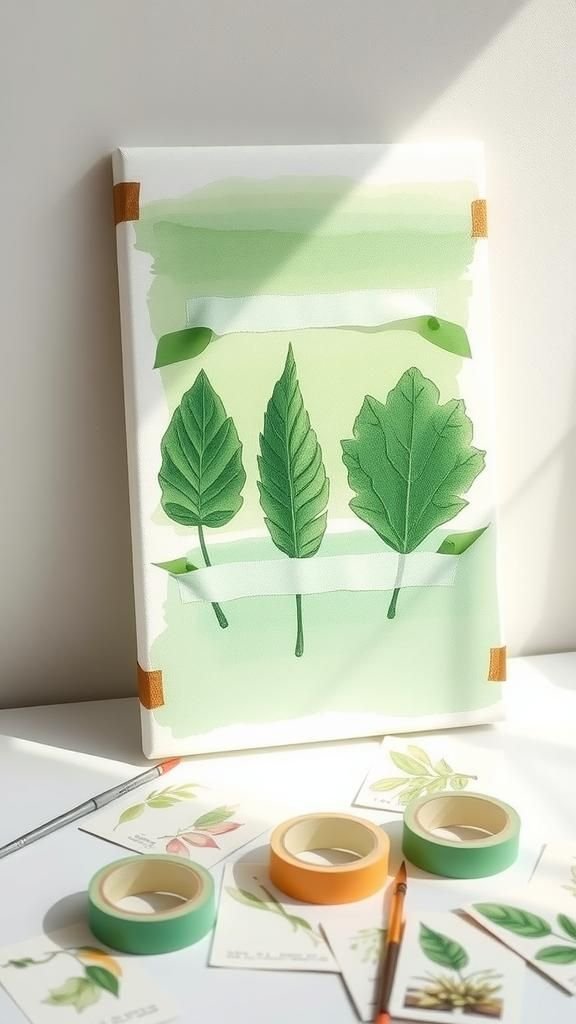
Silhouetted leaves and stems appear as bright negative space surrounded by layered washes. Painter’s tape outlines organic forms, while soft greens, olive, and fern tones overlap gently.
Occasional navy or aubergine touches introduce depth without heaviness. A semi-gloss finish enhances color richness while preserving clean edges.
The result pairs well with rattan accents and woven textiles, bringing an indoor garden vibe to kitchens or reading corners. As a gift, it suits plant lovers and new gardeners, wrapping nicely with a small packet of seeds and a note about growth and patience.
Steps
- Create leaf and stem shapes with tape to form clean silhouettes.
- Build transparent layers of green washes around the taped shapes.
- Dry, peel the tape to reveal white leaf forms, and seal lightly.
Cosmic Galaxy With Starry Tape Constellations
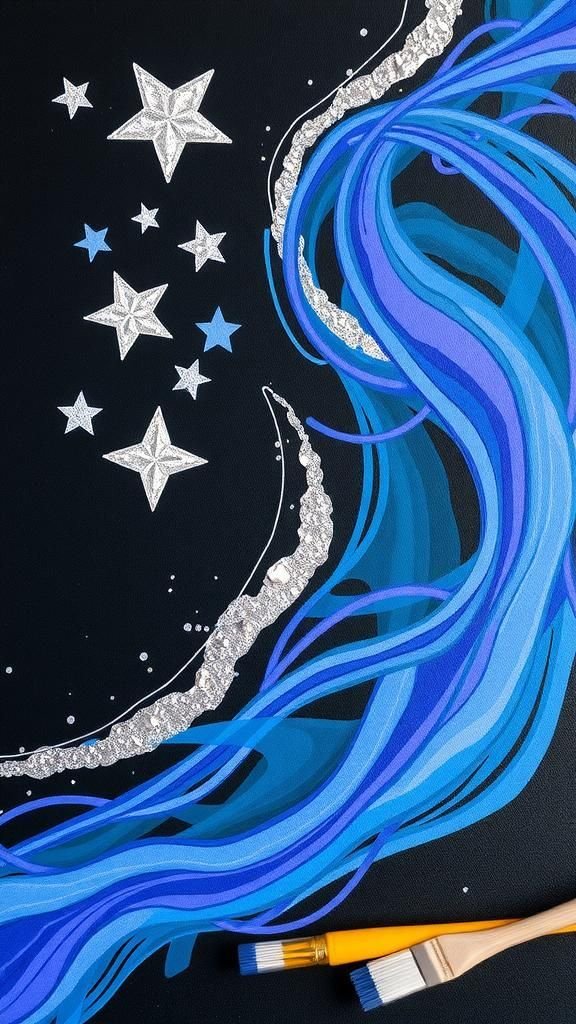
Nebula-like clouds swirl across the canvas while tape-dotted star clusters stay crisp and bright. Phthalo blue, violet, and magenta mingle with specks of titanium white for a distant glow.
Metallic silver adds a faint shimmer that catches lamplight like tiny stars. The contrast between airy blending and sharp masked points feels dreamy yet graphic.
Perfect for a bedroom feature or a cozy game nook, it also charms science fans. Gift it with a constellation map sticker and a tiny flashlight for nighttime stargazing vibes on the wall.
Steps
- Apply small tape bits as stars and larger tape lines as simple constellations.
- Blend dark blues, violets, and magentas, then flick white specks for stars.
- Peel tape to reveal crisp star shapes and seal with a satin coat.
Hand-Lettered Quote Masked In Tape

A favorite phrase stands out in clean, bright lettering surrounded by expressive color. The letters, masked in narrow tape strips, remain crisp while the background carries blends, splashes, or soft gradients.
Color choices vary from punchy primaries to gentle pastels, set off by a matte or satin finish. This piece pairs well with desks and entryway shelves where daily words matter most.
Gift options include personal mottos or family names, wrapped with a small calligraphy card that echoes the sentiment and ties the whole presentation together.
Steps
- Lay down narrow tape to form letter shapes for the chosen quote.
- Paint expressive color around the letters, adding soft blends or speckles.
- Allow drying time, peel the tape to reveal the crisp text, and varnish.
Moroccan Trellis Pattern In Jewel Tones
An interlocking trellis motif brings graceful symmetry and ornamental charm. Tape lines define repeating curves while saturated emerald, sapphire, and amethyst build a jewel-box palette.
White or champagne lines keep the pattern airy, with optional gold accents adding a quietly luminous touch. Framed in slim black or natural wood, the panel suits dining spaces, entry halls, and layered gallery walls.
As a present, it pairs nicely with a small lantern or tea set, winking at the origin of the motif and inviting conversation over warm beverages.
Steps
- Map the trellis grid and apply curved tape segments to form the motif.
- Paint alternating cells in rich jewel tones with subtle metallic touches.
- Dry fully, remove tape to reveal lines, and finish with a clear coat.
Sunburst Rays From A Gilded Center
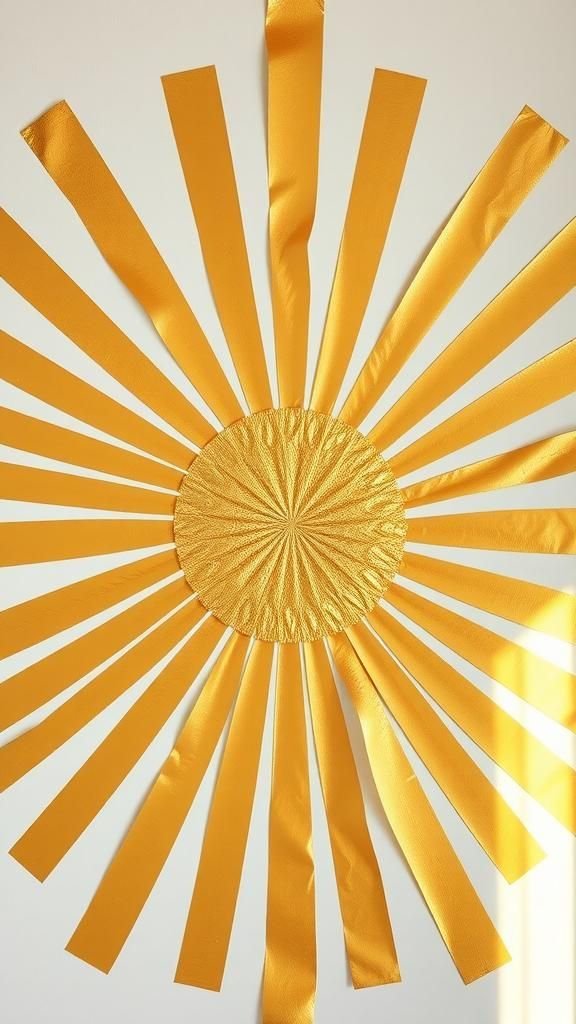
Radiating bands stream from a central circle, projecting warmth and movement. A gilded center glows with leaf or metallic paint, while rays alternate between sunny hues and gentle neutrals.
The taped edges ensure crisp geometry that balances the radiant palette. This piece enlivens breakfast nooks and small foyers, pairing well with wicker baskets and potted herbs.
As a birthday gift, it conveys cheerful energy and optimism, best presented with a small packet of citrus tea and a note brimming with rays of good wishes.
Steps
- Mask a small central circle and extend tape lines outward as rays.
- Paint alternating ray segments in warm tones and neutrals, gild the center.
- Dry, peel tape, and seal to preserve the metallic luster.
Nautical Anchor On Weathered Blue Wash

A bold anchor silhouette sits against layered ocean blues, evoking salt air and shoreline ease. Painter’s tape outlines the anchor while the background carries brushed textures and pale foam-like flecks.
Colors range from denim and sea glass to inky navy, with a matte finish for a chalky maritime feel. Rope details or a striped edge add personality without crowding the main shape.
Perfect for bathrooms, beach cottages, or poolside cabanas, it also makes a thoughtful gift for sailors and coastal dreamers, tied with twine and a tiny seashell charm.
Steps
- Tape an anchor silhouette at center with steady, curved segments.
- Build textured blue layers across the background with lighter speckles.
- Let dry, remove tape to reveal the anchor, and apply a matte varnish.
Winter Forest Silhouettes With Aurora Glow
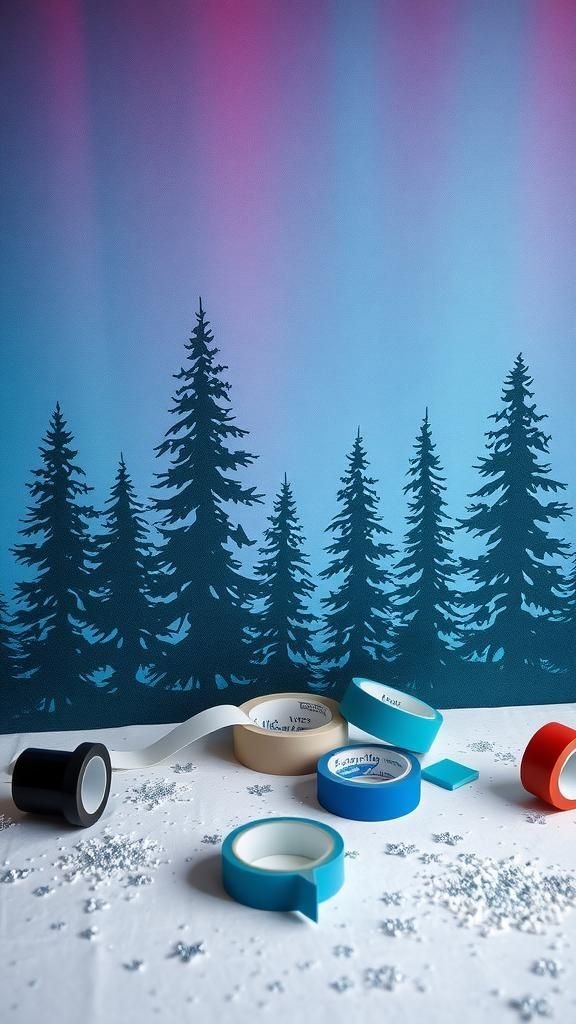
Crisp evergreen silhouettes emerge from a luminous aurora sky. Tape defines pine shapes along the lower edge while gradients of teal, violet, and lime dance overhead.
Specks of white suggest snowfall without overpowering the scene. A satin finish preserves the glow and the clean contrast.
This artwork suits calm bedrooms and seasonal vignettes, and it pairs beautifully with candles and knit throws. As a holiday gift, it travels well in a kraft box with a sprig of cedar and a handwritten note promising peaceful nights and starry skies.
Steps
- Mask pine tree silhouettes with angled tape and block the lower horizon.
- Blend aurora colors across the sky area, adding soft speckles of white.
- Dry, peel tape to reveal the trees, and seal lightly.
Watercolor-Look Acrylic Wash With Tape Grid

A tight tape grid keeps structure while transparent acrylic washes drift over the surface, mimicking watercolor. Pastel pools of mint, peach, and lavender overlap softly, with occasional bolder notes of ultramarine or crimson.
The crisp white lines gift a tidy lattice effect that pleases minimal and modern interiors. A thin frame keeps focus on the airy color fields.
Gentle and calming, this piece suits nurseries, studios, or home offices. Wrapped with a small brush set and a color chart bookmark, it makes an uplifting present for someone who loves serene, floaty color.
Steps
- Lay a uniform grid of tape lines across the canvas.
- Glaze transparent washes in overlapping layers inside each square.
- Allow to dry fully, remove the tape, and add a protective coat.
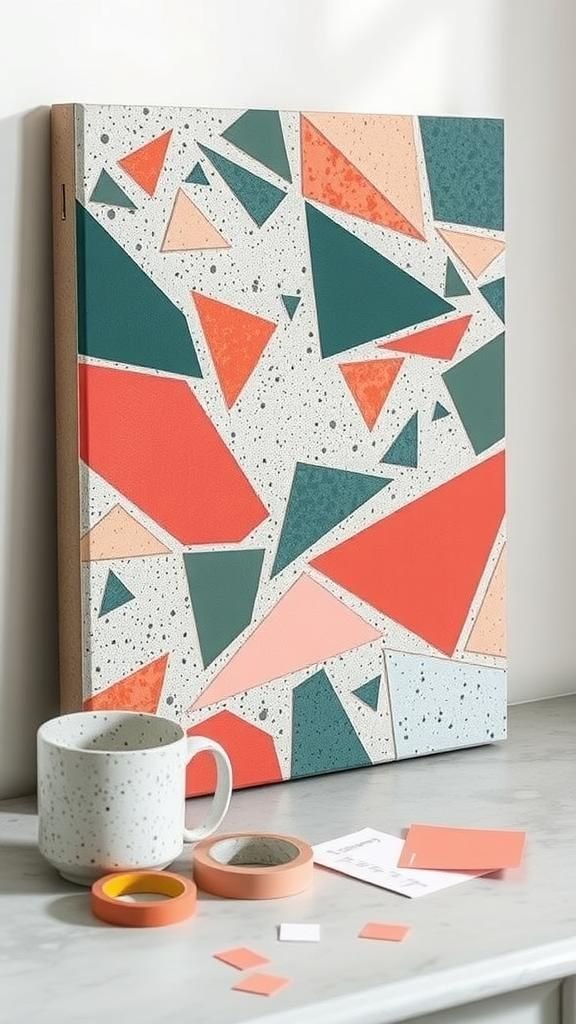
Metallic Foil Triangle Mosaic Canvas
Triangular cells shine with a mix of flat color and luminous foil. Tape divides the canvas into a tessellated mosaic, where matte charcoal neighbors rose-gold triangles and cool pewter sits beside blush.
The interplay of reflective and matte finishes brings lively texture without clutter. A simple black edge frame keeps attention on the pattern.
This piece stands proudly above media consoles or in hallway galleries. As a gift, it pairs nicely with a mirrored tray or metallic candle holders to echo the sparkle throughout a room.
Steps
- Create a triangle grid with intersecting tape lines.
- Paint selected cells and apply adhesive for metallic foil on others.
- Burnish, let set, peel tape, and seal with a compatible topcoat.
Splatter Paint Over Crisp Tape Chevron
![]()
Energetic splatters dance over a bold chevron masked beneath the paint. Neon pinks, citrus orange, and electric blue flick across a white or black base, while the taped chevron reveals tidy zigzags.
The mix of chaotic droplets and precise geometry gives a playful push-pull. A satin finish keeps color vivid without glare.
Great for teenager rooms, creative studios, and fun entryways, it delivers a lively welcome. Paired with patterned sneakers or a colorful key rack as a gift, it lands with personality and plenty of rhythm.
Steps
- Mask a repeating chevron pattern with wide tape.
- Splatter and drip contrasting colors over the entire surface.
- After drying, peel tape to reveal the zigzags and seal the canvas.
Bold Monogram With Patterned Borders

A large initial commands attention at the center, flanked by patterned borders defined by tape. The monogram stays crisp while stripes, dots, or hatch marks add flair along the edges.
Color stories can be school-inspired, corporate-chic, or softly domestic, ranging from navy and white to mauve and cream. A satin or matte finish suits office shelves, dorm walls, or nursery corners.
Ready to gift at graduations or new jobs, it pairs nicely with stationery and a coordinating pen set to create a cohesive, personal bundle.
Steps
- Tape the monogram shape and border lanes on the canvas.
- Fill background and border motifs with selected colors and textures.
- Dry, remove tape to reveal the letter, and add a light varnish.
Gradient Diamonds For A Mid-Century Vibe
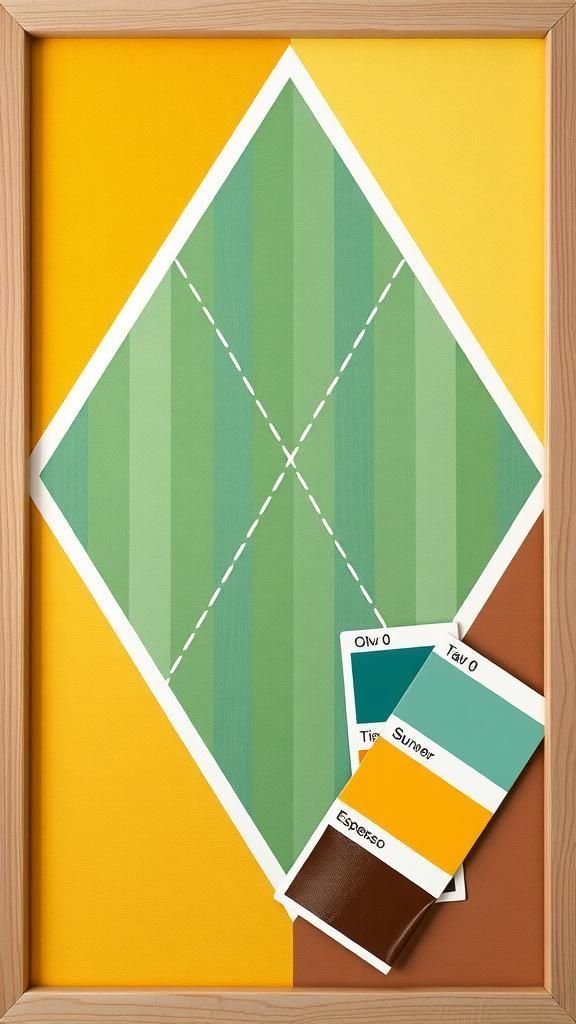
Elongated diamonds stack across the canvas with a smooth gradient passing through each row. Tape defines the crisp geometry while colors drift from mustard and olive into teal and espresso, nodding to mid-century palettes.
The rhythm feels orderly yet upbeat, especially with a natural wood frame. This piece settles nicely above sideboards, record players, and vintage chairs.
For gifting, it pairs well with a retro-style coaster set or a small planter in matte ceramic, tying the era together without looking costume-like.
Steps
- Mask tall diamond shapes in aligned rows across the canvas.
- Blend color gradients through each row, shifting hue as you move.
- Let dry, peel tape for sharp edges, and apply a protective finish.
Terrazzo Confetti With Tape-Shaped Shards
Tape-cut shards scatter across a neutral field, echoing terrazzo flooring with painterly charm. A soft greige or chalk white base hosts fragments in coral, forest, slate, and blush, while a few metallic flecks add sparkle.
The composition feels casual yet composed, the tape ensuring clean shard edges and quick visual readability. Perfect for kitchens and studio walls, it plays well with concrete counters and light woods.
As a gift, it comes alive paired with a terrazzo coaster or a speckled mug for an easy, cohesive theme.
Steps
- Place tape pieces to form irregular shard shapes over a neutral base.
- Fill shards with color, adding a few metallic touches for sparkle.
- Dry thoroughly, peel the tape, and finish with a satin sealer.
Optical Illusion Cube Pattern In Grays

A tessellation of cubes forms an eye-catching optical field. Tape isolates adjacent diamonds that, when colored in light, medium, and dark grays, read as dimensional boxes.
Small touches of warm beige or icy blue shift the mood without breaking the monochrome spell. The look suits minimalist interiors and design-forward offices, bringing structure and conversation without loud hue.
As a gift, it partners well with a geometric notebook and a sleek metal pen, creating a tidy package for lovers of order and clever visuals.
Steps
- Mask a repeating diamond grid that forms interlocking cubes.
- Paint alternating facets in light, medium, and dark shades for dimension.
- Dry, peel tape to reveal crisp edges, and apply a matte finish.
Stained Glass Effect With Black Tape Leading
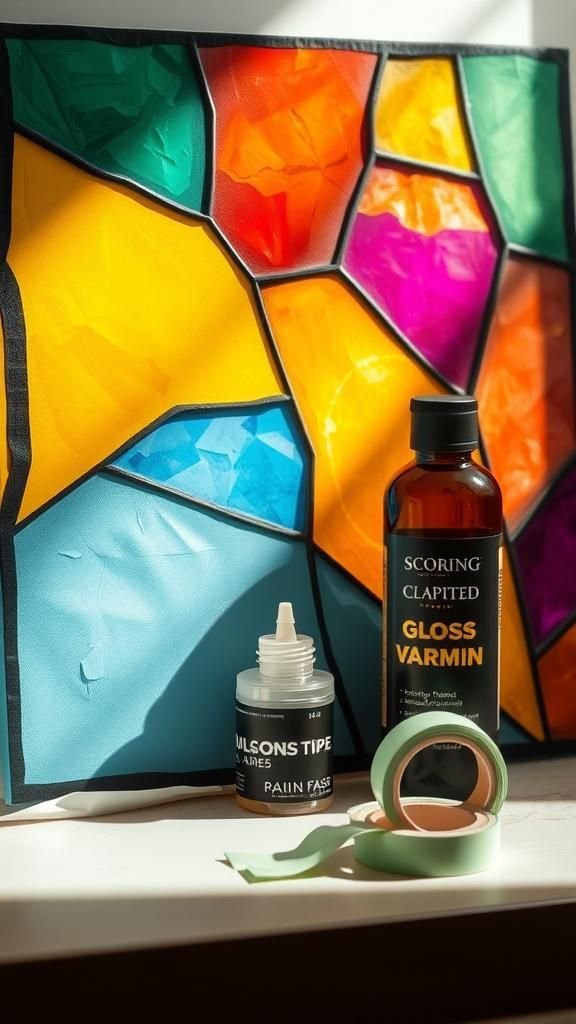
Bold black tape lines mimic lead came, enclosing glowing panes of color. Jewel-like cells in ruby, amber, and emerald mix with cloudy blues for a luminous window feel.
Gloss varnish amplifies the glassy illusion, catching light beautifully. Framed tight, it rests easily on mantels or hangs near sunny windows without competing with actual glass.
As a present, it pairs with a small suncatcher or tea light holder, echoing the theme and inviting warm reflections across a room.
Steps
- Lay black tape to form intersecting lines that mimic stained glass leading.
- Fill the cells with rich transparent or semi-opaque color.
- Let dry fully, peel tape if needed, and coat with a glossy finish.
Pastel Rainbow Archway With White Negative Lines
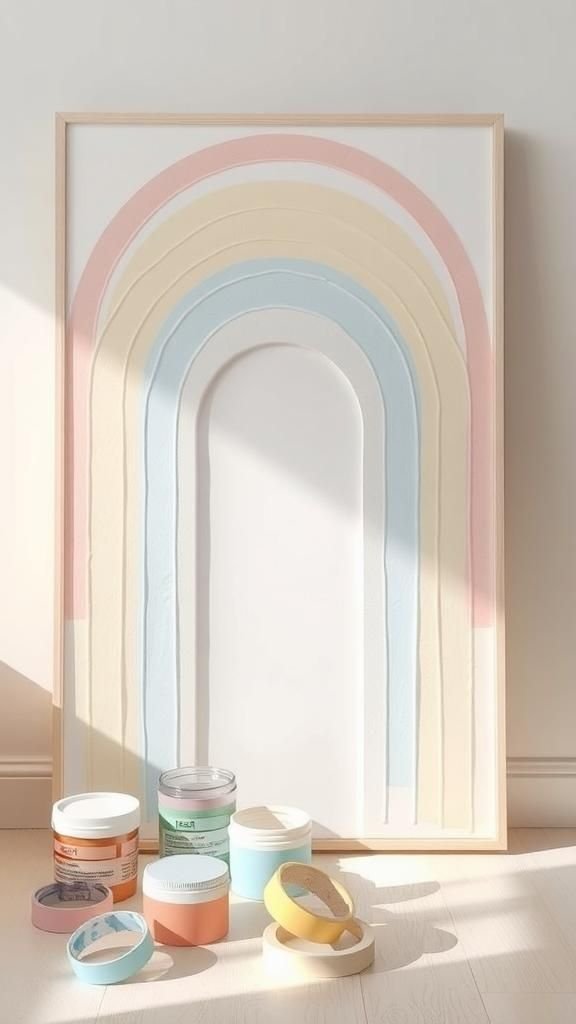
Curving arches sweep across the canvas in soft rainbow tones while slim white gaps stay crisp. The look feels gentle and modern, bridging nursery sweetness and living room polish.
Powder pink, butter yellow, mint, sky, and lilac harmonize under a velvety matte finish. The arcs echo mid-century forms without heavy nostalgia, making it versatile with neutral sofas and pale woods.
Wrapped as a baby shower or new home gift, it pairs well with a pastel throw or a small ceramic vase for a cohesive, airy vignette.
Steps
- Apply curved tape bands to outline a series of rainbow arches.
- Paint soft pastel colors between the bands to create layered arcs.
- Dry, remove tape to keep white lines crisp, and seal with matte varnish.
Minimalist Black-And-White Abstract Line Study
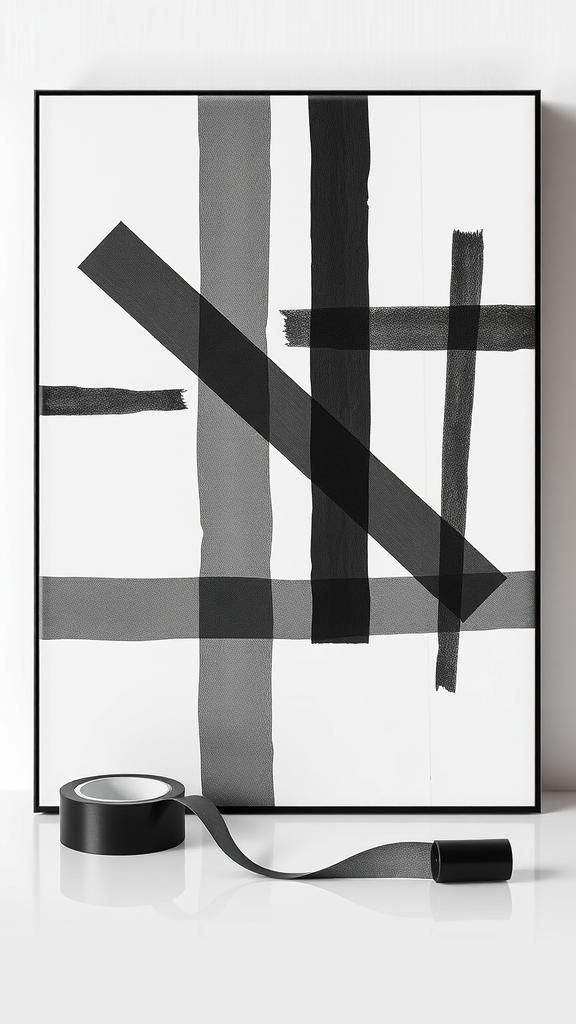
A sparse field of black strokes and white negative space creates an elegant statement. Tape isolates linear paths and angular pockets, letting bold black passages converse with untouched canvas.
The simplicity works with concrete, linen, and light oak, and a slim black frame completes the gallery vibe. A satin finish preserves ink-like character without glare.
This piece shines in entry halls and workspaces that favor calm, crisp visuals. As a gift, it teams well with a monochrome calendar or a linen-bound notebook for a tidy, modern set.
Steps
- Mask linear paths and small shapes using narrow tape strips.
- Fill selected areas with rich black acrylic, leaving others white.
- Dry, peel tape to reveal clean lines, and apply a satin seal.