Disclosure: This post contains affiliate links, which means we may earn a commission if you purchase through our links at no extra cost to you.
Ever since I moved to an apartment, I’ve been obsessed with indoor gardening ideas to grow fresh food year-round. With no backyard, I thought growing anything was impossible, but I was wrong. These indoor gardening ideas to grow fresh food year-round give you the chance to enjoy herbs, leafy greens, and even small fruits without going outside.
The smell of fresh basil in the morning, it’s something I didn’t know I needed. Because when you’re using indoor gardening ideas to grow fresh food year-round, the kitchen always feels alive.
Indoor gardening ideas to grow fresh food year-round are perfect for anyone who wants fresh ingredients, who want more control over what they eat. It make sense to start small—with jars, pots, or hydroponics.
There is many simple ways to get started, some which even beginners will find manageable. With the right light and a little patience, indoor gardening ideas to grow fresh food year-round becomes more than a hobby—it becomes part of your everyday meals. If someone have never tried it, now is the time.
Table of Contents
Windowsill Herb Garden

Growing herbs on your windowsill is a simple way to add freshness to your meals. I have tried this and found it to be both enjoyable and rewarding. When I look at my little herb garden, I see pots filled with vibrant green plants soaking up the sunlight.
In the image, you can see several terracotta pots lined up neatly. Each pot holds a different herb, which makes it a delightful sight. The sun shines through the window, casting beautiful shadows that make the scene even more inviting. The watering can nearby serves as a reminder that these little plants need care and attention.
To start your own windowsill herb garden, choose herbs that you love to cook with. Basil, parsley, and cilantro are some of my favorites. I usually fill each pot with good potting soil, plant the seeds or seedlings, and give them a good drink of water. It’s important to check the soil moisture regularly, since indoor plants can dry out quickly.
When I harvest my herbs, I feel a sense of accomplishment. Just snipping off a few leaves of basil or parsley can elevate a simple dish. We often use them in salads, pasta, or even to garnish soups. It’s a small effort that can lead to big flavor.
Sometimes, I forget to rotate the pots to ensure even sunlight, which leads to some plants growing taller on one side. However, I learn from my mistakes, and I find that adjusting their position helps them thrive.
Mason Jar Salad Greens

Growing salad greens in mason jars is not just easy, but it’s also a fun way to add greenery to your home. I remember the first time I tried this, I was amazed how quickly they sprouted. The image shows several mason jars filled with vibrant greens, each thriving in its own little space.
To get started, you only need a few basic supplies: mason jars, potting soil, and your choice of greens. I usually go with lettuce, spinach, and herbs like parsley. It is important to ensure that the jars have drainage holes, which is often done by simply poking small holes in the bottom.
First, you fill the jars with soil, leaving some space at the top. Then, you can plant the seeds or seedlings. I like to space them out so they have room to grow. After watering the soil gently, I place the jars near a sunny window. They need at least six hours of sunlight, otherwise they might not thrive.
It took me a few weeks to realize that my greens were growing taller than I expected. Regularly checking them and giving them water when the soil felt dry is essential. I have found that harvesting the leaves is the most satisfying part. Just snip what you need, and the rest keeps growing!
One downside is that sometimes, if I forget to water them, the leaves wilt. This teaches me to be mindful every day. Nonetheless, mason jar gardens have become a delightful part of my kitchen. They not only provide fresh greens but also serve as a charming decoration.
Hanging Planters With Strawberries

Hanging planters filled with strawberries can add a unique touch to any indoor space. I remember the first time I decided to try growing strawberries indoors. I was not sure how it would turn out, but I was excited. The vibrant red berries hanging from the planters are not just beautiful; they also provide fresh fruit right at home.
Growing strawberries in hanging planters is not only space-efficient but also quite aesthetic. The way those planters dangle by the window makes the room feel inviting. I place them where sunlight streams through in the morning, and they seem to thrive there. It is like watching nature unfold right before my eyes.
However, I did face some challenges along the way. Sometimes the strawberries would not ripen as quickly as I expected, which made me feel impatient. I learned that proper watering and choosing the right soil can make a difference. It is important to keep an eye on the plant health, ensuring they receive enough nutrients.
Besides growing strawberries, I also experimented with different plants in hanging planters. Each plant offers its own charm and benefits. The green leaves and red strawberries create a beautiful contrast, which I enjoy. Hanging planters can be a simple way to add life to a room, and they allow us to enjoy fresh food right at home.
Vertical Wall Garden

One of my favorite indoor gardening ideas is creating a vertical wall garden. I love how it transforms a plain wall into a lush green space, making it not only beautiful but also functional. This is especially useful when space is limited, and we want to grow fresh food right at home.
The image shows a wooden shelf system filled with various potted plants. You notice how the plants are neatly arranged, which helps in maximizing the space. Each plant seems to thrive, which makes me feel happy when I see it. I have tried different plants, and I find that herbs like basil and mint do especially well.
Setting up your wall garden is easier than it looks. I recommend starting with a sturdy framework to hold your pots. Consider using lightweight pots and a mix of herbs and leafy greens. Watering can be done easily, and I usually check if the soil feels dry. This is essential, because overwatering can harm the plants. The sunlight in the photo suggests that these plants probably receive plenty of natural light, which is key.
I’ve also enjoyed adding personal touches, like decorative pots and plant labels. The vertical garden becomes not just a food source, but a conversation piece in my home. It reminds me how rewarding it is to grow my own food. With a bit of effort, anyone can create their own vertical garden.
Lastly, do not forget that taking care of plants requires patience and observation. There were times when I thought some plants would not grow at all, yet with time, they surprised me. It becomes a journey of learning about each plant’s needs, which makes indoor gardening special.
Hydroponic Lettuce Station

I have always found growing my own food to be rewarding, and setting up a hydroponic lettuce station is one of my favorite indoor gardening projects. These little green wonders thrive in water without soil, which makes them a perfect choice for anyone looking to grow fresh food year-round.
In the image, you can see several jars filled with clear water, and each has a cluster of bright green lettuce sitting atop. The netting on the jars allows the roots to extend into the water, while the leaves reach for the light. It’s like watching a live performance of nature in my own space. I remember when I first started this, I was amazed at how quickly they grew. It was surprising that I could have fresh lettuce within weeks.
One thing I learned is that keeping the water clean is crucial. I change it every week, and sometimes I add a bit of nutrient solution because I want my plants to flourish. Also, using a grow light helped when natural sunlight was not enough, particularly during the winter months. The visual of vibrant green against a backdrop of winter gloom is a mood booster!
Hydroponic gardening can be quite simple, yet there are a few key points I wish I had known before diving in. First, you need to ensure the lettuce variety you choose is suitable for hydroponic systems. Some types do better than others. Secondly, light is essential; not just any light, but the right kind. I learned this lesson the hard way when my first batch of lettuce became leggy and weak, which is why I recommend doing some research.
Overall, I recommend trying it out. Even if you do not have a green thumb, this method seems forgiving. These fresh greens add a burst of flavor to salads and sandwiches, and they look so vibrant on the kitchen counter. The possibilities seem endless with what you can do with them!
Kitchen Counter Microgreens

Microgreens are tiny, flavorful plants that can easily grow on your kitchen counter. I always find myself amazed at how quickly they sprout and transform my cooking. The vibrant green leaves, as seen in the image, not only look fresh but also add a punch of flavor to any dish.
Growing microgreens on the counter is simpler than you might think. I have tried different varieties such as basil, radish, and arugula. It only takes a few days for them to grow, which is something I appreciate. You just need a shallow tray, potting soil, and seeds. The process begins by filling the tray with soil, then sprinkling seeds evenly before covering them lightly with more soil.
Watering is crucial, but I usually make sure not to overdo it. Keeping the soil moist helps the seeds germinate and grow into those lovely greens I love to use. Once they reach about 2 inches tall, they are ready for harvesting. I cut them just above the soil line, and they make a delightful addition to salads, sandwiches, or even as a garnish on soups.
I always recommend keeping your microgreens in a spot that gets indirect sunlight. This helps them grow strong without wilting or getting too leggy. My kitchen counter has become a little green oasis, and every time I see those little plants thriving, it brings a smile to my face. It is like having nature right in my home!
Without a doubt, microgreens can add a personal touch to meals, making them not only tastier but also more nutritious. Overall, I think growing microgreens can be a fun and rewarding experience for anyone who wants fresh ingredients year-round.
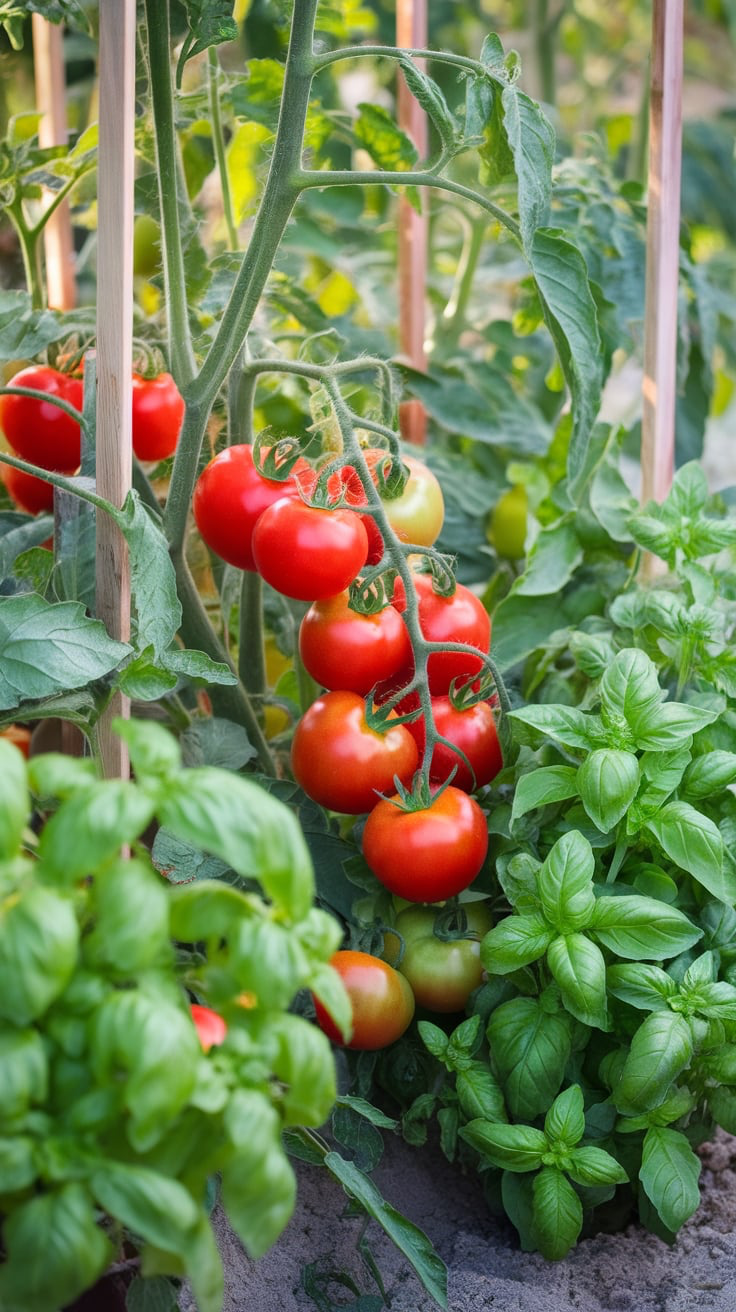
Indoor Tomato Plants

Growing tomatoes indoors can be such a rewarding experience. I have tried this myself, and seeing those plump, red tomatoes ripen right in my kitchen is something I truly enjoy. Indoor tomato plants can easily thrive with the right care. They add vibrancy to your space, while providing fresh produce.
When I first started, I learned that choosing the right variety is important. Cherry tomatoes are perfect for indoor gardening because they tend to grow smaller, yet still produce plenty of fruit. I often find myself picking a few fresh ones to toss into a salad or snack on as I work.
Light is another essential factor that I discovered. Tomatoes need at least six to eight hours of sunlight daily. I placed my plant by a south-facing window, but if natural light is limited, using grow lights can also be beneficial. This way, I have continuously had healthy plants growing.
I’ve made some mistakes along the way, such as overwatering my plants. It’s easy to do, especially when they seem thirsty. Now, I make sure to check the soil moisture before watering. Tomatoes prefer slightly dry soil between watering, which has lead to a healthier plant.
Fertilizing is necessary as well. I mix a balanced fertilizer every couple of weeks usually. This helps provide the nutrients needed for those juicy tomatoes to grow. Not to mention, harvesting ripe tomatoes feels like a small victory in my gardening journey.
In conclusion, having indoor tomato plants can be a fun way to grow your own food. With a bit of patience and care, you can enjoy fresh tomatoes year-round, I often find that little bit of green in my home lifts my spirits.
Ginger In Containers

Growing ginger in containers is a fun and rewarding experience. I remember the first time I decided to grow ginger indoors. I was captivated by the idea of having my own fresh ginger root right in my kitchen. The image shows a lovely ginger plant thriving in a pot, sunlight streaming in through the window, which is important for its growth.
To start, I filled my pot with well-draining soil, ensuring it had enough nutrients for the ginger. I planted the ginger rhizomes, making sure they were buried about an inch deep. Watering the soil gently, I waited for the magic to happen. My excitement was palpable as I watched the first green shoots emerge from the soil.
Ginger loves warmth and moisture, so I placed my container in a sunny spot, where it could soak up the sunlight. I was careful not to overwater, since soggy soil can lead to rot. I checked the soil moisture regularly. It was a balancing act, to keep it moist without drowning it.
After a few months, the ginger plants started to grow taller. I noticed that they added a vibrant touch to my home. Harvesting ginger is easy too. I simply dug around the base and removed a few rhizomes while leaving the rest to continue growing. The flavor was so much better than store-bought ginger.
What I loved most about growing ginger in containers was how easy it was to care for. There were no complicated steps involved, and it was a joy to see it flourish. Ginger in containers not only provides fresh ingredients for cooking, but also livens up your space. I highly recommend giving it a try!
Avocado From Seed

Growing an avocado from seed is a fun and rewarding indoor gardening project. Recently, I started my own avocado journey. I took a seed from a ripe avocado, washed it, and placed it in a jar of water. The seed sits suspended above the water with the help of toothpicks. Watching it sprout roots and a tiny stem was quite exciting.
After a few weeks, I noticed the roots growing longer, and a shoot started to emerge. It was thrilling to see something so small turning into a little plant. Ideally, I keep the jar in a sunny spot by the window, where it can absorb lots of light. I learned that consistent sunlight is crucial for healthy growth.
As the plant grows, I will eventually transfer it to soil. In my experience, avocado plants can thrive indoors if given the right care. They need well-draining soil, and consistent watering. I have made mistakes along the way, like forgetting to change the water. This led to some root rot, which was not fun. However, with patience and observation, I was able to correct those mistakes.
If you are interested in growing your own avocado, be prepared for a wait. It might take a while for the seed to sprout, sometimes up to six weeks. But the joy of nurturing a plant from such a simple start is worth it. I cannot wait to see how big my avocado tree will get!
Indoor Carrot Box

Growing carrots indoors is one of the easiest ways to enjoy fresh produce right from your home. I remember the first time I tried it; I was surprised at how well they thrived in a simple wooden box. The carrots, with their vibrant green tops, brought a bit of cheer to my kitchen.
In the image above, you can see a well-lit carrot box. The growing lights overhead provide the necessary brightness that carrots need, even when sunlight is limited. I learned that placing them close to a window also helps, but artificial light can make a big difference.
To get started, all you need is a shallow box filled with potting soil. Make sure the box has good drainage. I typically plant seeds about half an inch deep, spacing them out so they have room to grow. Water them lightly, keeping the soil moist but not soggy. In a few weeks, you may see tiny green shoots poking through the soil, which is an exciting moment.
One thing I found out while growing carrots is that they prefer cooler temperatures. If your indoor space is too warm, it may cause them to become tough and fibrous. So, I recommend keeping them in a cooler spot in your home. Fertilizing every few weeks can also give them a nice boost.
Harvesting is the most rewarding part. When the carrots are about an inch in diameter, you can pull them right from the soil. It always feels like a little treasure hunt. Plus, there is nothing quite like the taste of a freshly harvested carrot. They are crispy and sweet, a delightful treat that you can enjoy raw or add to your favorite dishes.
Indoor Pepper Plants

When I first decided to grow indoor pepper plants, I was a little unsure of what to expect. The image shows a vibrant pepper plant sitting by a sunny window, and it instantly reminds me of the joy these plants can bring. With a mix of red, yellow, and green peppers, this plant looks like a mini rainbow.
Each day, I eagerly check my little garden, hoping to see more peppers developing. They thrive in bright light, and I learned that placing them near a south-facing window works wonders. Sometimes, I even rotate the pot for even growth, which is important since every side needs its share of sunlight.
Watering is key, I found. I try to keep the soil slightly moist but not soggy. I remember the first time I overwatered, the leaves started to droop and I panicked. It was a lesson learned about balance and patience. Fertilizing every few weeks has also helped, giving the plants the nutrients they need. Like all of us, plants need a little boost sometimes.
Harvesting the peppers feels like winning a small prize. I love using them in salsa or adding them to stir-frys. Each time I pick a pepper, I can’t help but feel proud of its journey from seed to shelf. Growing my own indoor pepper plants also makes me appreciate the effort that goes into food production.
Lettuce In Recycled Containers

Growing lettuce in recycled containers is not only a fun project but also a wonderful way to be eco-friendly. I have been experimenting with this method for a while, and I find it so satisfying to see those green leaves thriving in reused bottles.
To start, I usually collect plastic bottles from my kitchen. I cut them in half, creating a top and bottom. The bottom half acts as the pot. Then, I fill it with soil and plant my lettuce seeds. I have also tried using small containers, like yogurt cups, which works well too.
Once planted, I place them on my windowsill. Lettuce loves sunlight, and I have noticed that they grow faster when they receive plenty of it. Watering is important, but I often forget to check the soil moisture and end up overwatering sometimes. Keeping an eye on them can be tricky.
As they grow, I take joy in watching the little seedlings turn into actual lettuce heads. I often think about how much fresher my salads will be once they are ready to harvest. When the time comes, I simply snip off what I need and leave the roots so that they continue to grow. I enjoy this process, and it brings a little piece of nature into my home.
In conclusion, using recycled containers for growing lettuce is a simple and rewarding experience. It is a great way to contribute to sustainability while enjoying fresh food right from your kitchen!
Indoor Green Bean Trellis

When I decided to start an indoor garden, I knew I wanted to grow green beans. They are not only delicious, but they also grow well in smaller spaces. I created a trellis for my plants, which is crucial because green beans are climbers. Without something to support them, they would just sprawl out everywhere.
I used a simple bamboo structure for the trellis. This method worked well, allowing the plants to climb up and soak in the sunlight streaming through my window. Each morning, I take a moment to admire their vibrant green leaves and how they stretch toward the light. It’s amazing how quickly they grow, sometimes they seem to grow inches overnight. Because of the trellis, the plants do not crowd each other, allowing for better air circulation, which is vital for healthy growth.
Watching my green beans climb has been a joy. I remember the first time I saw tiny flowers blooming, I was so excited! These flowers eventually turn into beans. The trellis not only supports the plants, it also adds a lovely vertical element to my indoor garden, making the space feel more alive. I often think about how rewarding it is to harvest your own food, plus green beans are great in salads or stir-fries.
As I sit near my indoor garden, I realize that tending to it has brought a bit of nature into my home. Being able to grow fresh food year-round is something I highly recommend. It’s a simple process, but the yield is rewarding.
Balcony Greenhouse Box

Having a balcony greenhouse box is a lovely way to grow plants in limited spaces. I remember the first time I set mine up; it felt like I was bringing a part of the garden into my apartment. The compact design fits perfectly on any balcony, allowing me to cultivate herbs and vegetables even in small areas.
In the image, you can see a clear greenhouse box filled with vibrant green plants. The plants, which include mint, lettuce, and aloe vera, thrive inside this little haven. I often find myself checking on them daily, watering them, and enjoying the process of nurturing. Each time I open the lid, I am greeted by a wave of fresh aromas, which makes me feel connected to nature.
What is nice about a balcony greenhouse is it helps regulate temperature and humidity, creating a mini-ecosystem. I had noticed that my plants grow much better, compared to when I left them outside unprotected. The transparent material allows sunlight to pour in, and I always make sure that the box is facing the right direction for maximum exposure.
I also learned that it is important to choose the right plants for your greenhouse box. I tend to stick with plants that are well-suited for smaller spaces. Some of my favorites are herbs like basil and chives, which I use in my cooking. They are easy to grow and need little maintenance.
So, if you have a balcony, a greenhouse box can easily transform it into an urban garden. I suggest you give it a try. It is a fun project and you will enjoy the rewards of fresh food right at your fingertips. Whether it be snipping herbs for dinner or teaching my kids about plant growth, the experience is one that I cherish.
Windowsill Celery Regrowth

Regrowing celery from kitchen scraps is a simple and satisfying way to enjoy fresh food right at home. I often find myself saving the bottom part of a celery stalk after using the rest in a dish. Just place the base in a glass of water, and watch as new growth appears. It is fascinating to see the little green shoots pushing up from the center.
In the picture, you can see a celery base sitting in water, with tender green sprouts emerging. This process does not take long, usually just a week or two, and soon you will have fresh celery ready for your next meal. I like to place my glass on the windowsill where it can soak up plenty of sunlight.
After the celery has grown a few inches, it can be transferred into a small pot with soil. It is one of the easiest indoor gardening projects I have ever tried. Not only does it provide fresh celery, but it also adds a bit of green decor to my kitchen.
If you want to give it a try, all you need are celery scraps, a glass of water, and a sunny spot. It is a fun project that also helps reduce food waste. Plus, the taste of homegrown celery is more flavorful than store-bought.
Sweet Potato Vine Jar

I recently decided to try growing a sweet potato vine in a jar, and it turned out to be a fun project. The image shows a sweet potato sitting in water, with vibrant green leaves and purple flowers sprouting from it. It’s not only a simple way to add greenery indoors, but also adds a splash of color to my windowsill.
The process is quite easy, which I enjoyed. All I did was cut a sweet potato in half, then placed it in a glass jar filled with water. The top half should be above the water, while the bottom half is submerged. Within a few weeks, you can see roots developing and shoots emerging. I was surprised how quickly it started to grow.
What I find interesting about sweet potato vines is that they are not only decorative but can also be edible. I have read about using the leaves in salads, which I think I will try soon. The leaves are tender and nutritious, so it feels good to know that I’m growing something healthy right at home.
Lighting is another important aspect to consider when growing sweet potato vines. They need plenty of sunlight, so I placed my jar in a bright spot. Although, I learned that too much direct sunlight can scorch the leaves, so it’s all about finding the right balance. I have to adjust the water regularly, ensuring it stays fresh, which is an easy task.
In conclusion, growing sweet potato vines in a jar is a delightful experience. It brings a bit of nature indoors, while also providing an opportunity to enjoy fresh food. I highly recommend giving it a try, you might find that watching it grow is just as satisfying as eating it. If I can do it, anyone can!
Diy Herb Ladder Shelf

Creating a DIY herb ladder shelf has been one of my favorite indoor gardening projects. The image shows a lovely wooden ladder styled shelf. It has several pots filled with different herbs such as basil, parsley, and cilantro, adding a splash of green to the space.
Using a ladder shelf not only saves space but also adds some charm to any room, I believe. Placing it near a sunny window allows your herbs to thrive. I like to rotate my pots around to see what grows best in certain spots. Herbs need sunlight and some water, which in my experience is easy to manage.
To make your own, all you need are some wooden planks, screws, and a ladder. I remember spending a weekend building mine. Once I had the structure ready, I painted it a soft color that matches my decor. After that, I filled it up with pots that I had collected over time. It was satisfying seeing my herbs grow.
With the plants arranged, the ladder became a beautiful focal point in my living room. Each time I look at it, brings a smile to my face. I often use the fresh herbs in cooking, which makes the whole experience even more gratifying. It feels like having a little garden inside my home.
Indoor Radish Planter

Growing radishes indoors has been a fun and rewarding experience for me. In the image, we can see a lovely planter filled with vibrant green leaves and the round, red bulbs of radishes peeking through the soil. Radishes are not only easy to grow but also quick to harvest, making them an excellent choice for indoor gardening.
When I first started my indoor garden, I was surprised at how little space I needed. A simple pot, some quality soil, and a sunny windowsill is all it takes. The planter in the image shows how well the radishes can thrive in a small space. I usually water them regularly, ensuring the soil stays moist but not soggy, which is important for healthy growth.
One thing I love about growing radishes is how quickly they come to maturity. Typically, they can be harvested in about four to six weeks after planting. I remember the excitement when I first pulled up a radish; it was a delight to see those colorful roots popping out of the soil. The fresh, crunchy taste of homegrown radishes is something that cannot be matched.
If you want to try growing radishes indoors, it is simple. I recommend planting them in well-draining soil and giving them plenty of light. If you have a sunny spot, such as a south-facing window, your radishes will thrive. I sometimes rotate my pots to ensure all sides get enough sunshine. You will be amazed at how quickly they grow, and they can produce a healthy crop even in limited space.
Onion Sprouting Station

Growing onions indoors has become one of my favorite activities. The image shows a lovely setup where onions are sprouting in jars. These jars are not just for decoration, they serve a purpose. Each jar holds an onion bulb sitting atop some soil, with green shoots sprouting upwards. It is fascinating to see how quickly they grow.
When I first tried this, I was surprised by how simple it was. All you need are some onion bulbs, jars, and soil. I use mason jars because they look nice and let me see the roots. You simply place the bulb in the jar, add water, and watch them grow over the next few weeks. It is a rewarding process that I look forward to daily.
Besides they are great for cooking, fresh green onions add a burst of flavor to any dish. I often chop them up for salads and soups. This method of growing them indoors means I can have fresh onions at my fingertips throughout the year. It not only saves money, but also provides a fun hobby.
Sometimes, I forget to change the water and it leads to some browning, which can be frustrating. To avoid this, I make sure to refresh the water every few days. If you want to try this at home, I recommend starting with just a couple of jars. You will amazed at how quickly they sprout.
Indoor Mushroom Growing Kit

Growing mushrooms indoors can be a delightful experience. I remember when I first set up an indoor mushroom growing kit in my kitchen. The small cardboard box, filled with a substrate of organic material, sat on my shelf waiting for those tiny spores to bloom into vibrant mushrooms. It’s not just about aesthetics, it is also about enjoying fresh produce right at home.
With the kit, all you need is a little water and some patience. I was surprised how quickly you can see results. Within a week, small pins started to form, and I was filled with excitement. Watching them grow was like a mini science experiment right in my home. Once they were fully grown, I harvested them and used them in a stir-fry. They tasted so fresh, much better than store-bought mushrooms. My family loved it, they said it tasted different.
One thing to consider is the environment. Mushrooms need a moist and dark area to thrive. I found that keeping the kit in a cool corner of my kitchen worked wonders. Sometimes, I forgot to check the humidity levels, which is important for good growth. You have to make sure not to overcrowd them as well.
So, if you are looking for a fun indoor gardening project, I highly recommend setting up a mushroom kit. It is enjoyable and rewarding, plus you get a tasty addition to your meals. Remember, the joy of gardening isn’t just in the plants you grow, it is in the moments you share with others while doing it.
Indoor Lemon Tree

There is something truly delightful about having an indoor lemon tree. I remember the first time I decided to bring one into my home. The little tree was small, with vibrant green leaves and plump, yellow lemons hanging from its branches. It not only adds a splash of color to my living space, but also fills the room with a fresh citrus scent.
Caring for an indoor lemon tree isn’t too complicated, but it require some attention. I found that placing it near a sunny window is essential for its growth. Watering it regularly, while being careful not to overwater, has worked well for me. I learned that the soil needs to be well-draining to prevent root rot, which is something I accidentally caused with my first tree.
When the lemons finally begin to ripen, I can hardly contain my excitement. The first time I used one in a recipe, it was a simple lemonade that reminded me of summer. Just mixing fresh lemon juice, water, and sugar, I was able to enjoy a refreshing drink right from my own plant. It felt satisfying to know that I had grown the lemons myself.
Additionally, having this tree indoors not only provides me with fresh fruit, but also gives me a sense of accomplishment. Each time I see the lemons growing, I am reminded of my gardening journey, and how much joy it brings me. Even when the tree isn’t bearing fruit, it serves as a lovely decor piece and a conversation starter with visitors.
Whether you are an experienced gardener or just starting out, an indoor lemon tree could be a fun project. I often think about trying to grow other fruits indoors, but there is a special charm with lemons that I cannot seem to shake off.