Disclosure: This post contains affiliate links, which means we may earn a commission if you purchase through our links at no extra cost to you.
I’ve always loved the small, hopeful rituals of starting seeds on a windowsill. Little projects that turn scraps into soft green beginnings have a way of brightening slow afternoons, and Garden Seed Starter Crafts became my favorite way to test ideas and learn by doing.
These garden seed starter crafts brought together odd bits from the kitchen, the recycling bin, and the yard.
Each idea felt pleasantly humble, with textures, scents, and tiny surprises that made those first sprouts feel especially earned.
Table of Contents
Eggshell planters: fragile little nursery cups

I keep a carton on the countertop now, not to toss but for the thin, chalky shells that cradle a seed. Holding a miniature eggshell in my palm feels oddly ceremonial; the porous scent of shell and a faint hint of morning breakfast linger.
When damp, the soil inside gives off an earthy aroma and the shell’s inner sheen gleams. Watching a tiny green tip push up beside the cracked rim has been quietly thrilling in those slow dawn moments, a reminder of small things growing from everyday remnants.
Steps
- Tap the top of the egg gently until a small opening forms, then pour out the contents into a bowl for cooking.
- Rinse the empty shells carefully and let them dry until the inner membrane feels clean and slightly matte.
- Fill each shell with a soft, loose seed-starting medium until it sits just below the rim.
- Place one or two seeds on the surface and cover with a thin dusting of medium until barely hidden.
- Set the shells in a shallow tray in a bright spot and keep the medium evenly moist until sprouts appear.
Newspaper pots: old pages turned new

There’s a quiet pleasure in folding newsprint into soft brown cups that smell faintly of ink and paper dust. The creases and tiny ink smudges feel honest under the fingertips, and the paper softens into a light, compost-friendly cup once damp.
When placed on the sill the pots take on the warm smell of sun and soil, a tactile contrast between crinkly edges and the cool, moist medium inside. Watching seedlings lean toward the light in those makeshift sleeves always brings a gentle, domestic satisfaction.
Steps
- Cut or tear a sheet of newspaper into a rectangle large enough for a small pot.
- Wrap the paper around a small jar or can to form a cylinder, folding the bottom to create a base.
- Tuck the top edge inward for a neat rim and press the folds so the pot holds shape.
- Fill the paper pots with a light seed-starting mix until each one is firm and level.
- Place seeds on the surface, cover lightly with mix, label the pots, and keep them moist.
Coffee grounds pods with subtle aroma

Leftover coffee grounds turned into tiny planting mounds gave my kitchen a soft, roasted scent that felt comforting rather than overwhelming. The dark, almost velvety texture of the grounds contrasted with the lighter soil and made the surface look like a miniature edible landscape.
Damp mornings brought a faint coffee perfume that mixed oddly well with moist earth. Seedlings seemed to pop against the dark background, and the whole process carried a slightly indulgent, cozy feeling—like planting something while still wrapped in the ritual of a morning cup.
Steps
- Gather cooled, used coffee grounds and allow them to drain in a fine sieve until slightly damp but not soggy.
- Mix the grounds with a soft, airy seed-starting medium until evenly combined and crumbly.
- Spoon the blend into small biodegradable cups until they reach near the rim.
- Tuck seeds gently into small hollows on the surface and cover them with a light dusting of the blend.
- Arrange the pods on a tray, maintain gentle moisture, and move to bright indirect light.
Citrus peel planters: fragrant tiny bowls

Hollowed citrus halves made for miniature planters that smelled like a sun-warmed orchard. Zesty top notes rose when the rind warmed under bright light, and the inner pith offered a soft, spongy bed that held moisture in an unexpected way.
The peel’s glossy exterior provided a cheerful pop of color on the windowsill—tangerine, lemon, lime—and the curved bowl shape felt perfectly cozy for a single seed. There’s a playful, almost whimsical quality to seeing a baby basil emerge from a citrus shell, with the scent layering into the experience.
Steps
- Halve a citrus fruit and scoop out the segments, leaving the peel intact as a hollowed shell.
- Lightly rinse the peel to remove excess fruit and let it dry until slightly tacky.
- Add a small amount of loose seed-starting medium into the peel until almost full.
- Nestle one or two seeds into the medium and cover with a thin dusting of the same mix.
- Place the peels on a drainage-friendly tray and keep the medium gently moist as sprouts appear.
Toilet-paper tube planters and little green columns

Empty cardboard tubes became surprisingly sturdy vessels with a rustic, papery scent and a satisfying weight when filled with dark medium. The hollow column shape created a miniature forest of cylinders that caught light differently across their ridged surfaces.
When watered the cardboard softened into a slightly compacted texture that retained warmth, and the thin walls allowed a hint of soil darkness to show through. I liked arranging them in repeating rows; the uniformity felt calming, while the tiny leaves emerging above each rim brought playful irregularity to the pattern.
Steps
- Collect clean cardboard tubes and flatten them slightly to create a stable base for each one.
- Fold one end inward several times to form a closed bottom that will hold the medium.
- Stand the tubes upright in a shallow tray and fill them with a light seed-starting mix.
- Place one or two seeds near the center of each tube and cover lightly with the mix.
- Keep the tray in bright light and maintain even moisture until roots and shoots develop.
Mason jar mini greenhouse on a sill

A clear jar flipped over a tiny pot created a humid microclimate that felt like a private glass world. Condensation beaded and slid down the curved glass, casting tiny refracted highlights across the soil.
The jar amplified the verdant color of seedlings, making each leaf look jewel-like, and mornings brought a cool, enclosed scent that blended soil and water. That close glass barrier made the seedlings seem tenderly sheltered, as if they were being observed through a benevolent lens.
Watching moisture cycle inside was oddly soothing, like a little weather system of my own.
Steps
- Place a small seeded pot or paper pot on a shallow saucer or tray.
- Position a clean, clear mason jar over the pot so the rim rests on the saucer and forms a dome.
- Monitor condensation and lift the jar briefly if air exchange is needed to prevent mold.
- Keep the jarred arrangement in bright, indirect light where temperatures remain steady.
- Remove the jar permanently once the seedlings have several true leaves and are acclimated.
Paper towel sprout strips for quick starts

Laying seeds on damp paper towel strips always felt like a small science experiment with a sweet domestic air. The cool, slightly papery smell mixed with the freshness of wet fiber, and the seeds sat visibly on top, easy to watch and anticipate.
The thin, translucent surface made the first roots and shoots suddenly obvious, a little show of life against white. Tapping the moisture and folding the strip into a compact bundle gave a cozy, sheltered feeling to the seeds, turning a kitchen counter into an observation station for tiny beginnings.
Steps
- Moisten a sheet of paper towel until it is evenly damp but not dripping.
- Lay seeds along the center of the damp strip with some spacing between each one.
- Fold or roll the towel gently to create a compact packet that keeps seeds snug.
- Place the packet inside a shallow, covered container to maintain humidity and warmth.
- Check daily and transfer germinated seedlings to pots when roots are visible and a few green tips appear.
Pinecone planters: woodland seed starters

Stumbling upon a pinecone full of moss and seed felt like finding a tiny forest capsule. The woody scent of resin and dry needles mixed with cool earthiness when the cones were moistened.
Each scale created a snug nook that held a pinch of medium and a single seed, making the whole thing feel wild and sculptural. Placed on a tray, the collection resembled a miniature landscape of rustic towers.
Watching a seedling push from the crevice among rough brown scales offered a charming contrast between raw woodland texture and delicate green growth.
Steps
- Select sturdy pinecones and clear away loose debris from between the scales.
- Soak the cones briefly to soften any dust and let excess water drip off.
- Tuck small amounts of light seed-starting mix into the nooks between scales where seeds will sit.
- Place a seed in each prepared nook and cover with a light dusting of mix.
- Arrange the pinecones on a tray and keep them in bright, humid conditions until sprouts appear.
Egg carton pockets for tidy little beds

An empty egg carton split into pockets felt like a ready-made nursery of little bowls, each with its own soft shadow and tiny damp warmth. The pulp material absorbed water and gave off a faint papery scent when wetted, the surface turning a darker, cocoon-like hue.
Lining up seedlings in the carton created a tidy grid that was easy to tend and visually satisfying. When a sprout pushed through, the contrast between the dull carton and the bright new leaf made each tiny green head feel like a small celebration of resourcefulness.
Steps
- Separate an egg carton into individual cups and arrange them on a shallow tray.
- Fill each cup with a light, airy seed-starting medium until nearly full.
- Place one or two seeds in the center of each cup and cover lightly with medium.
- Keep the tray in bright light and maintain even moisture by misting gently.
- Transplant the seedlings when roots begin to hold the cup together and foliage develops.
Coconut coir pots: earthy and fibrous starters

Coconut coir has a subtle tropical scent that feels clean and slightly sweet when damp, and the fibrous texture offers a soft cradle for seeds. Handling the mat-like material was oddly soothing; fingers slid through the strands as the coir held a gentle warmth.
The small mesh pots made from coir looked natural and tidy on a tray, and when watered they gave off that warm, humid smell of a greenhouse corner. Seedlings showed bright green against the tan fibers, as if popping from a neutral, organic stage.
Steps
- Soak compressed coir bricks in warm water until they fluff into a loose, crumbly medium.
- Pack the hydrated coir into small biodegradable cups or preformed coir pots until firm.
- Place seeds on the surface of each filled pot and cover with a thin layer of coir.
- Arrange the pots on a tray in bright, indirect light and keep the coir evenly moist.
- Move seedlings to larger containers or the garden once they develop sturdy roots and leaves.
Cotton ball herb starters in glass jars

Watching seeds germinate atop damp cotton balls in a clear jar felt delightfully simple and intimate. The cotton gave off a faint fresh scent when wetted and reflected light in a soft, cloud-like way.
Seeing roots thread into the fibers made the development visible and immediate, and tiny green tips felt almost to the point of being delicate jewelry against the bright white. The glass brought a quiet clarity, and the combination of soft fiber and glossy jar turned the process into a small, domestic portrait of growth.
Steps
- Place a layer of clean cotton balls at the bottom of a clear glass jar or small container.
- Moisten the cotton until it feels damp but not dripping with water.
- Spread seeds evenly across the cotton surface with gentle spacing between them.
- Cover the jar with a breathable lid or cling film with small vents to maintain humidity.
- Move seedlings to soil pots when roots are established and green tips reach a few centimeters tall.
Tin can planters with a rustic edge
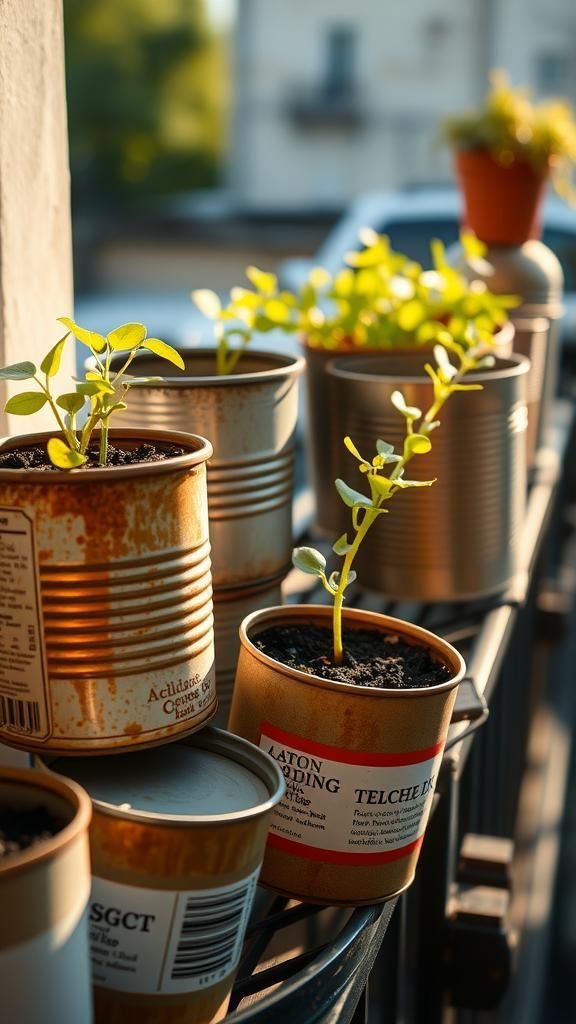
Old tin cans turned into planters brought a metallic tang to the air when first handled, followed by the warm scent of damp earth. The cool sheen of metal contrasted with soft green leaves and dark soil, creating a pleasing industrial-meets-garden look.
Dent marks and faded labels added character, and arranging a row of mismatched cans felt like curating a casual, lived-in display. Tiny seedlings peeked over the rim, and the weight of the cans kept them steady on a breezy balcony, blending utility and a hint of roadside charm.
Steps
- Clean and dry used tin cans, removing labels and any sharp edges for safety.
- Add a layer of small stones or broken pottery at the bottom for basic drainage.
- Fill the cans with a good seed-starting mix until near the rim.
- Gently press seeds into the surface and cover with a light dusting of mix.
- Set the cans in a bright spot and keep the medium evenly moist until seedlings grow.
Seed bombs: round, gritty garden nibs

Making seed bombs felt oddly like making little clay candies for the garden, with the mineral tang of clay mixing with the sweet earthiness of compost. Rolling the damp mix created pebble-like spheres that dried into matte shells with speckled textures.
Their compact size made them easy to toss into neglected corners, and the memory of tiny beads cracking open and sending up sprouts in a forgotten patch felt quietly satisfying. There was a tactile comfort in the gritty surfaces and the promise packed into those small, rounded packages.
Steps
- Combine powdered clay, compost, and a selection of hardy native seeds in a mixing bowl.
- Add small amounts of water gradually until the mixture holds together when squeezed.
- Roll the mixture into small balls about the size of a marble and set them on a tray to dry.
- Allow the seed bombs to dry thoroughly in a warm, ventilated spot before storing.
- Scatter the dried bombs in a chosen outdoor spot when conditions are favorable for germination.
Popsicle stick mini cloches and warm rows
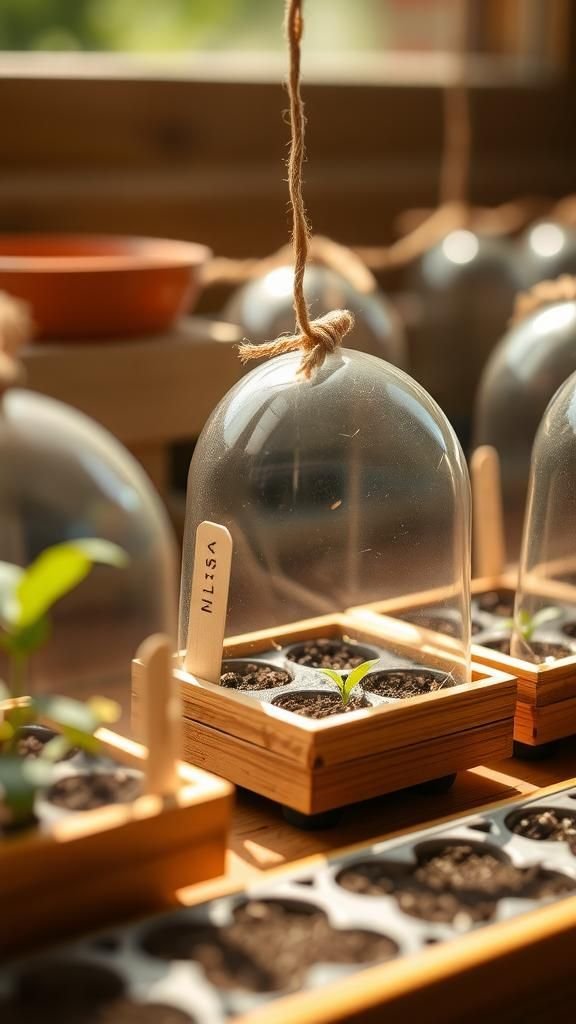
Small cloches built from popsicle sticks gave the seedlings a cozy, handcrafted shelter with a faint sweet wood smell and visible grain lines. The playfulness of painted or natural sticks forming tiny frames felt very domestic, like a craft project that served a purpose.
Light filtered through the gaps and threw soft linear shadows across the soil, creating an inviting pattern. Those miniature shelters seemed to speed up warmth retention and made the whole setup feel cared for, turning a simple seed tray into a charming scene of miniature architecture.
Steps
- Arrange a series of popsicle sticks into small rectangular frames and secure the corners with twine or thin wire.
- Place translucent plastic or thin glass over each frame to form a simple cloche dome.
- Set the cloches gently over seeded pots or trays to create a slightly warmer microclimate.
- Lift the cloches occasionally to check moisture and air the seedlings to avoid excess humidity.
- Remove the cloches when seedlings show strong growth and no longer require extra warmth.
Terracotta shards as tiny protective cloches
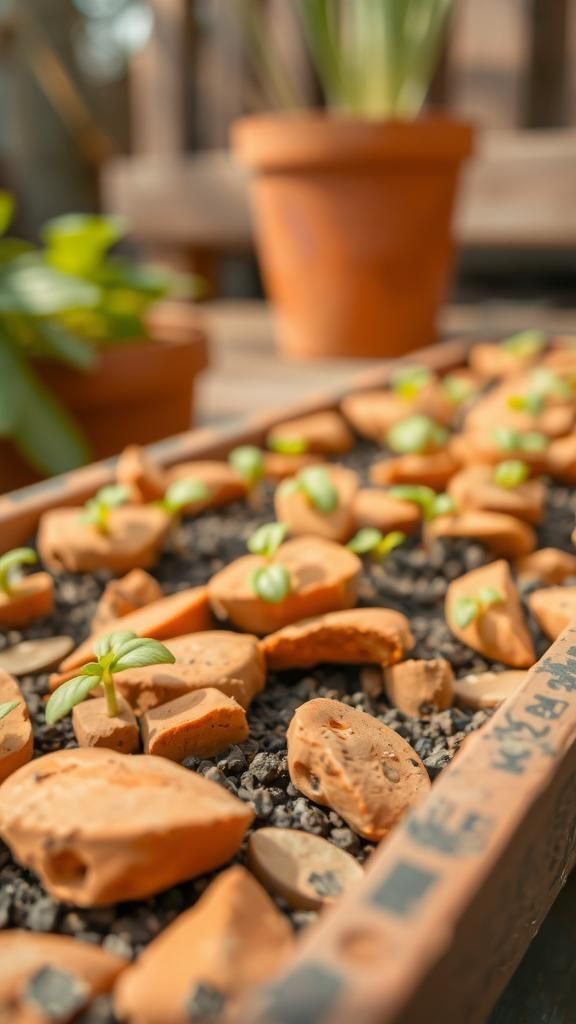
A broken terracotta pot left behind a curved shard with a warm, sunbaked scent of baked clay. The shard’s weathered edge created a rugged little shelter that softened the air around the seed.
The porous surface of terracotta offered a faint mineral dryness that balanced the moist soil beneath, while the curved form cast a gentle half-shadow over leaves. Placing several shards across a tray produced a field of little earthen nooks that felt timeworn and honest, an aesthetic that marries practicality with a touch of rustic nostalgia.
Steps
- Select smooth-edged terracotta shard pieces that will sit stably over small pots or seeded spots.
- Clean the shards and warm them briefly in sunlight to remove dust.
- Position each shard as a partial cover over individual seedlings to moderate light and retain warmth.
- Monitor moisture and lift the shards briefly for air exchange when necessary.
- Remove shards as seedlings grow larger and no longer need the protective miniature cloche.
Felt seed pouches for soft little nests
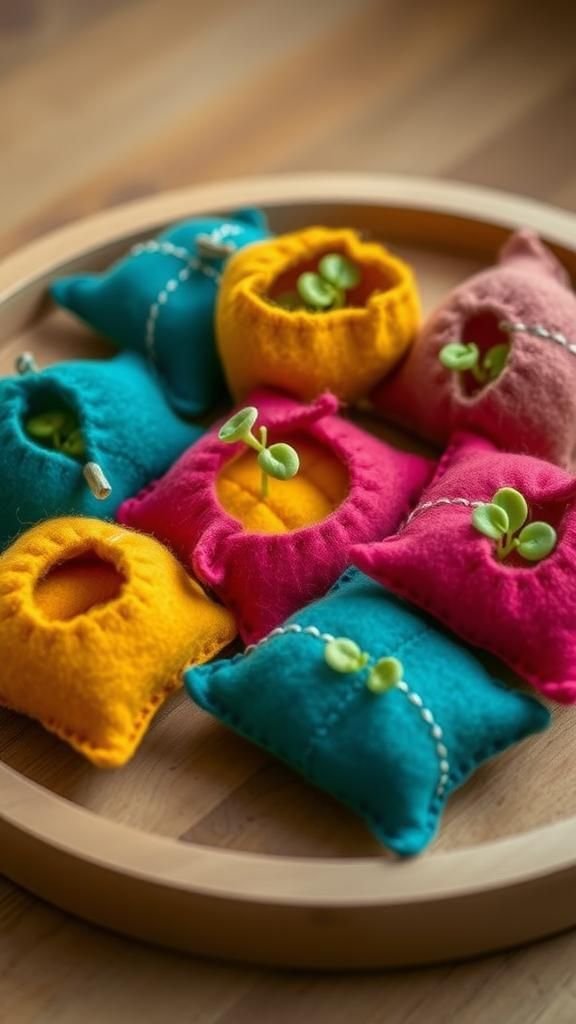
Soft felt pouches felt unexpectedly snug for seeds, offering a quiet, warm texture that contrasted with gritty soil. The woolly fibers held moisture gently and gave off a muted, cozy scent when wetted.
I enjoyed sewing tiny pouches with decorative stitching, each one becoming a small textile cradle that sat like a fabric flower on the sill. The tactile nature of felt made tending feel domestic and calm, and when green tips emerged they seemed cushioned by the soft walls, as if waking on a tiny, handmade pillow.
Steps
- Cut two matching pieces of felt into small rounded shapes to form the front and back of a pouch.
- Sew the edges together with a running stitch, leaving a small opening to add the medium.
- Fill the pouch gently with a light seed-starting mix until it feels slightly plump.
- Nestle seeds into the top of the medium and close the opening with a few more stitches.
- Keep the pouches in a bright spot and maintain gentle moisture until seedlings are established.
Nutshell starters: walnut and almond cradles

Hollowed nutshell halves felt tiny and precious, holding a dusting of mix and a single seed as if protecting a secret. The interior was smooth and slightly glossy, while the outer shell kept a woody, toasted scent that deepened when damp.
Each shell had unique markings and grooves that made the little nursery feel handcrafted by nature. Arranging them on a bed of moss turned the display into something like a fairy table, with the contrast of dark medium and pale shell creating a delicate, storybook scene for emerging leaves.
Steps
- Carefully open nuts and save the clean, intact half-shells for planting.
- Rinse and dry the shells, setting them on a tray for filling.
- Add a small pinch of fine seed-starting mix into each shell and level it gently.
- Place a single seed in the center and cover with a light dusting of mix.
- Position the shells on a moist bed of moss and keep them in bright, humid conditions.
Bamboo tubes: vertical little planters

Short bamboo segments felt sturdy and slightly sweet when wetted, their smooth interiors forming neat cylinders for small root systems. The hollow cores held moisture with a clean, almost grassy scent, and the natural nodes created charming lines and shadow play.
Arranging bamboo tubes in a small rack produced a vertical garden vignette that felt both architectural and organic. Seedlings suspended in those short columns looked like tiny flags of green, and the contrast between glossy inner walls and matte outside skin added visual interest to the set.
Steps
- Cut bamboo into short segments with one closed node to serve as a base for each tube.
- Sand any rough edges lightly so the openings are smooth and safe.
- Fill each tube with a well-draining seed-starting medium until near the top.
- Place seeds into the medium and cover with a thin layer of the same mix.
- Stand the tubes in a supportive rack or tray and maintain gentle moisture while seedlings begin to root.
Edible cone planters: cookie-style starters

Turning crisp edible cones into temporary pots added a playful, almost indulgent layer to starting seeds. The sweet baked scent of the cones mingled with moist earth in a curious way, and the crunchy texture softened into a slightly chewier cradle when damp.
Their conical shape drained naturally and made for a compact, portable nursery that tasted friendly to the eye as well. Watching a tender sprout arch over the rim of a cone felt delightfully ephemeral, like a short-lived pastry that had decided to host green life for a little while.
Steps
- Fit edible cones into a supportive holder or cup so they remain upright.
- Fill the cones gently with a light seed-starting mix, allowing for some drainage at the tip.
- Nestle one or two seeds near the top of each cone and cover lightly.
- Place the cones on a tray to catch any crumbs and keep them in bright, indirect light.
- Transplant seedlings to more permanent pots before the cones break down completely.
Tea bag gardens: tiny steeped nurseries

Empty tea bags repurposed as little planters carried the faint herbal aroma of their former contents, creating a gentle scent pool when moistened. The paper-like material cushioned seeds and held moisture in a soft embrace, while the tiny size made for neat, single-seed pockets.
Lining them up felt like arranging a drawer of delicate specimens, and the ritual of checking each one became a quiet moment of attention. Seeing a sprout split the bag’s surface felt tender and intimate, like watching a secret untie itself slowly and steadily.
Steps
- Open unused or emptied paper tea bags and remove any leftover tea leaves if necessary.
- Fill each bag with a small amount of fine seed-starting mix until each bag is slightly plump.
- Place a single seed on the surface and close the bag by pinching or stapling the top lightly.
- Lay the tea bags on a tray and mist them gently to keep them evenly moist.
- Transfer germinated seedlings into pots when roots are visible and foliage develops.
Broken CD saucers for quick drainage and shine

Old CDs repurposed as saucers under small pots offered a quirky, reflective base that threw little rainbows across the tray. The cool, metallic sheen contrasted with soft soil and green leaves, and the faint hummed memory of music felt like a hidden story beneath the seedlings.
Water collecting on the CD created tiny mirrored pools that glittered when light hit them, adding a playful, unexpected sparkle to the otherwise earthy setup. The combination felt thrifted and cheerful, a small reminder that even glossy leftovers can find a gentle second life.
Steps
- Collect old CDs and wipe them clean to remove dust and fingerprints.
- Place a CD under each small pot or paper cup to act as a reflective saucer.
- Arrange seeded pots on the CDs and water gently to allow excess to collect.
- Monitor moisture and wipe CDs occasionally to keep reflections bright.
- Move the setup outdoors or to a larger tray as seedlings grow and need more space.