Disclosure: This post contains affiliate links, which means we may earn a commission if you purchase through our links at no extra cost to you.
Embellished Switch Plate Cover Makeovers turn plain switch plate covers into small moments of joy. I’ve fallen for the way an embellished switch plate brightens a corner, and a switch plate makeover can echo a room’s story in a subtle, tactile way.
A decorated switch plate cover brings personality to a wall that used to be overlooked.
My first Embellished Switch Plate Cover Makeover happened after a rainy weekend, when a faded switch plate cover begged for attention. That tiny upgrade sparked a playful streak; now every switch plate makeover feels like a tiny gallery moment.
Embellished switch plate covers invite color, texture, and whimsy right where the hand reaches every day.
Table of Contents
Pressed Flower Resin Switch Plate With Botanicals
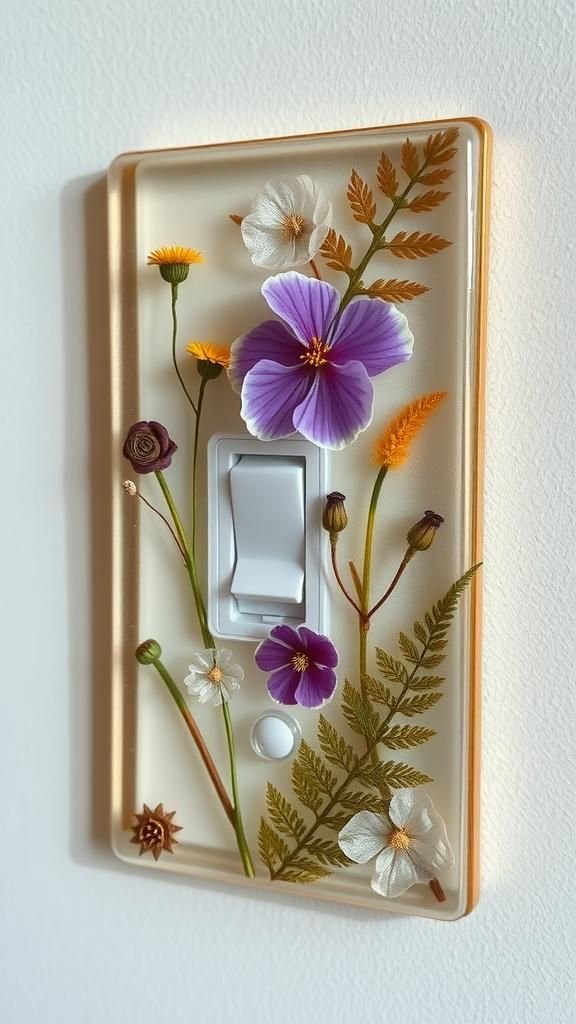
Dried petals and fern sprigs float beneath a glossy resin window, turning a switch plate into a miniature garden. The look favors airy neutrals and soft pastels, with cream, blush, and sage resting against a clear surface that catches morning light.
A metal or plastic base sits behind the floral layer, while thin gilded accents can rim the edges for a subtle glow. This piece fits cottage, coastal, or Scandinavian rooms and gifts well for nature lovers or new homeowners.
Display pairs nicely near a houseplant shelf, framed botanical prints, or linen curtains in muted tones.
Steps
- Arrange pressed flowers on the plate and secure with a thin layer of clear-drying medium.
- Build shallow barriers around the plate edges with tape to contain resin.
- Mix and pour resin, remove bubbles with gentle heat, and let cure fully.
- Sand any drips and polish the surface to a clear, glassy finish.
Faux Leather Switch Plate With Studded Edges
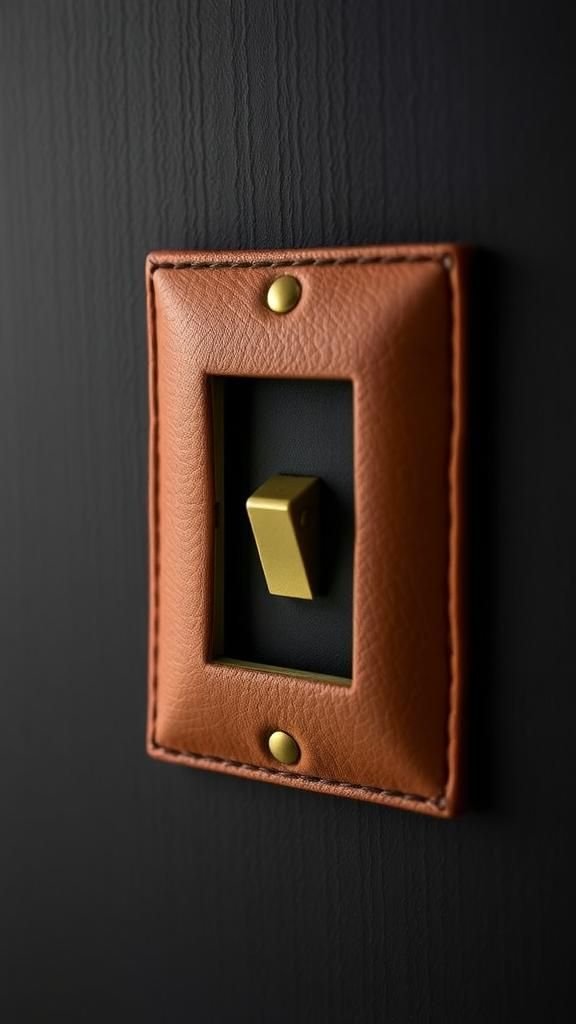
A supple faux leather wrap brings warmth and a touch of atelier mood to a switch plate, while tiny dome studs mark the perimeter with quiet shine. Chocolate, cognac, and charcoal finishes complement brass, nickel, or matte black hardware in the room.
A smooth grain reads refined, while pebbled texture leans casual. The style suits library nooks, dens, or masculine bedrooms and makes a smart gift for design-forward friends.
Display next to a leather chair, dark wood bookcase, or a framed black-and-white photograph for a cohesive, tactile vignette that ages gracefully with the space.
Steps
- Cut faux leather slightly larger than the plate and adhere evenly.
- Wrap edges to the back, smoothing corners for a neat profile.
- Mark and pierce openings for the switch and screws.
- Add small studs around the perimeter and secure the plate to the wall.
Vintage Map Decoupage Switch Plate Explorer Theme

Antique cartography turns a switch plate into a travel daydream, with aged cream, faded teal oceans, and sepia coastlines. A matte or satin sealer leaves a gentle sheen, while hand-burnished edges suggest an heirloom patina.
Nautical rooms, studies, and kids’ wanderlust corners benefit from the story-rich surface. Gifting pairs well with a compass bookmark or a framed itinerary.
Display next to rope accents, brass lamps, or framed postcards to weave the theme. A single city detail or a broad world map both set a destination tone while maintaining a calm, paper-soft texture.
Steps
- Trim map paper to fit the plate with slight overlap.
- Brush on decoupage medium, lay paper smoothly, and burnish bubbles.
- Seal with additional coats, drying between layers.
- Reopen switch and screw holes carefully and install.
Linen Wrapped Switch Plate With Ribbon Trim
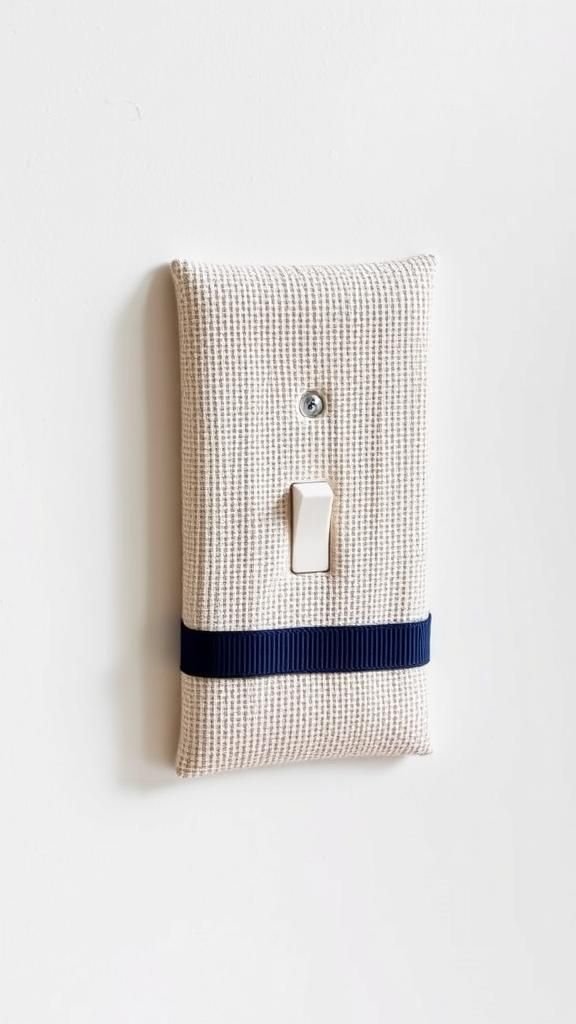
Tactile linen lends a breezy, natural look, with fibers that catch light and soften the hard outline of a switch plate. Neutrals like oatmeal, dove, and flax pair beautifully with satin or grosgrain ribbon edging in blush, navy, or forest.
The palette feels airy in bedrooms or entryways, and the texture pairs well with woven baskets, ceramic lamps, and washed oak furniture. As a housewarming gift, it brings gentle charm without overpowering the room.
Display near framed line drawings or botanical sketches, where the fabric’s weave reads as a calm, textural accent.
Steps
- Wrap the plate in linen fabric and adhere neatly on the back.
- Cut clean openings for the switch and screws.
- Apply ribbon trimming around edges for a tailored look.
- Seal lightly with fabric protector if desired and mount.
Iridescent Glass Mosaic Switch Plate Sparkle
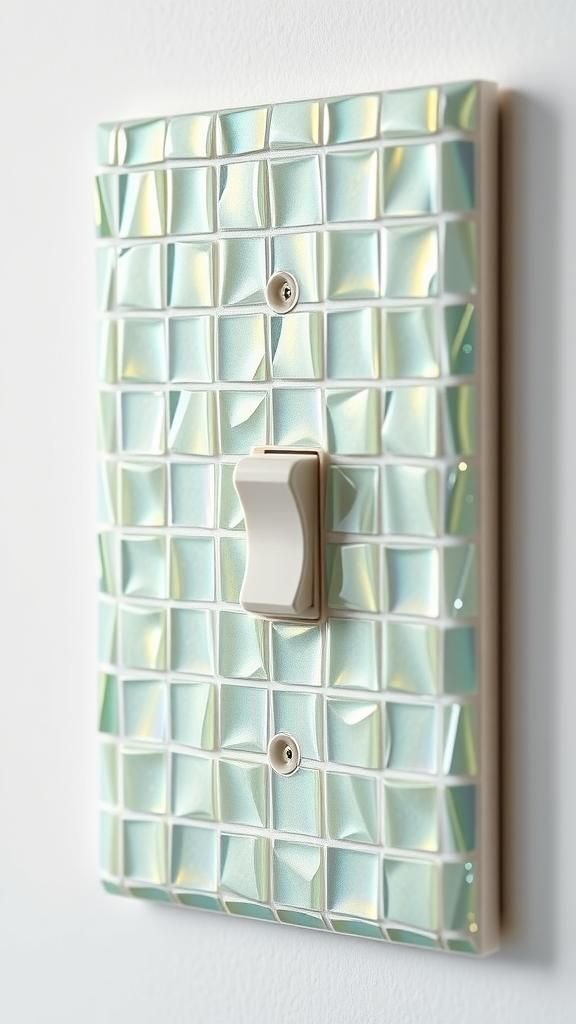
Tiny iridescent tiles refract rainbows across a switch plate, delivering a jewelry-box shimmer. Sea-glass greens, pearl, and glacier blue suggest coastal calm, while graphite and gunmetal tiles swing modern.
Grout color shifts the tone, from bright white to smoky gray for drama. This look creates a statement near vanities, kitchens, or anywhere a glint of light feels welcome.
As a gift, it suits lovers of sparkle and glass art. Display benefits from nearby reflective surfaces, like a mirror or chrome hardware, which bounce light and amplify the mosaic’s prismatic sheen.
Steps
- Plan a tile layout and adhere mosaic pieces to the plate.
- Let adhesive set fully before applying grout.
- Work grout into gaps, wipe excess, and buff tiles once cured.
- Open the switch and screw holes and reinstall.
Soft Ombré Watercolor Pastel Switch Plate
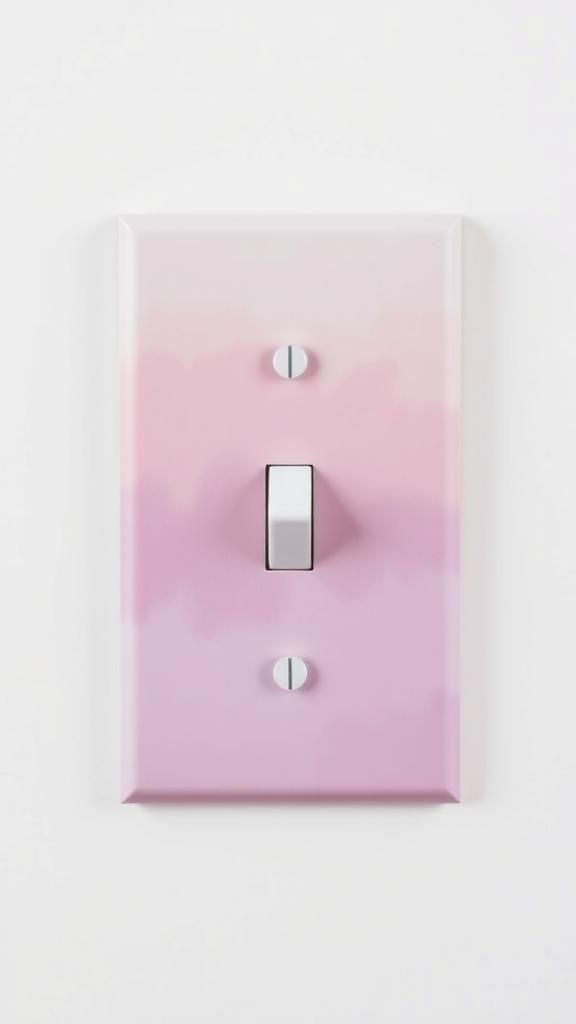
A gentle gradient drifts from pale dawn pink to hushed lavender or seafoam, evoking watercolor paper kissed by light. The plate can carry a cloudlike transition with satin or matte finish, while a faint gold line along the perimeter adds glow.
Pairing with white trim and cotton curtains keeps the mood airy; deeper accents like plum or teal provide contrast. As a present, it suits nursery decor or a calm reading nook.
Display near minimal art or a soft rug to let the soft fade breathe and soothe the eye.
Steps
- Prime the plate and blend pastel shades from light to dark.
- Feather transitions with a soft brush or sponge.
- Let dry and apply a protective clear coat.
- Reopen holes neatly and mount in place.
Geometric Wood Veneer Marquetry Switch Plate
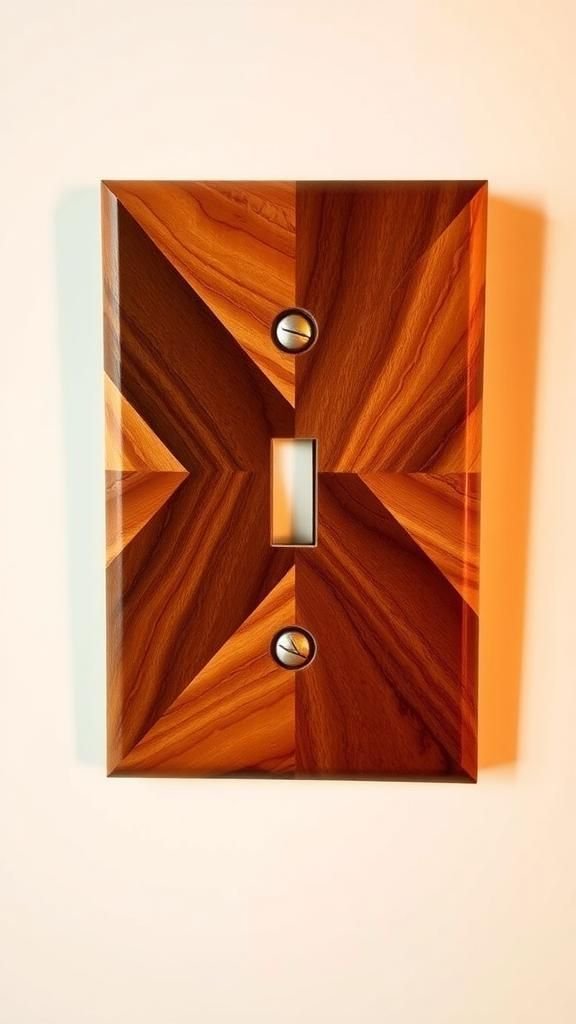
Thin slices of walnut, maple, and cherry create a crisp geometric field over a slim plate, bringing warmth through alternating grains and tones. Satin oil or wax enhances contrast while keeping a natural hand.
Patterns range from herringbone to triangular tessellations, fitting mid-century, Scandinavian, or rustic interiors. As a gift, it suits woodworkers and design purists.
Display reads best near wooden frames, slatted panels, or a record console, where the veneer’s lines echo other timber elements and the switch plate feels like a small piece of cabinetry on the wall.
Steps
- Cut veneer shapes based on a geometric plan.
- Adhere pieces carefully, aligning grains and edges.
- Trim excess, sand lightly, and finish with oil or wax.
- Open hardware holes and install the plate.
Gilded Metallic Leaf Luxe Switch Plate Cover

Whisper-thin metallic leaf envelopes the plate with a glamour gleam, whether in classic gold, warm copper, or antique silver. The surface can remain bright or receive a gentle patina for vintage character.
Subtle crackling and overlapping sheets create an artisanal look that suits dining rooms, vanity corners, and art-filled halls. As a gift, it pairs well with a small candle or a brass trinket dish.
Display near velvet drapery or framed oil portraits, where metallic highlights catch evening light and the switch plate becomes a quiet jewel on the wall.
Steps
- Apply adhesive sizing evenly over the clean plate.
- Lay metallic leaf sheets and burnish gently.
- Seal with a clear topcoat to protect the finish.
- Pierce openings and reinstall the plate.
Chalkboard Switch Plate With Tiny Chalk Ledge
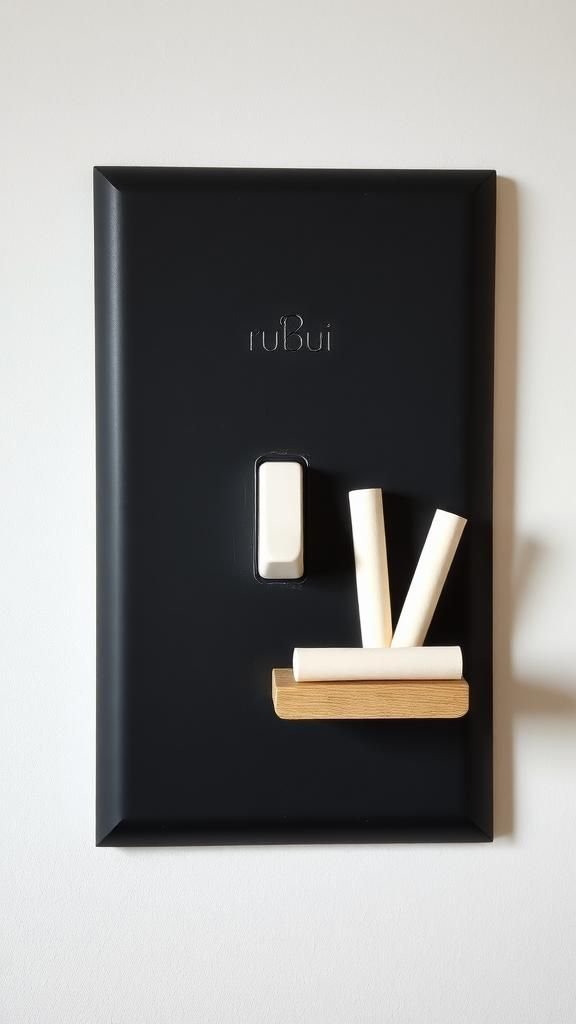
A matte charcoal chalkboard finish transforms the switch area into a playful zone for doodles or reminders, while a petite ledge keeps a stub of chalk handy. The texture feels soft to the touch, and white or colored chalk lines pop crisply.
This style fits kitchens, studios, or entryways with jot-down notes. As a gift, it delights teachers, artists, or busy families.
Display with a small magnetic clip board or calendar nearby so messages gather gracefully around the switch, keeping the mood light and functional without losing style.
Steps
- Coat the plate with chalkboard paint and let cure.
- Add a slim wooden or metal strip as a chalk ledge.
- Season the surface with chalk and wipe clean.
- Open holes and mount securely.
Micro Cement Concrete Texture Industrial Switch Plate
A micro cement skim coats the plate with a refined concrete feel, channeling loft vibes without weight. Shades run from soft greige to cool slate, with subtle trowel marks for authentic texture.
A satin sealer enhances depth and adds wipe-clean ease. This fits industrial or minimalist rooms and pairs smartly with black hardware and Edison bulbs.
As a gift, it suits fans of architectural finishes. Display next to raw wood shelves or framed monochrome prints, where the concrete surface acts as a grounded, modern punctuation mark against a clean wall.
Steps
- Apply a thin micro cement layer over the plate surface.
- Smooth and let set, adding a second pass for texture.
- Sand lightly if needed and seal with a clear coat.
- Reopen holes and reinstall.
Coastal Seashell And Sand Inlay Switch Plate

A shoreline memory gathers on the wall with tiny shells, crushed coral, and a sprinkle of fine sand set into a glossy clear top. Cream, soft peach, and driftwood tones pair with pale blues nearby.
The tactile surface feels like a tidepool paused in time and suits bathrooms, beach houses, or restful bedrooms. As a gift, it brings summer nostalgia year-round.
Display near woven rope accents or a jar of collected shells, where the switch plate becomes a little keepsake, catching light and telling a gentle ocean story.
Steps
- Arrange small shells and a thin layer of sand on the plate.
- Secure elements with clear adhesive and let set.
- Pour a clear epoxy or resin layer to encapsulate.
- Open hardware holes after curing and mount.
Washi Tape Stripes Pop Art Switch Plate
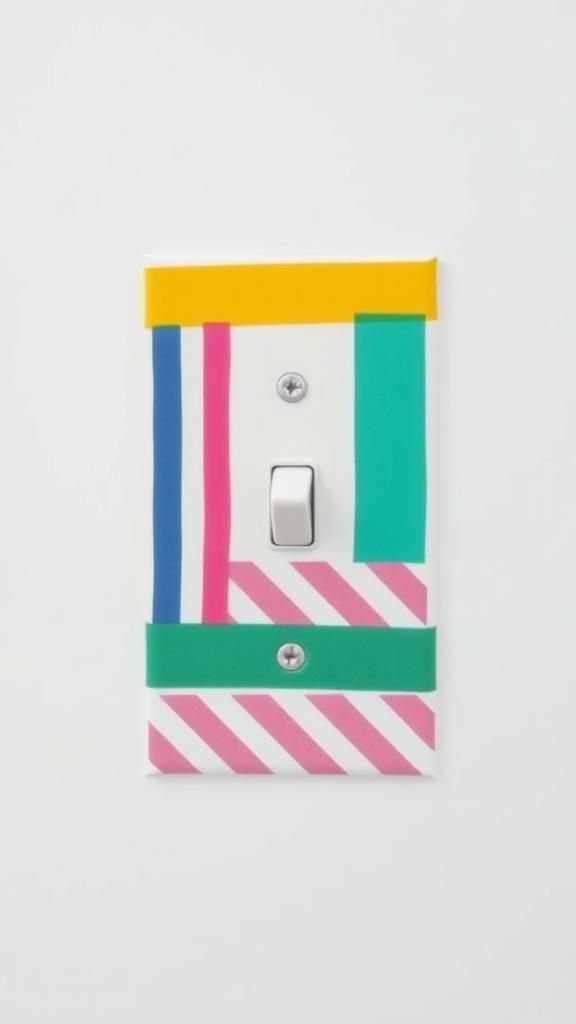
Bold washi stripes race across the plate in candy colors and graphic patterns, from polka dots to chevrons. The layered tapes create a collage of matte textures that can be sealed for durability.
Color stories range from neon rainbow to monochrome black and white. This playful accent energizes offices, kids’ rooms, or craft zones and makes an easy, upbeat gift.
Display alongside colorful frames or a pegboard of art tools, letting the pattern echo across the wall and turn an ordinary switch into a cheerful burst of pattern.
Steps
- Lay washi tape strips across the plate in chosen directions.
- Trim clean edges and reopen holes with a craft knife.
- Seal with a clear topcoat if a durable finish is desired.
- Install the plate and align patterns if needed.
Hand-Embroidered Canvas Panel Switch Plate Cover
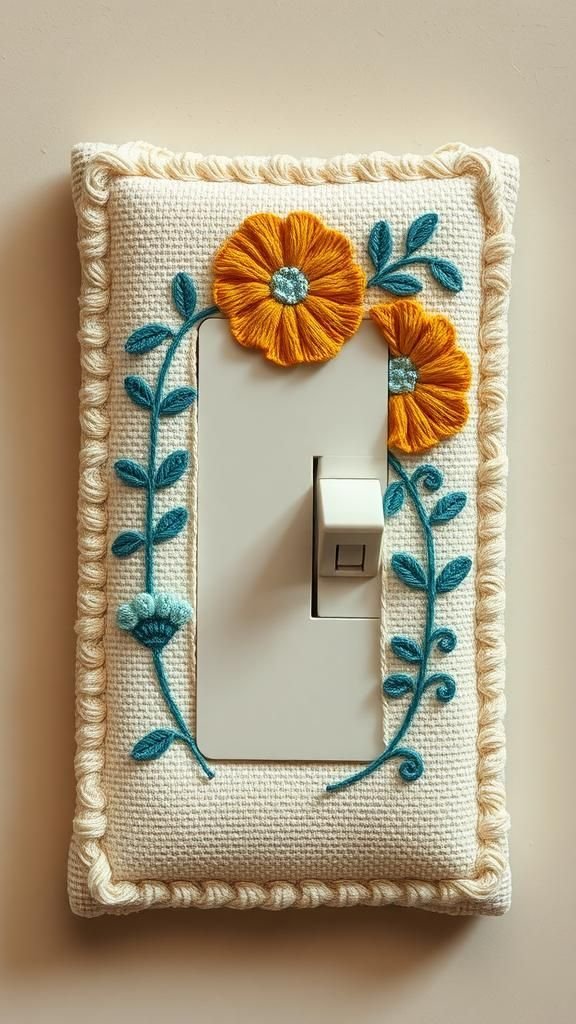
A small stretched canvas panel fitted over the plate becomes a textile gallery, with embroidered motifs like wildflowers, constellations, or geometric lines. Natural canvas carries off ivory or ecru well, while threads in mustard, teal, and rust give dimension.
A subtle frame effect around the edges lends polish. This piece feels at home in boho, cottage, or artful spaces and makes a heartfelt gift.
Display near fiber art or a macrame hanger so threads converse across the wall, turning the switch area into a tactile, handmade moment.
Steps
- Stitch a simple design onto a canvas panel sized for the plate.
- Mount the canvas over a modified plate or frame-style base.
- Cut tidy openings for the switch and screws from the back.
- Secure assembly and install on the wall.
Corkboard Switch Plate Mini Mood Board

Cork brings organic texture and a warm brown hue, turning the switch area into a tiny mood board. Thumbtacks can hold a photo strip, ticket stub, or a clipped quote without adding clutter.
A beveled frame in black or brass dresses the edges for a clean finish. This idea fits studios, entryways, or kitchen message centers and makes a fun gift for friends who love pin-worthy moments.
Display near a larger corkboard or framed calendar, letting the switch plate act as a pocket-sized gathering place for memory sparks.
Steps
- Cut thin cork to size and adhere to the plate.
- Frame edges with slim molding or adhesive trim.
- Reopen switch and screw holes carefully.
- Install and pin a tiny note or photo.
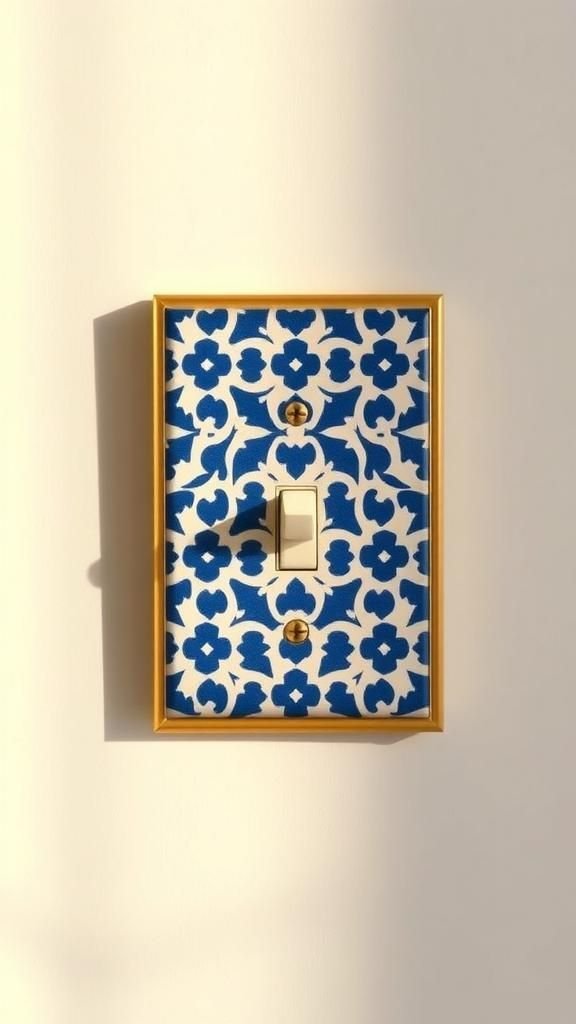
Faux Ceramic Tile Pattern Decal Switch Plate
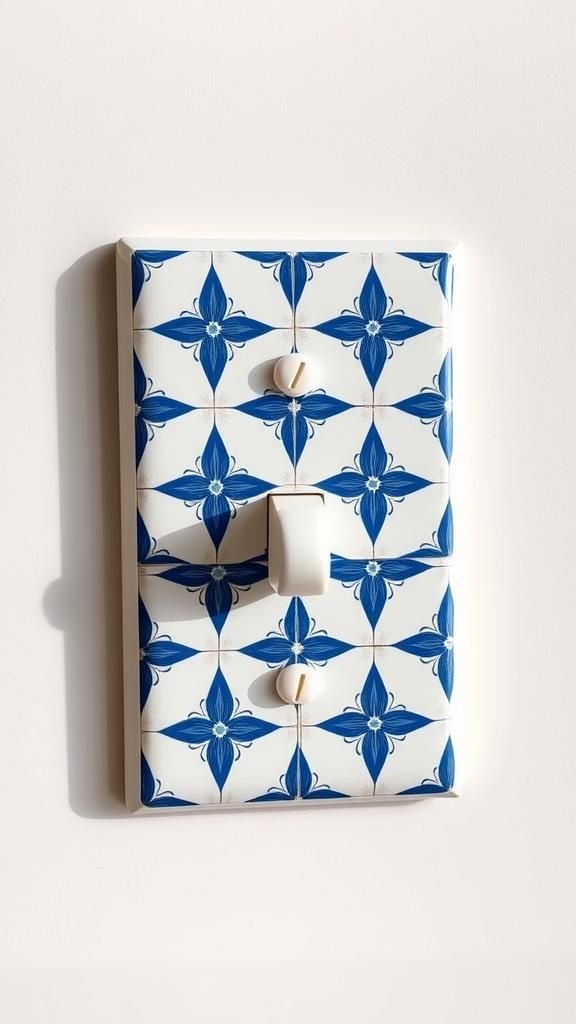
Printed decals in Delft blues, talavera brights, or Art Nouveau swirls deliver a tile look without bulk. A satin or gloss topcoat adds believable sheen, while crisp edges keep the pattern tidy.
This style suits kitchens and baths, echoing real tile backsplashes nearby. As a gift, it works for renters seeking quick personality.
Display next to patterned tea towels or a blue-and-white vase, allowing motifs to converse across the room. The result reads polished and cheerful, with classic ornament compressed into a small, charming square.
Steps
- Clean the plate and apply the patterned decal smoothly.
- Press out air pockets and trim excess along edges.
- Seal with a clear topcoat appropriate for decals.
- Reopen holes and install.
Moroccan Stencil Pattern Bold Color Switch Plate
Repeating ogee or star motifs sweep across the plate in saturated hues like cobalt, saffron, or emerald. A matte base contrasts with crisp stenciled lines, and a thin metallic border elevates the finish.
The design pairs with patterned rugs, carved wood, and hammered metal accents. As a gift for color lovers, it sparks joy in entryways or around gallery walls.
Display near a potted cactus or lantern, where warm light grazes the texture and the pattern feels gathered from a faraway marketplace.
Steps
- Prime the plate and roll on a solid base color.
- Align the stencil and dab paint through evenly.
- Lift carefully, touch up edges, and let dry.
- Seal with a protective coat and reinstall.
Glow-In-The-Dark Constellation Night Sky Switch Plate
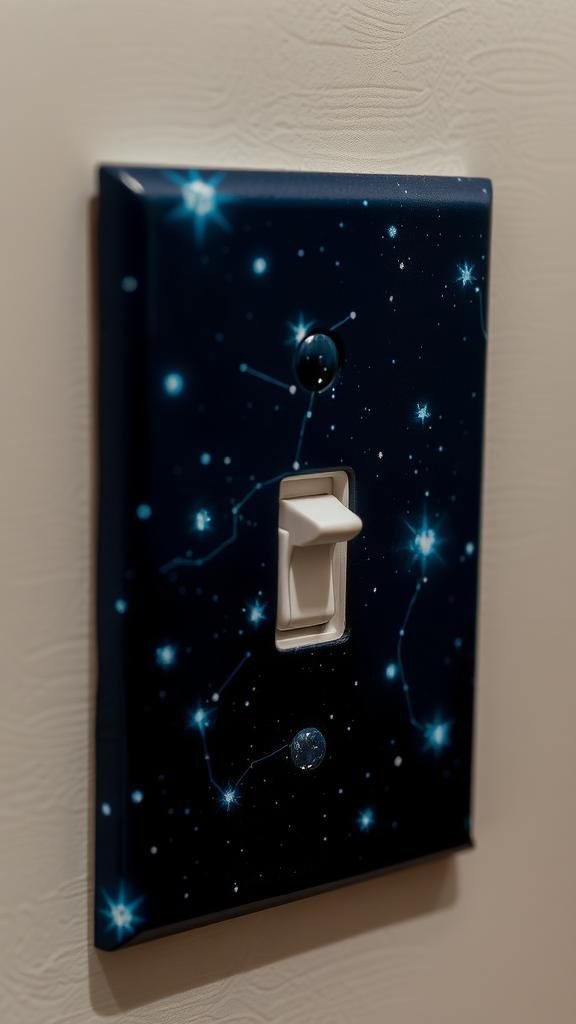
A midnight base dotted with glow pigment forms a starfield that softly lights the dark. Constellation lines in fine silver pen add a celestial guide without overpowering.
The glow reads gentle, handy for hallways or kids’ rooms. As a gift, it captivates stargazers and bedtime readers.
Display near a moon poster or a brass telescope figurine for whimsy. During the day, the plate looks like modern art in navy and ink; at night, points of light bloom, turning a tiny wall area into a private planetarium.
Steps
- Paint the plate a deep navy base and let dry.
- Add stars with glow-in-the-dark paint and connect constellations.
- Charge under bright light and apply a clear coat.
- Open holes and mount in place.
Boho Beaded Fringe And Tassel Switch Plate
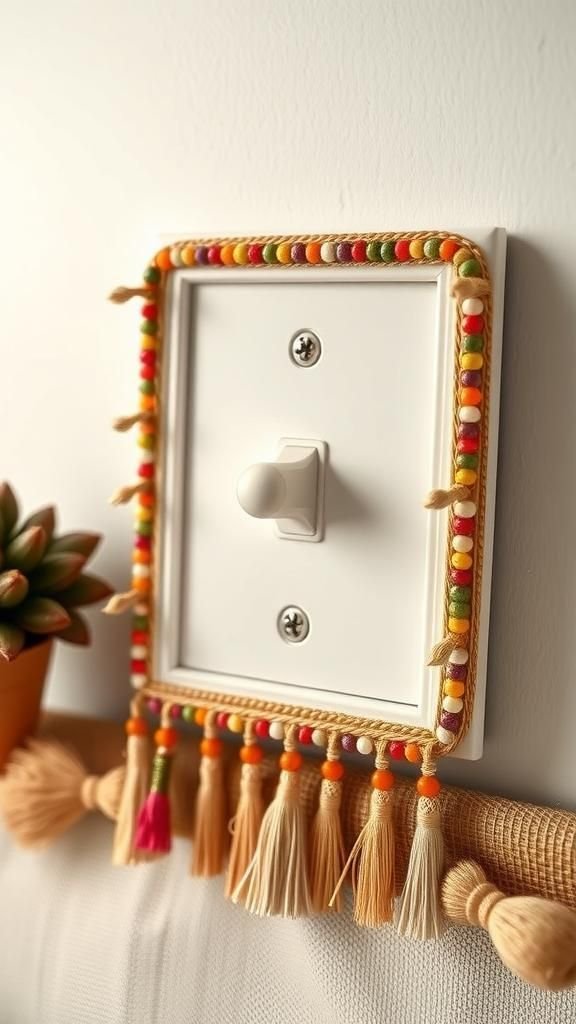
A border of seed beads and a tiny tassel fringe turn a humble plate into boho jewelry for the wall. Earthy palettes with terracotta, mustard, and indigo feel grounded, while metallic beads add sparkle.
Cotton threads, wooden beads, and linen backing deliver warmth and texture. This suits eclectic living rooms, music corners, or a creative studio.
As a gift, it charms anyone who loves textiles and color. Display beside woven wall hangings or a rattan mirror to echo the layered, collected spirit across the space.
Steps
- Apply a fabric backing to the plate for texture.
- String beads and prepare short tassel strands.
- Secure bead strands and tassels along the perimeter.
- Reopen holes and install carefully.
Faux Stone Granite Contact Film Switch Plate

Stone-look adhesive film gives the plate a granite or marble vibe without heft. Veining in soft gray, warm taupe, or bold black-and-white pairs well with chrome or matte black switches.
A glossy finish mirrors real stone, while satin reads calmer. Ideal for modern kitchens or sleek bathrooms, it also glides into rental settings.
As a gift, it offers an easy style upgrade with minimal bulk. Display near actual stone counters or a marble tray, creating a subtle echo that visually stitches surfaces together.
Steps
- Cut adhesive film oversize and apply to the plate surface.
- Smooth bubbles and wrap edges neatly to the back.
- Trim openings for the switch and screws.
- Burnish edges and reinstall.
Acrylic Pour Marble Swirl Glossy Switch Plate
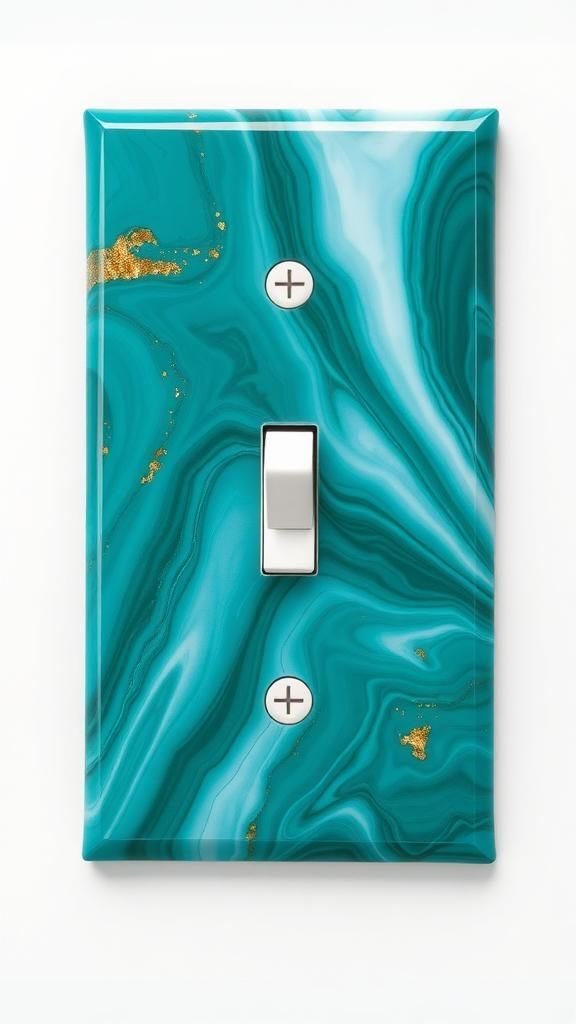
Fluid color swirls dance across the plate in an acrylic pour finish, creating unique marbling every time. Color stories can lean coastal with teal and white, or moody with charcoal, plum, and metallic accents.
A high-gloss clear coat intensifies depth and movement. This style shines in creative spaces or as a single statement in a neutral room.
As a gift, it suits art lovers who enjoy one-of-a-kind pieces. Display near abstract prints or a high-gloss planter, letting reflections play across the glossy surface.
Steps
- Elevate the plate and mix pour-ready acrylics.
- Pour colors over the plate and tilt for organic patterns.
- Let cure thoroughly and apply a high-gloss clear coat.
- Reopen holes and mount once hardened.
Terrazzo Polymer Clay Speckled Minimal Switch Plate

Tiny flecks of colored polymer clay set into a neutral base mimic terrazzo, delivering a playful yet refined speckle. Chips in coral, jade, charcoal, and cream scatter across a warm gray background with a satin sheen.
The plate works with minimalist, mid-century, or playful modern spaces. As a gift, it charms fans of terrazzo floors and small-batch design.
Display near matte ceramic planters or a terrazzo coaster to echo the motif, allowing the speckles to read as confetti for the wall in a quietly celebratory way.
Steps
- Condition clay colors and slice thin terrazzo chips.
- Blend chips into a neutral clay sheet and smooth to thickness.
- Wrap a heat-safe plate form, bake per clay directions, and cool.
- Trim openings, finish edges, and install.